This Wild Season

Sharing what I'm learning in the kitchen as well as outside of it.

Navigation
  • Home
  • Blog
  • Recipes
    • Appetizer
    • Breakfast/Brunch
    • Side Dish
    • Main Course
    • Dessert
    • Drinks
    • Personal
  • About

Overnight Cinnamon Rolls with Maple Cream Cheese Icing

February 12, 2015 by Asharae Leave a Comment

These past few weeks, between some of the stories we’ve heard from our friends, the book we’re reading with our small group, and reflecting on our own circumstances, I’ve been hit over and over with the truth that God uses the “in-between times” to shape us for what he has ahead of us.

We’ve been filming the story of our dear friends Courtney and Ryan who adopted their daughter Nara from Ethiopia nearly two years ago. From the time they started the adoption process, they waited three years to be able to bring her home. They agonized in the waiting when all they wanted to do was have their daughter in their arms. And yet, as we’ve been unpacking more of their story the last couple weeks, they shared how God was active and working that whole time. He was preparing them for the next task – moving to Ethiopia to work in full-time ministry. It’s something they didn’t see coming, but looking back they’re able to see all the pieces of the puzzle falling into place. I can’t wait to share more of their story with you – till then you can read more on their blog.

Just last night as I was reading the book that we’re going through with our small group, I came across this quote. “God uses your present experiences to mold you for future usefulness here on earth and in eternity.” Stop. Read it again. Okay, and maybe one more time for good measure. He is using our present experiences. And He is preparing us not just for tomorrow but for the future, for eternity. Whoa. I honestly can’t even wrap my mind around that.

Do your present experiences seem ordinary and dull like mine usually feel? Maybe it’s not that they’re actually ordinary, but that we simply don’t have our eyes open to the ways God is working around us and through those “normal” events. Maybe it’s not that He’s not working around us, but rather we’re just not seeing Him. He is there, but we’re getting too bogged down by the seemingly ordinary-ness of our circumstances – we’re too self-focused to see beyond to what could be.

I want to learn to be sensitive to how God is at work around me. Most days I don’t even know where to begin. If I look back though, it’s so incredibly clear to see how He has used other people and the pieces of my story to bring me to where I am now. Why then is it so hard to believe that He’s using the here and now for what is to come?

Overnight Cinnamon Rolls - thiswildseason.com -2 Overnight Cinnamon Rolls - thiswildseason.com -3 Overnight Cinnamon Rolls - thiswildseason.com -4 Overnight Cinnamon Rolls - thiswildseason.com -5 Overnight Cinnamon Rolls - thiswildseason.com -6 Overnight Cinnamon Rolls - thiswildseason.com -7

I’d love to have some sweet analogy for you to tell you why I’m sharing this recipe with my thoughts above. It would be something about waiting, patience, and trusting that your cinnamon rolls are rising, even though you don’t see it happening in the moment. I haven’t fully worked it out in my head, so I’ll let you make those connections if you wish 😉

Now, on to the recipe! These cinnamon rolls are sweet goodness! The best part? You can make them ahead of time, pop them in the fridge overnight, let them come to room temperature and rise a bit in the morning, and they’re ready to bake! Make these this weekend for your sweetheart, for your kids, or maybe even just for yourself!

Overnight Cinnamon Rolls with Maple Cream Cheese Icing

Adapted from Beth Kirby
Print Recipe Pin Recipe
Prep Time 5 hrs
Cook Time 25 mins
Total Time 5 hrs 25 mins
Servings 12 rolls

Ingredients
  

For the Dough

  • 3.5 cups all purpose flour + 1/4 - 1/2 c for kneading
  • 1.5 c buttermilk warm
  • 1 stick unsalted butter melted & warm
  • 3/4 c sugar
  • 6 Tbs cornstarch
  • 1 packet instant yeast 2 1/4 tsp
  • 1/2 tsp salt
  • 2 large eggs
  • 2 Tbs butter for greasing the pan

For the Filling

  • 1 cup brown sugar packed
  • 1.5 Tbs cinnamon
  • A couple dashes of nutmeg
  • One stick of butter very soft

For the Icing

  • 4 oz cream cheese softened
  • 1 Tbs brewed coffee
  • 1 Tbs maple syrup
  • 1.5 c powdered sugar
  • 1 tsp vanilla
  • 1-2 Tbs milk

Instructions
 

  • Gently warm buttermilk - you don't want it to get too hot or it will curdle. Dissolve yeast in warmed buttermilk. Add warm melted butter, sugar, salt, and eggs. Stir together thoroughly by hand.
  • Mix the cornstarch and flour in a separate bowl. Add to the buttermilk mixture. Stir together until flour is completely incorporated. Cover with a cloth and let rise in a warm place for an hour and a half, or until dough has doubled. Punch down and let rise for another hour and a half.
  • On a clean work surface, sprinkle 1/4 c flour. Place the dough in the middle of the flour and gently knead it into a workable dough. Use the other 1/4 cup flour if it's still too sticky to work with. Beth's advice is to use the least amount of flour possible - that makes the rolls more tender in the end. Be sure not to over-work the dough while you're kneading it.
  • Flour a large work surface (about 20inx20in) and roll your dough out into an 18x18in square. At this point be sure you have enough flour so the dough doesn't stick to the counter when you're ready to roll it up (I made that mistake!)
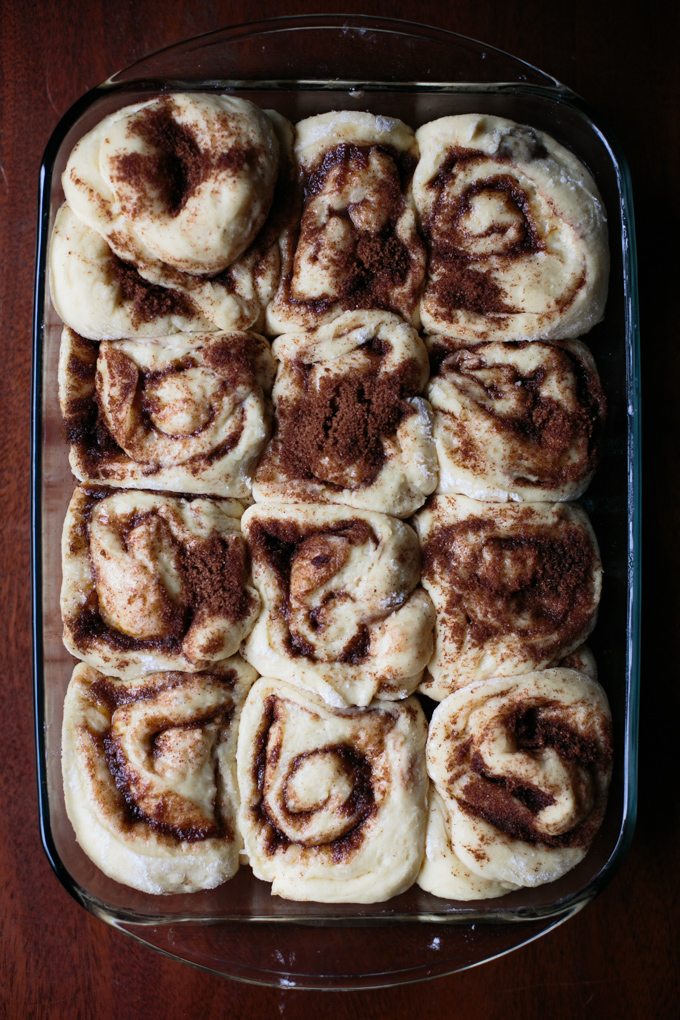
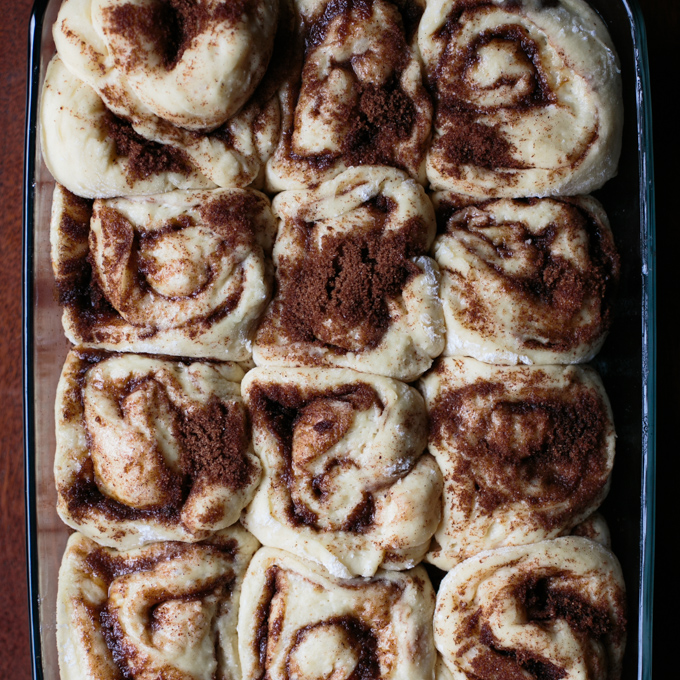
  • Combine brown sugar and cinnamon and a couple dashes of nutmeg in a small bowl. Gently spread the very soft butter over your dough, leaving about a 1in border around the edges. Sprinkle nearly all of the cinnamon sugar mixture over the butter, reserving a couple tablespoons to use in a moment. Start with the edge closest to you and begin gently rolling the dough. Once you reach the end, pinch the seam shut so all your cinnamon-sugary-butter goodness doesn't escape.
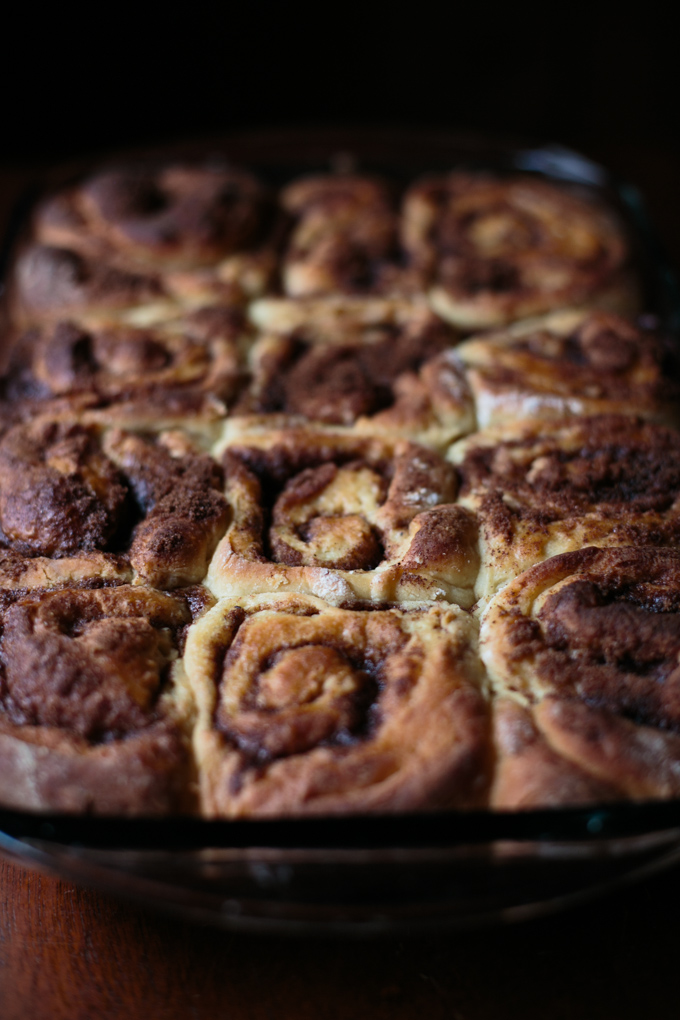
  • Melt two Tbs of butter and pour them into a 9x13 glass baking dish. Tip the baking dish so the butter coats the bottom and up the sides a bit. It may pool in the bottom of your pan - that's okay! It'll make the bottoms of your cinnamon rolls extra delicious! Using a floured knife, cut your rolled up dough into 12 equal pieces. I think the easiest to do is cut your roll in half. Then cut each of those pieces in half. You'll have four equal pieces. Each of those gets cut in thirds, leaving you 12 equal-ish cinnamon rolls. Place each in the buttered baking dish.
  • You'll notice that those sad little end rolls got skimped on the sugar - once they're in the pan, feel free to use the cinnamon sugar mixture you saved to sprinkle in those end rolls and any others that look like they need some extra love.
  • If you're making these rolls at night so they'll be ready to bake the next morning, you cover them tightly with plastic wrap at this point and place them in the fridge. In the morning, set them in a warm place till they have doubled in size, about an hour (they may have risen a bit in the fridge.) If making these rolls straight through, let them rise till doubled in size, about an hour and a half, then you're ready to bake.
  • Heat your oven to 325F. Bake rolls for 25-35 min. Beth recommends using an instant read thermometer and removing the rolls once they've reached an internal temperature of 190F. She says this ensures they stay delicious and gooey on the inside, and I have to agree! Allow rolls to cool about 10 minutes in the pan.
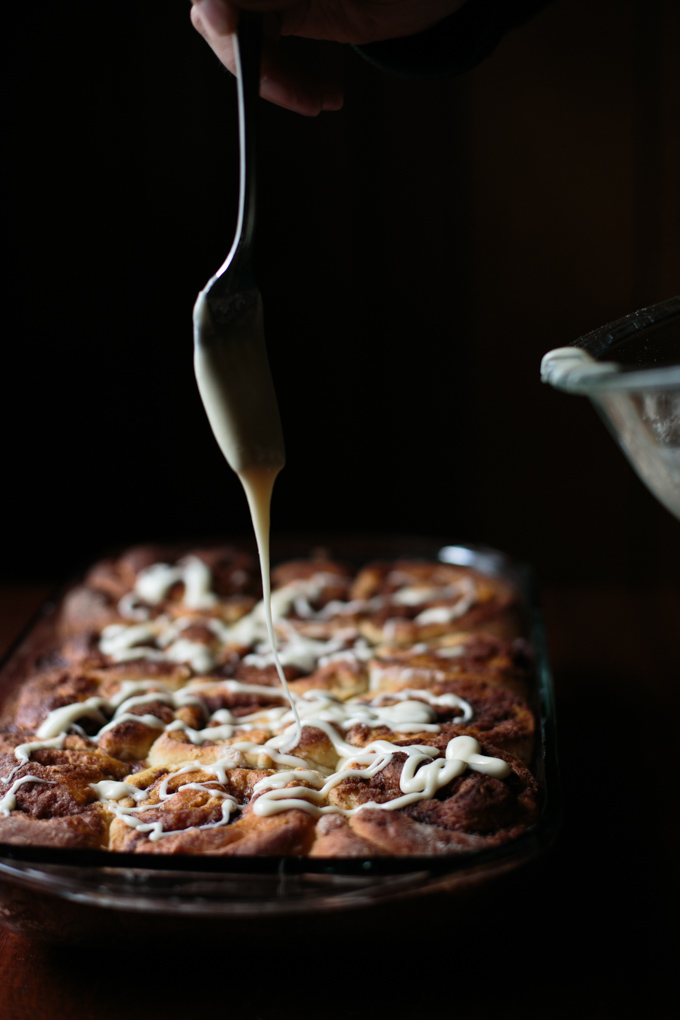
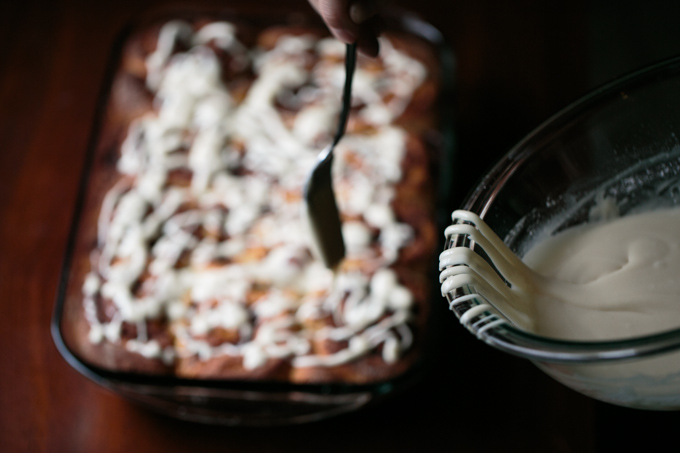
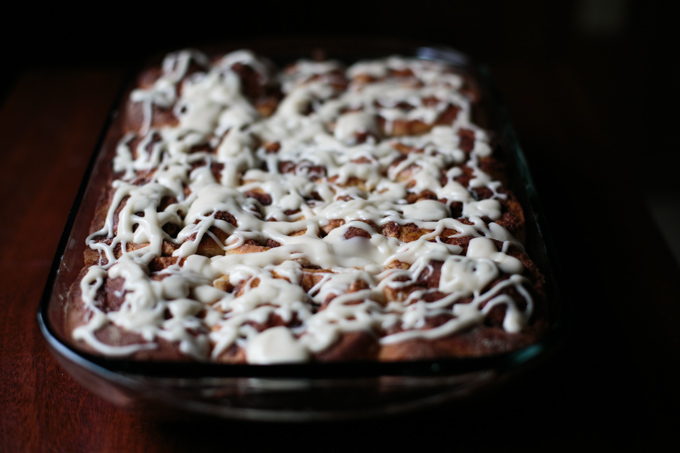
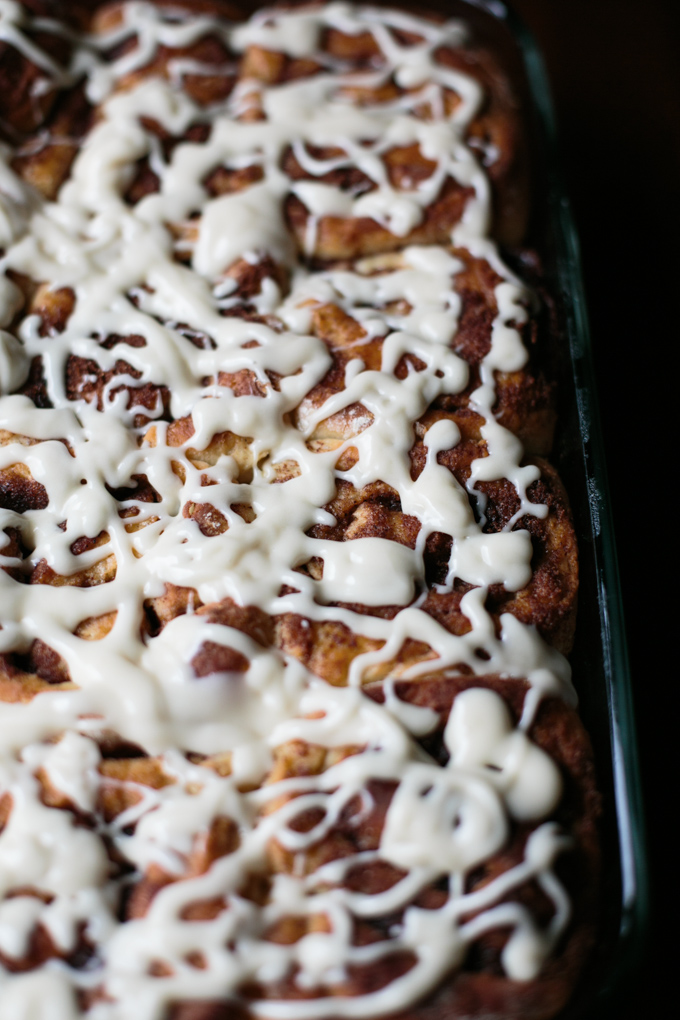
  • While the rolls are baking, you can assemble the icing. Use a fork or a whisk to combine cream cheese, coffee, maple syrup, and vanilla. Add powdered sugar and milk and mix well to combine, making sure icing doesn't have any lumps of powdered sugar. Start with 1 Tbs milk and add another if icing seems too dry. Drizzle over the cinnamon rolls and enjoy!

This post contains affiliate links, but all opinions are my own.

Filed Under: Breakfast/Brunch, Personal

The Best Guacamole

January 29, 2015 by Asharae 3 Comments

Confession time. I’ve been holding onto this recipe for a long time. As in I-took-these-photos-last-February long time. And I offer you my deepest apologies. This guacamole is seriously delicious, and it should have been in your life a long time ago. I usually don’t write my recipes down for things like salsa, tzatziki, and guacamole – but last year I finally wrote this one down to share with all of you. And then I promptly – ahem – misplaced the recipe card. (Okay, maybe I lost it, never to be found again.)

Since we’re nearing the end of football season, and in anticipation of the big game (can I call it the Super Bowl here? Is that allowed?) I figured it was the perfect time to recreate this recipe for you to enjoy!

If you like a little texture to your guacamole, feel free to add diced onions and perhaps don’t mash your avocados all the way. If you’d rather have smooth guacamole, you can mash it to your heart’s content. The jalapeños are also optional in this recipe – if you remove the seeds, they don’t add too much heat, but you’re welcome to leave them out if you’re sensitive to spicy food. I prefer this recipe with lots of white onion for crunch (even though I photographed it with red onion) and a jalapeño or two for added heat. The lime and cilantro help to balance out the jalapeño and onion and add an extra level of deliciousness. Mmmm. So good.

The Best Guacamole - thiswildseason.com -2 The Best Guacamole - thiswildseason.com -3 The Best Guacamole - thiswildseason.com -4

The Best Guacamole

Asharae Kroll
Print Recipe Pin Recipe
Servings 6 -8

Ingredients
  

  • 4 ripe avocados see note below about choosing avocados
  • 1 tsp cumin
  • 1/4 tsp chili powder
  • 1/4 tsp onion powder
  • 1/4 tsp garlic powder
  • 1/8 tsp cayenne
  • Juice of 1-2 limes
  • Handful of cilantro leaves chopped
  • Salt and pepper to taste
  • Optional about 1/4 c red or white onion, minced
  • Optional 1 jalapeño, seeds removed, diced

Instructions
 

  • Remove avocado from the peel. The best way to do it - carefully using a sharp knife, cut all the way around the avocado, end to end. You'll gently cut around the pit in the middle. An easy way to remove the pit is to carefully, but firmly press a sharp knife into the pit (please be careful - don't want you to lose any fingers in the name of guacamole!) Once the knife blade is pressed into the pit, take the avocado half in your hand and gently twist the avocado one way and the knife the other direction. The pit should release from the avocado. Save one of your avocado pits to use in a minute. Once you've halved all your avocados and removed the pits, use a butter knife to cut the avocado into pieces, being careful not to cut through the skin. Use a spoon to scoop the avocado pieces out.
  • Combine avocado with the rest of ingredients and mash together until guacamole reaches the consistency you prefer. Enjoy with chips, on tacos, with a quesadilla, or eat straight with a spoon - I won't judge.
  • Place the avocado pit you saved in with the finished guacamole - this helps keep it from turning brown so quickly. Store in an airtight container and enjoy within 3 days.

Notes

When choosing an avocado at the grocery store, look for ones with firm, smooth skin (no weird hollow spots, squishy spots, or bruises). You can check to see if an avocado is past its prime by removing the small stem - if it's still green underneath, your avocado is still okay. If it has turned brown under the stem, the avocado is past being ripe - don't purchase these. Let the avocados ripen on your counter for a few days if they're particularly firm.


Filed Under: Appetizer, Side Dish Tagged With: easy recipe, Super Bowl snack

Chicken n Waffles with a Spicy Sweet Sriracha Maple Sauce

January 17, 2015 by Asharae 1 Comment

So we’re a couple weeks into 2015 – how are those New Year’s resolutions going? Meh? Mine too. Well, actually – I didn’t really make a resolution, so I suppose mine are going great!! But really, I’ve been finding myself teetering between wanting to eat super healthy foods and drink lots of water all day, to wanting to cozy up on the couch and stuff copious amounts of these cookies into my face.

This recipe was born out of that tension. The day I came up with this idea, I desperately wanted to have chicken and waffles – oh fried chickeny goodness! But I also didn’t particularly want all the grease that tends to accompany all that deliciousness. So I found this fantastic oven-fried chicken recipe over on The Recipe Rebel and proceeded to half it and adjust it to give it a little more crunch.

I started to run with the idea of a sweet/salty/spicy combination for this recipe and sought out a waffle recipe that would be a good base for that. We had some extra buttermilk leftover in the fridge (from a recipe I’ll share soon!) so I figured I should use it to make buttermilk waffles…as one does. (This was literally the first time I’ve ever bought buttermilk – if you don’t have any, just add 1 Tbs lemon juice or vinegar to 1 cup of milk and let sit for 5-10 minutes before using.) I found this delicious-looking recipe for bacon, cheddar, green onion waffles over on The Candid Appetite. Don’t those waffles sound incredible?? Well, I didn’t have any bacon on-hand. Or green onions. And I was too hungry for chicken and waffles to make a special trip to the store. Don’t worry, we’re going to make up for lack-of-bacon with our sauce!

I really wanted this recipe to have a kick to it – that’s where the Sriracha and jalapeño come in! While your chicken is baking in the oven, you can whip up this spicy sweet Sriracha maple yogurt sauce to drizzle over your chicken and waffles. If you’re not a fan of spicy food, leave out the jalapeño and take it easy on the Sriracha. The yogurt helps cool down the flavor a bit, so don’t be scared! Adjust the flavors to whatever your taste buds prefer!

Chicken N Waffles - thiswildseason.com -2 Chicken N Waffles - thiswildseason.com -3 Chicken N Waffles - thiswildseason.com -4 Chicken N Waffles - thiswildseason.com -5 Chicken N Waffles - thiswildseason.com -6

Chicken n Waffles with a Spicy Sweet Sriracha Maple Sauce

Print Recipe Pin Recipe
Servings 2

Ingredients
  

Chicken (Adapted from Recipe Rebel)

  • 2 chicken breasts cut into strips
  • 3 Tbs butter
  • 1/4 c flour
  • 1/4 c panko
  • 1/4 tsp salt
  • 1/2 Tbs seasoning salt I used this recipe to make my own. You can also use something like Lawry's seasoning salt
  • 1/4 tsp pepper
  • 1 tsp paprika

Waffles (Adapted from The Candid Appetite)

  • 1 c flour
  • 2 Tbs light brown sugar
  • 1/2 tsp baking soda
  • 3/4 tsp baking powder
  • 1/4 tsp salt
  • 1 tsp pepper
  • 3 eggs at room temperature
  • 2.5 Tbs butter melted and cooled
  • 1 c buttermilk at room temperature
  • 1/2 c cheddar cheese shredded (or cut into tiny chunks)

Sauce

  • 1/2 c plain Greek yogurt
  • 1/2 Tbs Sriracha
  • 1 Tbs + 1 tsp real maple syrup
  • 1 jalapeño diced and seeded
  • Salt and pepper to taste

Garnish

  • Chives

Instructions
 

Chicken

  • Heat oven to 400F. Melt butter on a rimmed baking sheet in the oven. Keep watch on it and remove from the oven once it has melted.
  • Combine flour, panko, salt, seasoning salt, pepper, and paprika in a large ziplock bag. Add sliced chicken and shake to coat the chicken. Place on buttered baking sheet and bake 10-12 minutes. Remove from oven, flip chicken, and bake another 10-12 min. (My chicken slices were fairly thin, so I only baked them 5 additional minutes.) Remove from the oven and let rest once finished. Lower the oven temperature to 200 degrees.

Waffles

  • Combine flour, brown sugar, baking soda, baking powder, salt, and pepper. Make a well in the center.
  • Crack the eggs in a separate bowl, whisk together, and pour into the flour mixture. Add butter and buttermilk and stir together to combine. Fold in the cheddar cheese.
  • Depending on the size of your waffle maker, cooking time will vary. Lightly grease your waffle maker before pouring batter in. I used a 1/3 c measurement to scoop the batter in and that made the perfect size waffles. Remove waffles when golden.

Sauce

  • Combine all ingredients in a small bowl and keep in fridge until ready to serve

To serve

  • Once the oven temperature has lowered to 200F, you can keep the chicken and waffles in the oven to keep them warm for a few minutes till you're ready to serve them.
  • Top each waffle with chicken, spicy sweet sauce, and chives. Serve as an open-face sandwich or top with another waffle for a full sandwich.

Notes

Update - After making this recipe a few more times, we've found that we like our waffles to have a bit more crunch to them. We pop them in the toaster right before serving to ensure they're warm and create a slightly crunchy exterior.


Filed Under: Main Course Tagged With: comfort food, savory, sweet

What I’ve Learned in 2014

January 2, 2015 by Asharae 5 Comments

2014 has come with an immense amount of learning for us in and out of the kitchen. We spent over 100 days of our year on the road or in the air, traveling to shoot weddings and engagement sessions, visit friends and family, and everything in between. I reflected on our year with Grain & Compass over on our blog yesterday, but I also wanted to reflect on everything I’ve learned in the kitchen this year.

Here on This Wild Season I’ve reflected on what it’s like to be an introvert, my struggles with battling against comparison, and learning how to strive for meaningful work rather than striving for success by the world’s standards. As I started reflecting on all the food-related things I’ve learned this year, my list actually got much longer than I expected! I have loved that this blog is a creative outlet and source of encouragement for me to try new things.

I hope you see something below that you haven’t yet learned how to do, and that you follow the links and learn something new! Tis the season for New Year’s Resolutions and learning new things – the great thing about learning a new technique to use in the kitchen is that it’s a lifelong skill you’ll always have! You can take each of the skills below and use them in so many ways to create new and delicious food for you and your family.

What I’ve learned in 2014:

– How to peel a butternut squash. There are lots of ways to peel a butternut squash, but I learned a method recently that involves poking holes in your squash and microwaving it for a few minutes to make it easier to peel. Read more about it in my recipe notes for Butternut Squash Soup.

Butternut-Squash-Soup-thiswildseason.com-4

– How to clean leeks. Leeks are in season through the winter, reaching their peak in January. If you’ve never cooked with them, now’s the perfect time! They have a mellow onion flavor that works well in many dishes. Leeks are grown in sandy soil, so they typically have fine sand and grit hiding between the layers. Here’s a great quick video online that shows how to simply cut and wash leeks.

– How to make the most delicious chocolate chip cookies. Hint: It involves browning butter. If you’ve never done it, you should learn how! It’s ridiculously easy. And your newly acquired butter browning skills will come in handy when you tackle these salted brown butter rice crispy treats from Smitten Kitchen.

Brown-Butter-Chocolate-Chip-Cookies_This-Wild-Season-9

– How to roast garlic. A few weeks ago I roasted garlic for the first time. I had assumed I’d never need to roast garlic and that it was more work than it’s worth. Oh man was I wrong. Roasted garlic is sweet and delicious – it loses that bite that raw garlic has and it’s easily minced and mixed into sauces, spread on fresh bread, or eaten with a spoon (to keep the vampires away, of course.) How Sweet it Is has a great little tutorial for roasting garlic – check it out here!

– How to make homemade stovetop popcorn. It’s simple and delicious and healthy. Enough said.

This-Wild-Season_Homemade-Stovetop-Popcorn-4

– Not all measuring cups are created equal. Did you know? Cups for liquid and dry ingredients actually measure slightly differently. If you’re getting serious about something like baking, the science is important, and you should use dry measuring cups for things like flour and sugar, and liquid measuring cups for things like water and milk.

– How to make a simple homemade bread. We rarely bought bread this year – partly because we traveled so much we were hardly home long enough to get through a whole loaf of regular bread. And partly because this bread is easy to make, tastier than much of the stuff you get at the store, and contains no preservatives or weird ingredients. It’s delicious so it’ll disappear much quicker than a regular loaf of bread – you’ve been warned. A bread machine makes quick work of the bread dough, then you just let it rise in the pan, pop it in the oven, and enjoy the sweet aroma of fresh baked bread.

Basic-Bread_This-Wild-Season-8

– How to make veggie burgers. This is one I’m still working on, so I want to throw it out there – do you have any great veggie burger recipes? I’ve tried this black bean burger from Saveur and this sweet potato burger from How Sweet It Is – both of them are delicious! We’re still learning the best method for cooking each burger – how hot the pan needs to be, how much oil to use, whether to coat the burger patty in corn meal or flour or something else before cooking. That’s the fun about experimenting in the kitchen – we’re constantly adding new skills and new ideas to our repertoire.

– How to make risotto. This is another one of those dishes I thought would be more trouble than it’s worth. But again, it’s not too difficult – just requires patience and a lot of stirring. And lots of patience. Risotto is a great versatile dish to serve with veggies, a salad, chicken or steak. The first time I made risotto, it was a corn risotto made with Corona instead of white wine and it got stuffed in a poblano pepper and roasted in the oven – you can thank Deb Perelman’s The Smitten Kitchen Cookbook for that. I’m currently working on refining a risotto dish to share here on the blog, but until then you should check out Shauna Niequist’s risotto recipe over on her blog.

– Food that’s in season really does taste better. This is the second year we’ve grown veggies in our garden and we continue to learn more about what each vegetable requires and when it comes into season. This knowledge helps us appreciate all the work that other people put into growing the majority of our food for us. It also helps us know what to look for at the grocery store so we can spend our money well, choosing what’s in season because it’ll be tastier and cheaper. There’s nothing more delicious than a juicy tomato, picked fresh off the vine in the height of summer, sliced up, drizzled with balsamic vinegar, sprinkled with salt and pepper, and topped with mozzarella and fresh basil. I’m drooling just thinking about it. Whether you have your own garden or you get your fruits and veggies at the store, it’s worth knowing what’s currently in season so you can save money and eat food that’s more delicious.

Caprese-Salad-with-Honey-Balsamic-Reduction-thiswildseason.com-5

Did you learn anything new in 2014? What did you do that you’re proud of? Add any new skills to your arsenal?

I’m not a huge fan of setting a New Year’s resolution, because that always sounds to me like something I’m automatically going to fail at accomplishing. But I am a huge proponent of dreaming big, setting goals, and taking steps to achieve those goals, no matter what time of year it is. What are you hoping to do this coming year? Are you setting any goals for yourself? Where do you want to see yourself one year from today?

As we move into 2015, I’m stoked to continue learning new recipes and new cooking techniques. I’m hoping to plan our garden soon and get started earlier in the season than I usually do! Some days I dream of having land, growing lots of our own food, having chickens and goats and bees, making our own cheese and honey, and creating a beautiful space for others to get away from it all and to rest and relax. But we’re not there. And I’m not sure if that’s ultimately where we’ll end up.

But today, in this place and in this time I can take small measures toward those dreams. I can learn more about growing our own food, I can appreciate the work that goes into it, make meal plans, shop smart and in-season, and truly savor each meal and each moment with my husband, my family, and my friends. I may not set a New Year’s resolution, but I’m happy to name my goals and take steps toward them.

Blueberry Mint Lemonade - thiswildseason.com -9

Blueberry Lemonade recipe can be found here!

This post contains affiliate links, but all opinions are my own.

Filed Under: Personal

  • « Previous Page
  • 1
  • …
  • 13
  • 14
  • 15
  • 16
  • 17
  • …
  • 27
  • Next Page »

Hello there!

My name is Asharae. I’m a photographer by trade, wife to an amazing man, and mama to three little ones. I am passionate about creating good food, sharing meaningful conversation around the table, trying new things, and encouraging others to do the same.

Welcome to This Wild Season! This is a place for sharing what I’m learning in the kitchen and outside of it. Most of all, it is a challenge to myself and to you to slow down, be present in the moment, and re-learn how to savor food and conversation around the table.

About

Search

Connect

  • Facebook
  • Instagram
  • Pinterest
  • Twitter
  • Vimeo

Find my book on Amazon:

Recent Posts

  • Emmeline’s Birth Story, The Story of Her Name
  • Emmeline’s Birth Story, Birth Day Part 2
  • Emmeline’s Birth Story, Birth Day Part 1
  • Emmeline’s Birth Story, My Pregnancy
  • Emmeline’s Birth Story, An Introduction
Follow on Bloglovin
Visit This Wild Season's profile on Pinterest.

Copyright © 2025 · Foodie Child Theme by Shay Bocks · Built on the Genesis Framework · Powered by WordPress