This Wild Season

Sharing what I'm learning in the kitchen as well as outside of it.

Navigation
  • Home
  • Blog
  • Recipes
    • Appetizer
    • Breakfast/Brunch
    • Side Dish
    • Main Course
    • Dessert
    • Drinks
    • Personal
  • About

Spicy Stuffed Poblano Peppers with a Fresh Lime Crema

October 6, 2015 by Asharae Leave a Comment

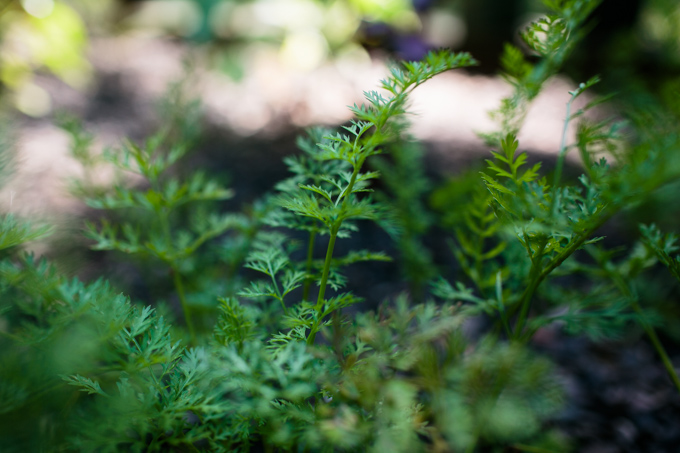
I’ve had a mild obsession with poblano peppers as of late. Ever since making Deb Perelman’s delicious corn risotto-stuffed poblano peppers from The Smitten Kitchen Cookbook I’ve been dreaming of making my own version of stuffed peppers. I even planted a poblano pepper plant in our garden this year in hopes of having fresh peppers from our yard to use in my recipes. Alas! Our pepper plant produced no peppers.

Pepper tragedies aside, I finally picked up a few poblanos from the grocery store the other week and put together this recipe for you guys! I’ve tried it with bell peppers as well and it was just as delicious. I prefer the smoky flavor of poblanos, and while most of these peppers are fairly mild, you can get a rogue spicy one in the mix. If you have a strong aversion to spicy food, I recommend using bell peppers for this recipe.

Stuffed Poblano Peppers with a Fresh Lime Crema by thiswildseason.com -2 Stuffed Poblano Peppers with a Fresh Lime Crema by thiswildseason.com -3 Stuffed Poblano Peppers with a Fresh Lime Crema by thiswildseason.com -4 Stuffed Poblano Peppers with a Fresh Lime Crema by thiswildseason.com -5 Stuffed Poblano Peppers with a Fresh Lime Crema by thiswildseason.com -6 Stuffed Poblano Peppers with a Fresh Lime Crema by thiswildseason.com -7 Stuffed Poblano Peppers with a Fresh Lime Crema by thiswildseason.com -8

This recipe can easily be halved to serve less people. I’ve been making the full filling recipe (but have been using less peppers) so that I can have leftovers of the filling the next day. It’s delicious in a tortilla or just reheated and served with leftover lime crema and cilantro.

Spicy Stuffed Poblano Peppers with a Fresh Lime Crema

Print Recipe Pin Recipe
Servings 4 -6

Ingredients
  

  • 6-8 poblano peppers or 4+ bell peppers if you prefer

Filling Ingredients

  • 2 c cooked rice
  • 1 lb ground beef and spices brown and season according to this recipe or use a packet of taco seasoning mix
  • 2 c freshly shredded cheese I like using 1 c cheddar and 1 c pepperjack
  • 1/2 c feta
  • 1 c frozen corn thawed

Lime Crema Ingredients

  • 1/4 c sour cream
  • 1/4 c plain Greek yogurt
  • Juice of 1 lime
  • 1/4 tsp kosher salt
  • Pepper to taste

For garnish

  • Cilantro chopped

Instructions
 

  • Cook rice according to package instructions and set aside to cool.
  • Brown ground beef and season according to this recipe (or use a packet of taco seasoning mix if you wish.) Set aside to cool.
  • Optional step: If you don't like the skins on your peppers, you can broil the peppers whole till the skins are charred, remove them from the oven and cover them with foil for 5 minutes or so till they've cooled a bit, then carefully remove the skins. I have found that I like doing this with bell peppers but I don't mind the skins on poblano peppers. If you do this step, it does make the peppers a bit more difficult to stuff with the filling later.
  • Heat oven to 400 degrees F.
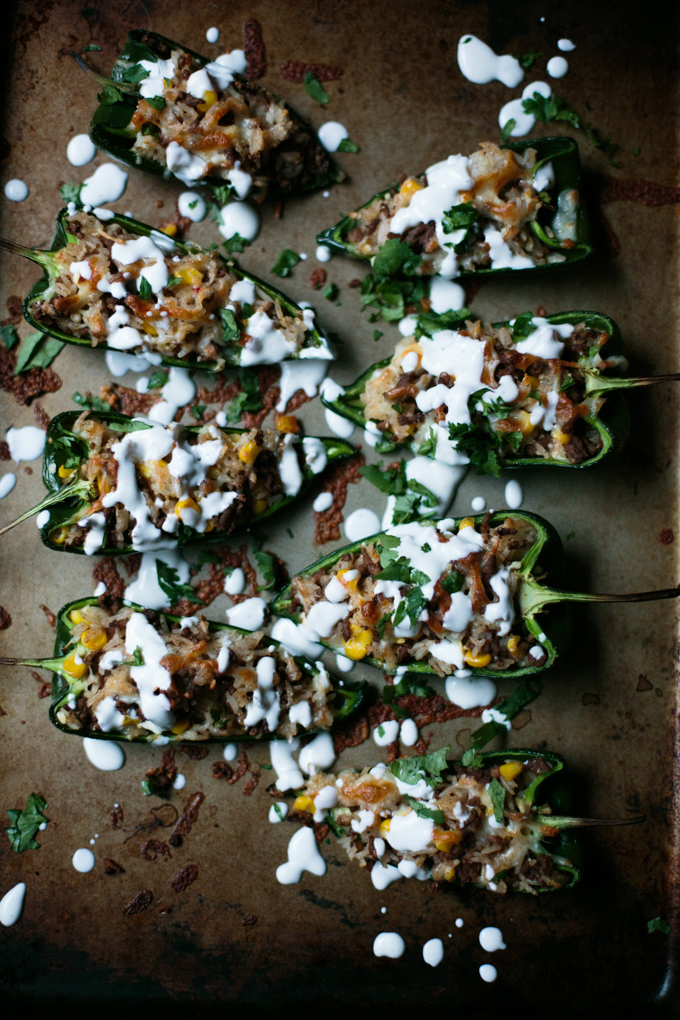
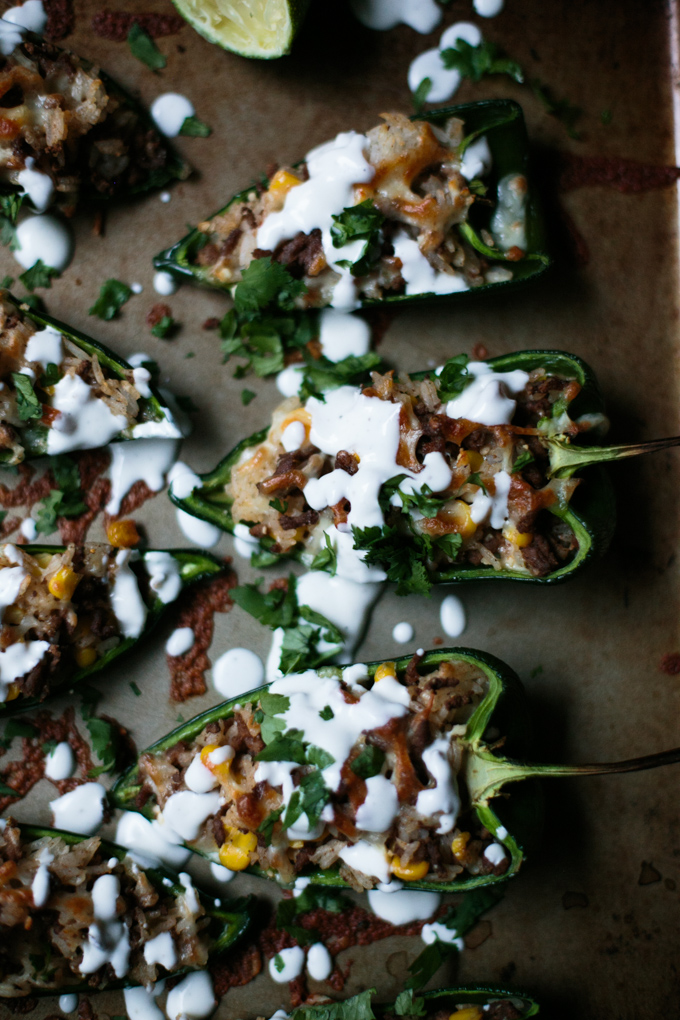
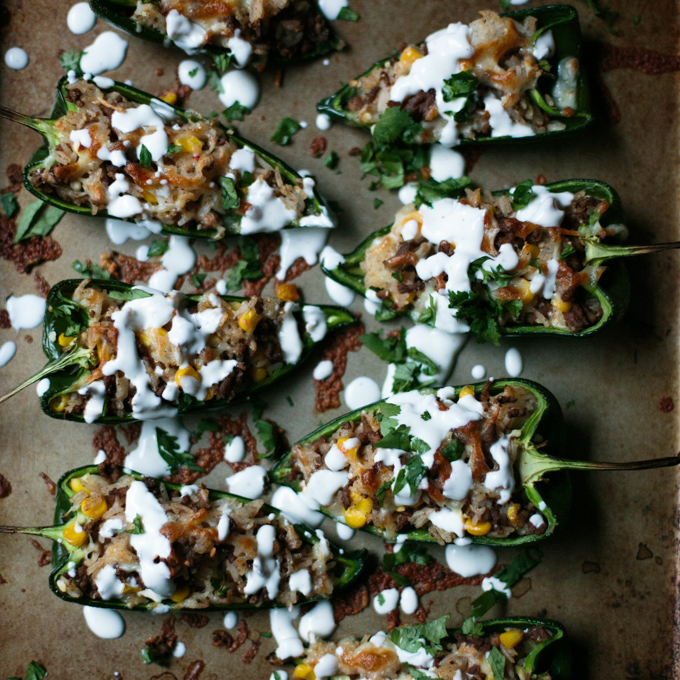
  • Combine all lime crema ingredients in a small bowl. Set aside.
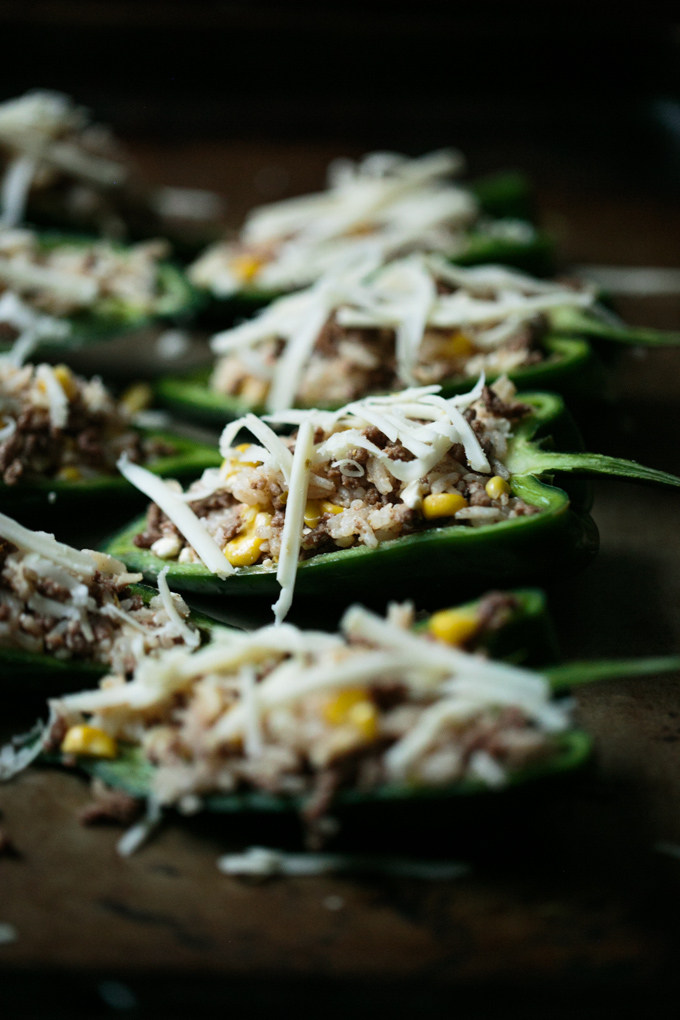
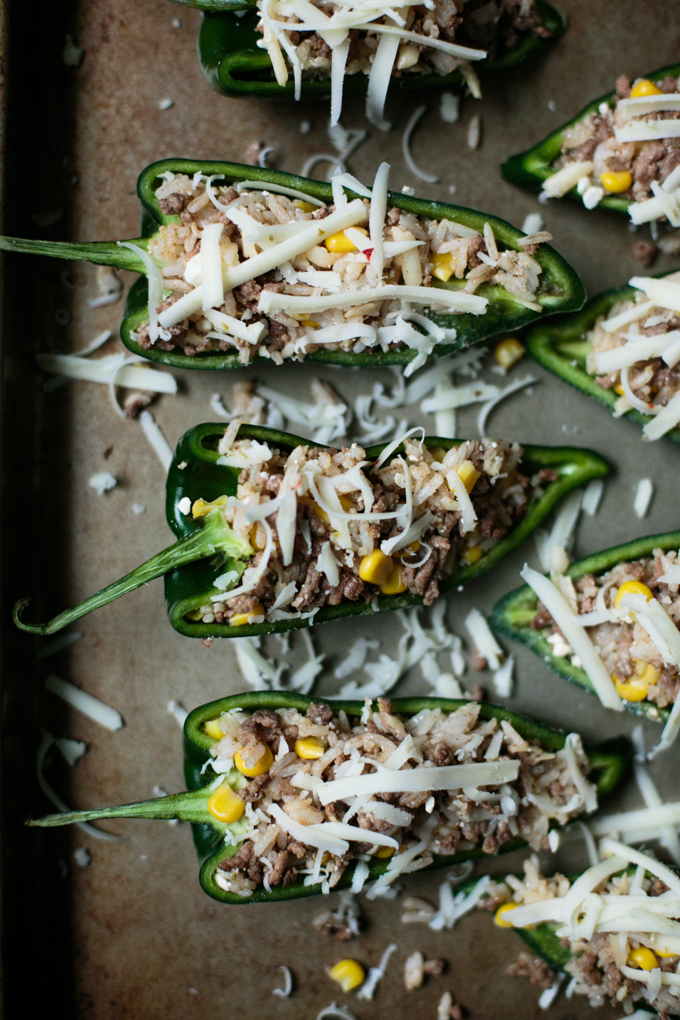
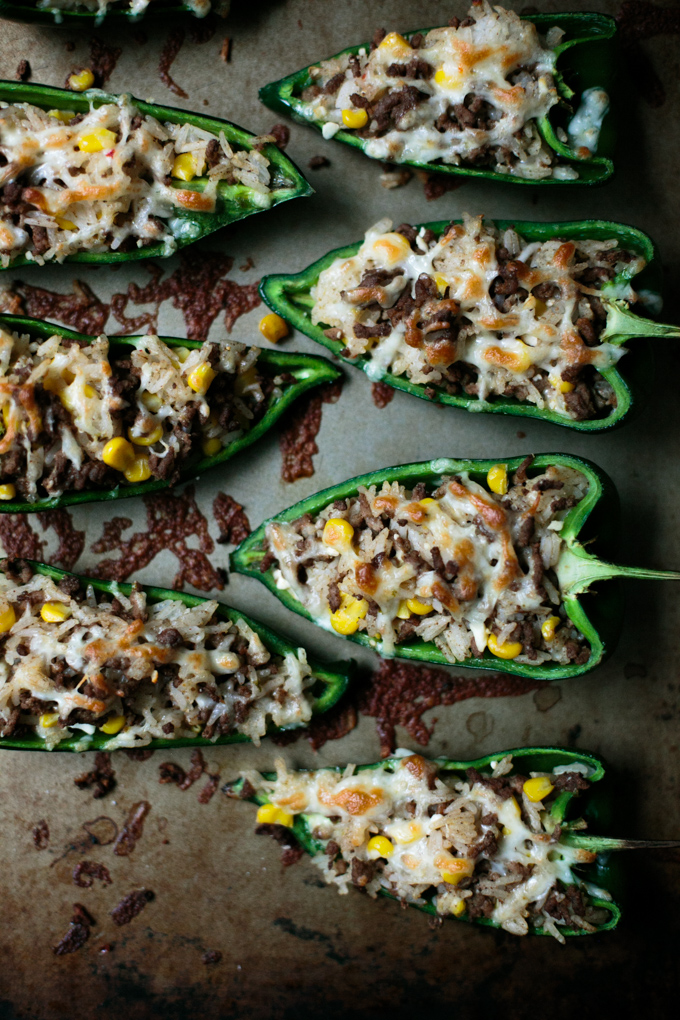
  • Combine 2 c cooked rice, ground beef, feta, most of the shredded cheese (save some for topping the peppers later), and corn in a large bowl to create filling.
  • If using poblano peppers, cut them down the center, stem to point, to create little boats. If using bell peppers, carefully use a knife to cut a hole around the stem (like you would to carve a pumpkin!) Remove the seeds and membranes from the peppers (careful with the poblanos, they can be spicy.)
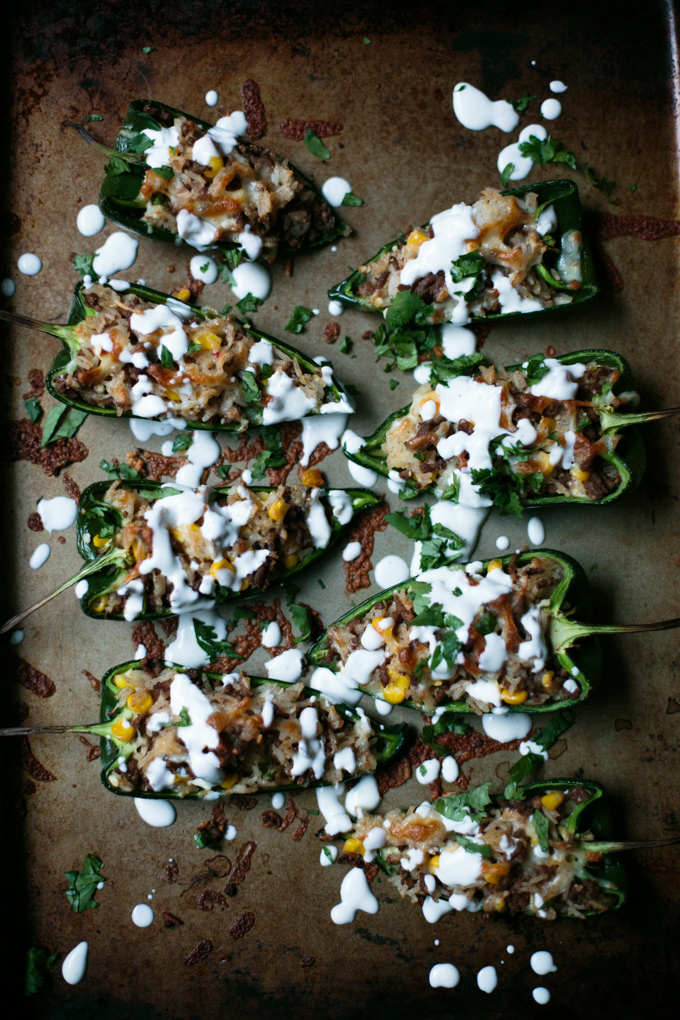
  • Stuff each pepper with filling, place in a glass baking dish, top with extra shredded cheese, and bake at 400 degrees F for 12-15 minutes, until heated through and peppers are tender. Broil for a few minutes to brown the cheese if you wish.
  • Remove the peppers from the oven and let cool for a few minutes. Serve with lime crema drizzled on top and garnish with cilantro.

Notes

Try adding a can of black beans (rinsed and drained) to your filling if you wish!
A note about poblano peppers - many are very mild, but you can get an occasional spicy one in the mix. If you have a strong aversion to spicy food, you may want to stick with bell peppers.

This post contains affiliate links but all opinions are my own.

Spicy Stuffed Poblano Peppers with Fresh Lime Crema by thiswildseason.com

Filed Under: Main Course Tagged With: mexican, peppers, spicy, stuffed peppers

Refreshing Cucumber Lemon Water

September 30, 2015 by Asharae 1 Comment

Every once in a while I feel like I just need to hit the reset button on life, and particularly on my eating habits. A summer of travel tends to equal a summer of eating terribly, never working out, and generally feeling pretty crummy. Since we’ve finally been spending more than two or three nights home at a time, I’m getting back into the rhythm of cooking, eating (slightly) healthier, and finding a routine of working out occasionally (which, in my book, means going on walks or doing yoga – let’s not get crazy now.)

Early in the summer I purchased a Fitbit Flex to help me be more active and to track how many steps I get in a day. I wasn’t sure how effective it would be for me (who tends to buck routine and discipline of any kind) but I’ve been very surprised at how motivating it is! First of all, it was terribly sad to realize how inactive I really am on any given work day. I knew that sitting at a computer all day wasn’t great for me, but I wasn’t completely aware of how little I was really moving during the day. The recommended step count is 10,000 steps per day, and some days I found I was barely reaching 2,500. Yikes.

Now that my Fitbit is tracking all my steps, I find I’m much more likely to walk the long way to the kitchen, volunteer to go get the mail, and clean and put away items around the house one-at-a-time, just to get in more steps. It’s a weird mental game, but it’s totally working. I highly recommend it. When the little lights on my Fitbit go off and it buzzes like crazy to let me know I’ve hit my 10,000 steps for the day, I want to do a happy dance! It sounds silly, but it’s definitely motivating.

I also love that the Fitbit app on my phone keeps track of lots of other things too – I just use it for tracking how much sleep I get each night and how many glasses of water I drink every day. With the Fitbit band I have, I also have the option to log my weight and keep a food diary in the phone app. Other more advanced Fitbit Wristbands also track your heart rate and how many floors you’ve climbed each day.

Tracking how much water I drink has been super helpful for me. On days when I’m feeling more sluggish and tired, I often realize I haven’t had enough water for the day. It’s a simple way to be mindful of my water intake and ensure I’m drinking enough.

Sometimes though, it can get boring drinking plain water all the time. We’ve harvested a few remaining cucumbers from our garden and I’ve been using them to make this refreshing cucumber-infused water lately. It really couldn’t be more simple. Slice up a cucumber, place it in a pitcher, fill the pitcher with water, and let it sit for a few hours or overnight. Serve it with a squeeze of lemon and voila! You’ve got a refreshing infused water with numerous health benefits! I’m obviously not a doctor, so I don’t have expert advice, but I’ve heard from various places that cucumber water can aid in digestion and lemon water can help reduce inflammation. Sounds like a pretty good combo for feeling like your best self.

Refreshing Cucumber Lemon Water by thiswildseason.com -2 Refreshing Cucumber Lemon Water by thiswildseason.com -3

Refreshing Cucumber Lemon Water

Print Recipe Pin Recipe
Prep Time 3 mins
Total Time 3 mins

Ingredients
  

  • 2 quarts of water
  • 1 cucumber sliced
  • 1 lemon

Instructions
 

  • Slice cucumber and place in a large pitcher. Add 4 quarts of water and let chill in the fridge for several hours, or overnight.
  • Serve with a generous squeeze of fresh lemon juice.

This post contains affiliate links but all opinions are my own.

Filed Under: Drinks Tagged With: drink recipe, easy drink recipe, easy recipe, healthy recipe, infused water

Harvesting Carrots and Learning to Slow Down

September 19, 2015 by Asharae Leave a Comment

These last several weeks have been a whirlwind. My husband and I did a three week road trip to Chicago for two weddings and a reunion with my college roommates, then we traveled to Maryland to see Tim’s parents for Labor day, and then we headed back home for a couple nights before packing our bags for a long weekend at the beach with friends. At this point in our wedding season, a little getaway with no agenda was exactly what we needed. We’ve been going nonstop since April and it was wonderful to sit on the beach for a few days and think of nothing but the sound of the ocean waves.

Now it’s back to reality – catching up on editing and emails after being on the road for a month, trying to juggle work and rest, and desperately looking forward to our off season when we’ll have some time to reset and recoup our energy.

Our work takes us to some pretty extraordinary places, and for that I am eternally grateful. There are some days though, that I simply crave a slower pace and some time to breathe.

Rainbow Carrot Harvest -- thiswildseason.com -2 Rainbow Carrot Harvest -- thiswildseason.com -3 Rainbow Carrot Harvest -- thiswildseason.com -4

For me, our garden is becoming my place to slow down and breathe. Judging by its current ragged state from being neglected most of the summer, I can tell I’ve had little time to slow down lately. Our tomatoes are in a sad state, the tomatillos grew too big for their cages and toppled over onto the cucumber trellis in a wind storm, and the cucumbers were starved for sun (because of the tomatillos), so they’ve long since withered up. I typically post photos of our garden spoils over on Instagram all summer, but it’s been a sad year produce-wise, so I’ve kept those posts in check.

Early in the spring, before our wedding season got underway, we planted tiny little carrot seeds in our garden. We watered and we waited. In early summer the little green carrot fronds told us they were ready to be plucked from the ground. This was the first time we tried growing carrots, and we may have pulled them up a little early judging by how little they were. But they turned out sweet and tender and delicious anyway.

Rainbow Carrot Harvest -- thiswildseason.com -5 Rainbow Carrot Harvest -- thiswildseason.com -6 Rainbow Carrot Harvest -- thiswildseason.com -7

The chill of fall is already in the air this week in NC, but I may see if we can get one more carrot harvest this season. According to this planting guide that NC State published for our area, I’m pushing it to get those little carrot seeds in the ground before it gets too cold. We have this weekend off and we’ll actually be home to enjoy it – for the first time since early May. I do believe this weekend will be full of rest and slowing down from the frenzied pace we’ve had these past several months.

I would love to know – how do you make yourself slow down and rest? What works best for you? Do you play in the dirt, read a book, go for a walk, or something else?

Rainbow Carrot Harvest -- thiswildseason.com -8 Rainbow Carrot Harvest -- thiswildseason.com -9 Rainbow Carrot Harvest -- thiswildseason.com -10 Rainbow Carrot Harvest -- thiswildseason.com -12 Rainbow Carrot Harvest -- thiswildseason.com -13 Rainbow Carrot Harvest -- thiswildseason.com -14

Filed Under: Garden, Personal

DIY Handlettered Menu

September 3, 2015 by Asharae 1 Comment

Last Friday I shared a bit about the summertime dinner party I got to put together with Susannah from Feast + West, Julia from Tag & Tibby, and Katie from Twin Stripe. We had the best time brainstorming a fabulous menu full of in-season fruits and veggies, local ingredients, and delicious recipes.

While Susannah was grilling her delicious corn on the grill, and Julia and Katie were hard at work on the table decor for our dinner, I sat down and created a handlettered menu to showcase each recipe that we’d created.

As some of you know, I’m currently co-authoring a DIY Handlettering book. (I still can’t believe it!) So I figured this sweet little handlettered menu was a great way to give you all a tiny sneak peek into everything I’ve been working on!

Follow along below for a list of supplies you’ll need and some simple instructions for creating your own handlettered menu for your next dinner party!

DIY Hand Lettered Menu - thiswildseason.com -2

The tools you need:

Pencil with a good eraser

Pen or Marker

Paper you plan to write your menu on (I used watercolor paper that had some texture to it and I glued that to a larger sheet of gold paper to give it a pretty border.)

DIY Hand Lettered Menu - thiswildseason.com -3 DIY Hand Lettered Menu - thiswildseason.com -4 Steps:

1. Using a pencil, gently sketch a general outline of how you’d like to layout your menu. Be sure to leave enough space for each item on your menu. If you find you’ve spaced your lines out too much, feel free to erase and start again.

2. Once you have a general outline, begin to sketch the lettering for each of your menu items. I chose a loose flowy cursive style for the title and recipe names, and combined that with a skinny upright all-caps style for the name of each course. I recommend very lightly sketching this in so it’s easier to erase later!

DIY Hand Lettered Menu - thiswildseason.com -5 3. When you’re confident you’ve got a good layout for your menu and lettering, go over your pencil lines with a pen or marker. Be sure to wait till your lettering is completely dry before erasing your pencil lines.

4. Once your lettering is finished and pencil lines erased, feel free to use a pretty sheet of scrapbooking paper as a border or background to your menu. I simply cut the paper 1/4 inch larger than my menu on each side and then attached them together using a glue stick.

DIY Hand Lettered Menu - thiswildseason.com -6

I’ll be updating the links below as each new blog post from our summer supper collaboration goes up! Be sure to check back soon for more great recipes! You can also follow along on Instagram and other social media with the hashtag #sweetsummersupper

Appetizer

Smoked Salmon and Cucumber Bites // Twin Stripe

Entree

Bader Hill Farm Citrus Herb Roasted Chicken

Sides

Cathead Biscuits // Feast + West

Grilled Mexican Corn // Feast + West

Mojito Melon Salad // This Wild Season

Heirloom Tomato Caprese Salad // Tag & Tibby

Drinks

Honey Lavender Gin + Tonics // Twin Stripe

Watermelon Orange Margarita Punch // Feast + West

Dessert

Oatmeal Peach Crisp // Tag & Tibby


Filed Under: DIY, How To Tagged With: craft, crafting, DIY, DIY Handlettering, hand lettering, handlettering, meal planning, menu, shared meals

Mojito Melon Salad

September 1, 2015 by Asharae 6 Comments

This mojito melon salad is probably the simplest recipe I’ve ever posted here. At this point in the summer, when school is starting back, and you’re not quite ready to get back in the kitchen full-time, this is a perfect side dish to toss together and throw in the fridge till you’re ready to serve it.

This salad was part of my summer suppers collaboration with Tag & Tibby, Twin Stripe, and Feast + West. Be sure to check out my intro post for more photos and visit each of these lovely ladies’ blogs for some more fabulous recipes this week! Come back here on Thursday for a fun DIY feature as well!

Summer Suppers Collaboration - thiswildseason.com -2 Summer Suppers Collaboration - thiswildseason.com -3 Summer Suppers Collaboration - thiswildseason.com -4 Summer Suppers Collaboration - thiswildseason.com -5 Summer Suppers Collaboration - thiswildseason.com -6 Summer Suppers Collaboration - thiswildseason.com -7

If you’re feeling a little extra fancy, try using a melon baller to scoop out the watermelon – it makes the dish extra pretty! This was actually the first time I’d ever used a melon baller, and I found it worked much better on the juicy watermelon than the other melon I used for this recipe. Feel free to adjust the flavors to suit your taste, and try it with and without feta to see which you like better!

Mojito Melon Salad

Asharae Kroll
Print Recipe Pin Recipe
Prep Time 15 mins
Total Time 15 mins

Ingredients
  

  • 1 small watermelon cut into small pieces
  • 1 small melon honeydew or other melon
  • Juice of 1-2 limes
  • Handful of mint chopped
  • Pinch of salt
  • Handful of feta optional

Instructions
 

  • Combine all ingredients except the feta. Let rest in the fridge for a half hour or so to allow the flavors to combine
  • Adjust lime, mint, and salt to taste
  • Serve topped with feta (optional)

I’ll be updating the links below as each new blog post from our summer supper collaboration goes up! Be sure to check back soon for more great recipes! You can also follow along on Instagram and other social media with the hashtag #sweetsummersupper

Appetizer

Smoked Salmon and Cucumber Bites // Twin Stripe

Entree

Bader Hill Farm Citrus Herb Roasted Chicken

Sides

Cathead Biscuits // Feast + West

Grilled Mexican Corn // Feast + West

Mojito Melon Salad // This Wild Season

Heirloom Tomato Caprese Salad // Tag & Tibby

Drinks

Honey Lavender Gin + Tonics // Twin Stripe

Watermelon Orange Margarita Punch // Feast + West

Dessert

Oatmeal Peach Crisp // Tag & Tibby

Filed Under: Side Dish Tagged With: brunch recipe, easy recipe, easy side dish, simple recipe, summer recipe, summertime

  • « Previous Page
  • 1
  • …
  • 6
  • 7
  • 8
  • 9
  • 10
  • …
  • 21
  • Next Page »

Hello there!

My name is Asharae. I’m a photographer by trade, wife to an amazing man, and mama to three little ones. I am passionate about creating good food, sharing meaningful conversation around the table, trying new things, and encouraging others to do the same.

Welcome to This Wild Season! This is a place for sharing what I’m learning in the kitchen and outside of it. Most of all, it is a challenge to myself and to you to slow down, be present in the moment, and re-learn how to savor food and conversation around the table.

About

Search

Connect

  • Facebook
  • Instagram
  • Pinterest
  • Twitter
  • Vimeo

Find my book on Amazon:

Recent Posts

  • Emmeline’s Birth Story, The Story of Her Name
  • Emmeline’s Birth Story, Birth Day Part 2
  • Emmeline’s Birth Story, Birth Day Part 1
  • Emmeline’s Birth Story, My Pregnancy
  • Emmeline’s Birth Story, An Introduction
Follow on Bloglovin
Visit This Wild Season's profile on Pinterest.

Copyright © 2025 · Foodie Child Theme by Shay Bocks · Built on the Genesis Framework · Powered by WordPress