This Wild Season

Sharing what I'm learning in the kitchen as well as outside of it.

Navigation
  • Home
  • Blog
  • Recipes
    • Appetizer
    • Breakfast/Brunch
    • Side Dish
    • Main Course
    • Dessert
    • Drinks
    • Personal
  • About

Simple Beef Tacos

July 28, 2015 by Asharae Leave a Comment

Earlier this summer I decided it was time to remove the word “busy” from my vocabulary. Answering the question “How’s life?” with the answer “Busy!” had become too routine and I didn’t like it.

It’s easy to see “busy” as a badge of honor – as if the busier we are, the more important, well-liked, and respected we must be. Goodness is that far from the truth. Busy makes me want to shrink back under the covers and hide from all the things. Busy makes me short of breath with all the ways I feel I’m failing. Busy is often a distraction from digging into the good stuff of life – it keeps us always on the go, never settling in to slow down and soak up the little moments.

Sometimes busy isn’t really a choice though, and sometimes we have to endure a season of busy before we can move on to the next thing. For us this is a season of busy but I’m choosing to call it something different. Instead of busy, I’ve decided that full is a more fitting word to describe where we are right now. It doesn’t carry with it the frenetic feeling of overwhelm. Instead, full gives an accurate description without having that prideful “badge of honor” quality that the word “busy” can give off.

Life has been so very full lately you guys. Full in every sense of the word.

Simple Beef Tacos by thiswildseason.com -2 Simple Beef Tacos by thiswildseason.com -3 Simple Beef Tacos by thiswildseason.com -4 Simple Beef Tacos by thiswildseason.com -5

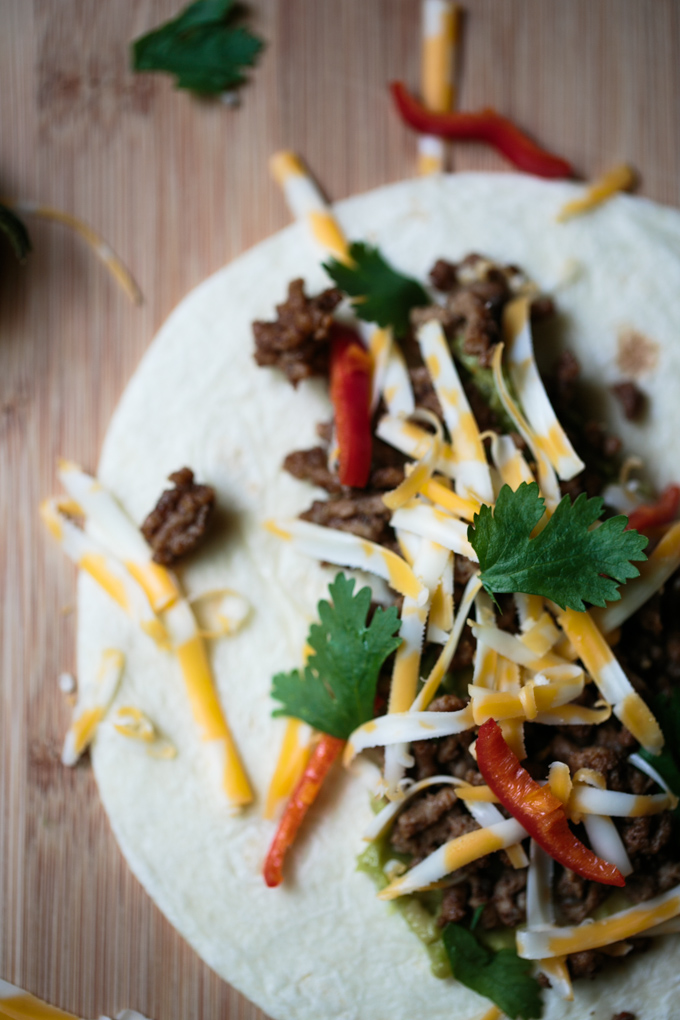
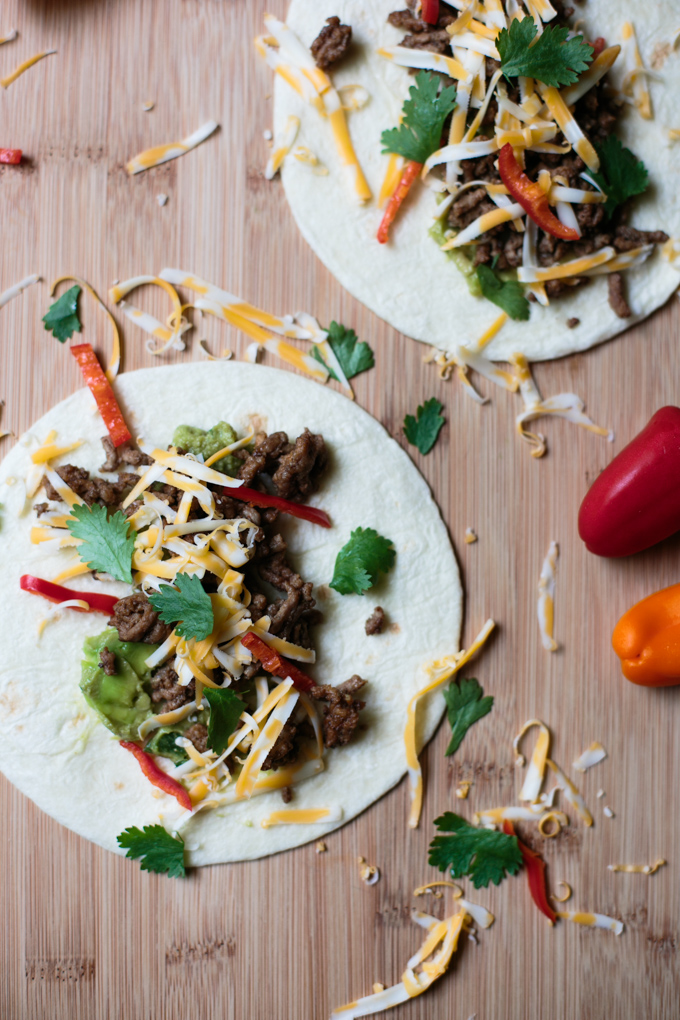
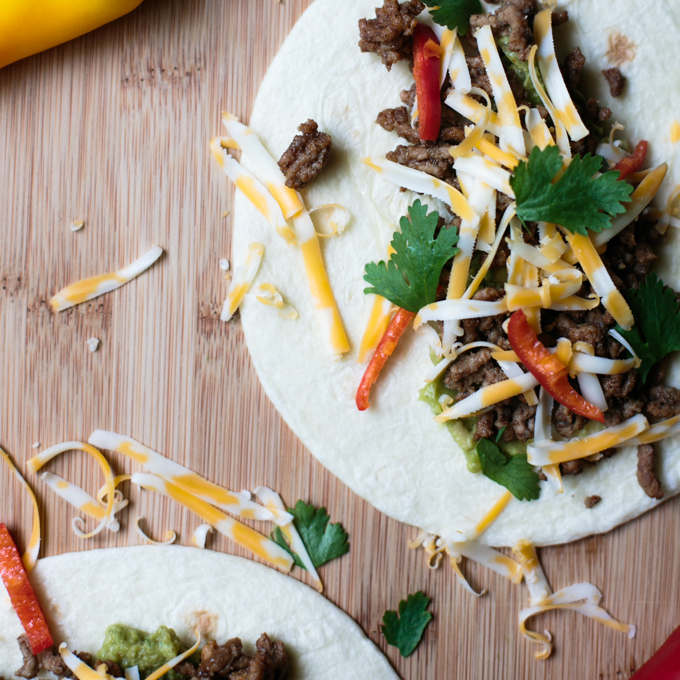
In the midst of this life-feeling-full-ness, I had to sit down and write this post for you guys. I’ve had the photos ready for weeks now, and the recipe is really the perfect one for a post about life feeling full. It’s super simple and great for a quick and delicious week night dinner, when you just can’t muster making an extravagant meal. You can even pat yourself on the back for taking one extra step to your taco-making by mixing the spices yourself. No need to buy a pre-made packet of who-knows-what to mix into your ground beef for tacos anymore. Enjoy!

Asharae Kroll

Simple Beef Tacos

Print Recipe Pin Recipe
Cook Time 20 minutes mins
Total Time 20 minutes mins
Servings: 4
Ingredients Method

Ingredients
  

  • 1 lb ground beef
  • 1/3 c water
  • 1/4 tsp cornstarch optional
  • 1/4 tsp kosher salt
  • 1/2 tsp cumin
  • 1/2 tsp chili powder
  • Dash of onion powder
  • Dash of paprika
  • Dash of cayenne more to add more heat

Method
 

  1. Brown the ground beef over medium heat. (Optional - whisk the corn starch into the water) Combine all spices in a small bowl while the meat is browning.
  2. Drain the ground beef, place it back in the pan, add water mixture and all spices to the pan.
  3. Simmer over medium low for a few more minutes, until most of the water has evaporated and the sauce has thickened slightly.
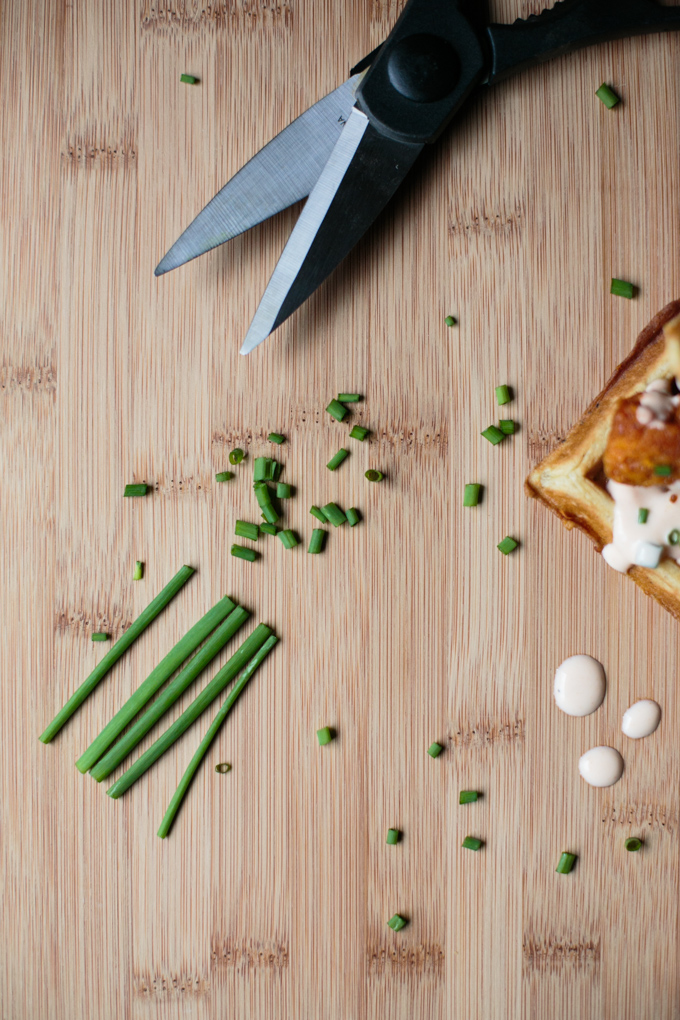
  4. Serve in tortillas with your favorite taco toppings!


Filed Under: Main Course

Guest Post by Lauren Lee: Fresh Spring Pea Soup With Crème Fraiche & Garlic Croutons

March 19, 2015 by Asharae Leave a Comment

I’m so excited to have one of my dear friends share a fantastic springtime recipe here today! I have looked up to Lauren for a long time for her confidence in the kitchen, her love of cooking and sharing meals with others, and her fabulous restaurant recommendations. Our stories overlap back and forth, starting before she was even in college when we worked at the same camp together, extending to shooting her wedding a couple years ago, with a whole lot in between!

You might remember that I mentioned her family in a post last summer on stovetop popcorn – they get complete credit for inspiring me to learn how to make it!

I absolutely love that Lauren and her husband have ended up in North Carolina, not too far from us. If you’re ever in the Chapel Hill area and need a good restaurant suggestion, Lauren is the person to talk to!

I can attest that this soup is totally fresh and delicious. It’s perfect for these days lately that have been hinting at spring, but still get chilly in the evenings.

Without further ado, I’ll hand it over to Lauren!

Spring has arrived in North Carolina! It’s hard to believe that just three short weeks ago there were several inches of snow on the ground.

In honor of spring, I would like to share a recipe for Fresh Spring Pea Soup. I know that peas can get a bad rap, but this soup is amazingly flavorful, healthy, and shockingly green! It’s also a bit impressive when serving it to friends, but super simple (and quick) to make.

The origin of this soup comes from my favorite chef- Ina Garten, also known as The Barefoot Contessa. I love Ina for her classic and “Foolproof” recipes, and of course for her love of Paris. Paris and recipes aside, I believe my (more than minor) infatuation* with The Barefoot Contessa comes from the way that her food unites my family as we live states apart.

Every week my sister (Chelsy), my mom, and I share food stories over the phone. For me, the joy of making a great meal is only multiplied when I am able to share the details with them. Although we can’t physically sit down to eat dinner together, we love poring over recipes and meal ideas, laughing & learning from each other’s cooking fails, and celebrating successful dinners together.

I can’t quite remember if it was my sister or my mom who sent me this recipe the first time, but we’ve all made it at some point, and have decided to put it in our arsenal of good soup recipes. I hope you enjoy making & eating it, and that you find yourself sharing it with your favorite foodie friend.

*Chelsy and I have (somewhat jokingly) dreamed of going to the Hamptons to stalk Ina at her gorgeous home 🙂

Fresh Spring Pea Soup at thiswildseason.com -2 Fresh Spring Pea Soup at thiswildseason.com -3 Fresh Spring Pea Soup at thiswildseason.com -4 Fresh Spring Pea Soup at thiswildseason.com -5

Adapted from Ina Garten

Fresh Spring Pea Soup With Crème Fraiche & Garlic Croutons

Print Recipe Pin Recipe
Prep Time 15 minutes mins
Cook Time 20 minutes mins
Total Time 35 minutes mins
Servings: 4 -6
Ingredients Method

Ingredients
  

  • 2 tablespoons unsalted butter
  • 2 cups chopped leeks white and light green parts (about 2-3 leeks) (Asharae's note - if you're unfamiliar with leeks, fear not! They're easy to use - be sure to check out this video on how to clean your leeks before you get started!)
  • 1 cup chopped yellow onion
  • 4 cups chicken stock homemade or store-bought
  • 2 10-ounce packages frozen peas (the freezing process locks in freshness)
  • 2/3 cup chopped fresh mint leaves
  • 2 teaspoons kosher salt
  • 1 teaspoon freshly ground black pepper
  • ½ cup crème fraiche
  • ½ cup chopped fresh chives
  • Garlic croutons for topping (see recipe below)

Method
 

  1. Melt the butter in a large saucepan.
  2. Add the leeks and onion. Cook on medium-low heat for 5 to 10 minutes until the onion is tender.
  3. Add the chicken stock, and turn the heat to high to bring it to a boil.
  4. Add the peas and cook for about 3 minutes, or until the peas are tender.
  5. Turn off the heat, and add the mint, salt, and pepper. Stir to combine.
  6. Next is the fun part- Pureeing the soup until smooth. As Asharae has mentioned in her previous posts, the immersion blender is a great tool for soups like this. If you don’t have an immersion blender, you can use your regular blender or food processor to puree the soup until smooth. Just be careful when transferring the extremely hot liquid.
  7. Whisk in the crème fraiche and chives and add more salt and pepper to your preference.
  8. Serve hot with garlic croutons, a tiny dollop of crème fraiche, a sprinkle of snipped chives, and a drizzle of olive oil.

Asharae’s Note: If you’re looking for the immersion blender I recommend, check out this one. I seriously use it all the time.


Adapted from Martha Stewart

Garlic Croutons

Print Recipe Pin Recipe
Prep Time 5 minutes mins
Cook Time 15 minutes mins
Total Time 20 minutes mins
Ingredients Method Notes

Ingredients
  

  • ½ loaf of crunchy bakery bread my favorite is a rustic Italian or French loaf, and day or two old works great
  • 2 tablespoons chopped garlic
  • 2-4 tablespoons olive oil
  • Kosher salt and freshly ground black pepper

Method
 

  1. Heat your oven to 400 degrees.
  2. (You can make croutons in a skillet on the stove or in the oven. If making on the stove, read more about that method here.)
  3. Cut the bread into cubes. I never make mine look perfect- always going for that easy, rustic feel.
  4. Toss the bread cubes in a large bowl with a generous amount of olive oil (I tend to use a lot). Then add the garlic, a heavy pinch of salt, and several cracks of pepper to the bowl and mix it all together.
  5. Spread your croutons on a foil lined rimmed baking sheet (rimmed sheets are great for keeping these little guys from slipping off the pan, and foil makes the clean-up process way easier). You want them spread out and not too crowded.
  6. Bake for about 10-15 minutes until golden brown and crunchy. You will want to give them a good stir or shake about half way through to get all of the sides browned.
  7. Set aside to cool while you make your soup.

Notes

These babies are also awesome on salads (often with a bit of parm melted on them)

This post contains affiliate links, but all opinions are my own.

Filed Under: Guest Posts, Main Course Tagged With: comfort food, easy recipe, Guest Post, shared meals, simple recipe, soup

Roasted Winter Veggies and Israeli Couscous

February 26, 2015 by Asharae Leave a Comment

Today we’re snuggled up in our house, trying to avoid taking part in anything pertaining to the outdoors. Last night we had a big storm come through, but the promised 8-10 inches of snow simply didn’t happen at our house. Our yard is a slushy muddy mess at the moment, and I confess I’m jealous of all our friends posting photos that look like Narnia.

One big snowfall. That’s all I ask of winter in North Carolina. Until then, I’m going to stay holed up in my house, pretending spring is just around the corner. Last week I shared a blood orange strawberry limeade that’s perfect for warding off the winter blues! This week I wanted to share one of my new favorite dinner recipes that’s great for all the same reasons.

Between the Israeli couscous, the vinaigrette, and the fresh veggies, this meal is a light alternative to the hearty, filling dishes I typically think of for winter meals. Since all the veggies I included in this recipe are still in season, they’ll be cheaper at the store and they’ll taste better than veggies that come into season later in the year!

Roasted Winter Veggies and Israeli Cous Cous Bowl by thiswildseason.com -2 Roasted Winter Veggies and Israeli Cous Cous Bowl by thiswildseason.com -3 Roasted Winter Veggies and Israeli Cous Cous Bowl by thiswildseason.com -4 Roasted Winter Veggies and Israeli Cous Cous Bowl by thiswildseason.com -5

I was inspired by several sources while coming up this recipe. Be sure to check each of these out for even more delicious winter recipe ideas!

Winter Buckwheat + Shaved Brussels Sprouts Bowl by Dolly and Oatmeal // Winter’s Bounty Buddah Bowl by Vegenista’s Kitchen // Winter Pasta Salad by Victoria McGinley

The idea for the vinaigrette also came from a couple places: Shaved Root Vegetable Salad with Goat Cheese and Hazelnuts by Salt & Wind // Basic Vinaigrette by Shauna Niequist in her book Bread & Wine

Roasted Winter Veggies and Israeli Couscous

Print Recipe Pin Recipe
Ingredients Method

Ingredients
  

Couscous and Veggies
  • 1 1/4 c of israeli couscous I used this couscous from World Market
  • 3 medium carrots washed, peeled, sliced into rounds
  • 1 turnip washed, peeled, diced
  • 8 oz brussels sprouts outer leaves removed, ends trimmed, quartered
  • 2-3 leaves kale finely chopped
  • Shelled pistachios or sliced almonds for garnish
Vinaigrette
  • 1/4 c white balsamic vinegar
  • 2 tsp dijon mustard
  • 1 tsp maple syrup
  • 1/4 tsp salt
  • 1/8 tsp pepper
  • 1/2 c olive oil

Method
 

  1. Preheat oven to 400 degrees F
  2. Combine all vinaigrette ingredients except olive oil in a small jar with a lid. Cover with lid and shake to combine. Add olive oil, cover again, and shake to combine. Set aside.
  3. Heat a pot of water for the couscous (follow the package instructions - my couscous called for 1 3/4 c water to 1 1/4 c couscous). While the water is heating, chop your veggies. Cook your Israeli couscous according to the package instructions.
  4. Toss sliced carrots and diced turnips on a rimmed baking sheet, drizzle with 1-2 Tbs olive oil, toss to combine, sprinkle with salt and pepper and roast in 400 degree oven for 10 minutes. Remove from oven, flip veggies with a spatula, and roast 5 more minutes.
  5. Toss cleaned, chopped brussels sprouts in 1 Tbs of olive oil. Remove veggies from the oven, add brussels sprouts to the pan, roast for 5 more minutes. Chop the kale while you're waiting. Add kale to the pan, sprinkle with salt and pepper if desired, and roast the veggies one final time for 5-10 minutes, until kale is slightly crispy.
  6. Combine veggies and cooked Israeli couscous in a large bowl, toss to combine. Serve with vinaigrette on the side so each person can add the amount they like. Garnish with almonds or pistachios if you wish!

This post contains affiliate links, but all opinions are my own.

Filed Under: Main Course Tagged With: easy recipe, roasted vegetables, salad dressing, simple recipe, vegetarian, vinaigrette

Chicken n Waffles with a Spicy Sweet Sriracha Maple Sauce

January 17, 2015 by Asharae 1 Comment

So we’re a couple weeks into 2015 – how are those New Year’s resolutions going? Meh? Mine too. Well, actually – I didn’t really make a resolution, so I suppose mine are going great!! But really, I’ve been finding myself teetering between wanting to eat super healthy foods and drink lots of water all day, to wanting to cozy up on the couch and stuff copious amounts of these cookies into my face.

This recipe was born out of that tension. The day I came up with this idea, I desperately wanted to have chicken and waffles – oh fried chickeny goodness! But I also didn’t particularly want all the grease that tends to accompany all that deliciousness. So I found this fantastic oven-fried chicken recipe over on The Recipe Rebel and proceeded to half it and adjust it to give it a little more crunch.

I started to run with the idea of a sweet/salty/spicy combination for this recipe and sought out a waffle recipe that would be a good base for that. We had some extra buttermilk leftover in the fridge (from a recipe I’ll share soon!) so I figured I should use it to make buttermilk waffles…as one does. (This was literally the first time I’ve ever bought buttermilk – if you don’t have any, just add 1 Tbs lemon juice or vinegar to 1 cup of milk and let sit for 5-10 minutes before using.) I found this delicious-looking recipe for bacon, cheddar, green onion waffles over on The Candid Appetite. Don’t those waffles sound incredible?? Well, I didn’t have any bacon on-hand. Or green onions. And I was too hungry for chicken and waffles to make a special trip to the store. Don’t worry, we’re going to make up for lack-of-bacon with our sauce!

I really wanted this recipe to have a kick to it – that’s where the Sriracha and jalapeño come in! While your chicken is baking in the oven, you can whip up this spicy sweet Sriracha maple yogurt sauce to drizzle over your chicken and waffles. If you’re not a fan of spicy food, leave out the jalapeño and take it easy on the Sriracha. The yogurt helps cool down the flavor a bit, so don’t be scared! Adjust the flavors to whatever your taste buds prefer!

Chicken N Waffles - thiswildseason.com -2 Chicken N Waffles - thiswildseason.com -3 Chicken N Waffles - thiswildseason.com -4 Chicken N Waffles - thiswildseason.com -5 Chicken N Waffles - thiswildseason.com -6

Chicken n Waffles with a Spicy Sweet Sriracha Maple Sauce

Print Recipe Pin Recipe
Servings: 2
Ingredients Method Notes

Ingredients
  

Chicken (Adapted from Recipe Rebel)
  • 2 chicken breasts cut into strips
  • 3 Tbs butter
  • 1/4 c flour
  • 1/4 c panko
  • 1/4 tsp salt
  • 1/2 Tbs seasoning salt I used this recipe to make my own. You can also use something like Lawry's seasoning salt
  • 1/4 tsp pepper
  • 1 tsp paprika
Waffles (Adapted from The Candid Appetite)
  • 1 c flour
  • 2 Tbs light brown sugar
  • 1/2 tsp baking soda
  • 3/4 tsp baking powder
  • 1/4 tsp salt
  • 1 tsp pepper
  • 3 eggs at room temperature
  • 2.5 Tbs butter melted and cooled
  • 1 c buttermilk at room temperature
  • 1/2 c cheddar cheese shredded (or cut into tiny chunks)
Sauce
  • 1/2 c plain Greek yogurt
  • 1/2 Tbs Sriracha
  • 1 Tbs + 1 tsp real maple syrup
  • 1 jalapeño diced and seeded
  • Salt and pepper to taste
Garnish
  • Chives

Method
 

Chicken
  1. Heat oven to 400F. Melt butter on a rimmed baking sheet in the oven. Keep watch on it and remove from the oven once it has melted.
  2. Combine flour, panko, salt, seasoning salt, pepper, and paprika in a large ziplock bag. Add sliced chicken and shake to coat the chicken. Place on buttered baking sheet and bake 10-12 minutes. Remove from oven, flip chicken, and bake another 10-12 min. (My chicken slices were fairly thin, so I only baked them 5 additional minutes.) Remove from the oven and let rest once finished. Lower the oven temperature to 200 degrees.
Waffles
  1. Combine flour, brown sugar, baking soda, baking powder, salt, and pepper. Make a well in the center.
  2. Crack the eggs in a separate bowl, whisk together, and pour into the flour mixture. Add butter and buttermilk and stir together to combine. Fold in the cheddar cheese.
  3. Depending on the size of your waffle maker, cooking time will vary. Lightly grease your waffle maker before pouring batter in. I used a 1/3 c measurement to scoop the batter in and that made the perfect size waffles. Remove waffles when golden.
Sauce
  1. Combine all ingredients in a small bowl and keep in fridge until ready to serve
To serve
  1. Once the oven temperature has lowered to 200F, you can keep the chicken and waffles in the oven to keep them warm for a few minutes till you're ready to serve them.
  2. Top each waffle with chicken, spicy sweet sauce, and chives. Serve as an open-face sandwich or top with another waffle for a full sandwich.

Notes

Update - After making this recipe a few more times, we've found that we like our waffles to have a bit more crunch to them. We pop them in the toaster right before serving to ensure they're warm and create a slightly crunchy exterior.


Filed Under: Main Course Tagged With: comfort food, savory, sweet

  • « Previous Page
  • 1
  • 2
  • 3
  • 4
  • …
  • 6
  • Next Page »

Hello there!

My name is Asharae. I’m a photographer by trade, wife to an amazing man, and mama to three little ones. I am passionate about creating good food, sharing meaningful conversation around the table, trying new things, and encouraging others to do the same.

Welcome to This Wild Season! This is a place for sharing what I’m learning in the kitchen and outside of it. Most of all, it is a challenge to myself and to you to slow down, be present in the moment, and re-learn how to savor food and conversation around the table.

About

Search

Connect

  • Facebook
  • Instagram
  • Pinterest
  • Twitter
  • Vimeo

Find my book on Amazon:

Recent Posts

  • Emmeline’s Birth Story, The Story of Her Name
  • Emmeline’s Birth Story, Birth Day Part 2
  • Emmeline’s Birth Story, Birth Day Part 1
  • Emmeline’s Birth Story, My Pregnancy
  • Emmeline’s Birth Story, An Introduction
Follow on Bloglovin
Visit This Wild Season's profile on Pinterest.

Copyright © 2026 · Foodie Child Theme by Shay Bocks · Built on the Genesis Framework · Powered by WordPress