This Wild Season

Sharing what I'm learning in the kitchen as well as outside of it.

Navigation
  • Home
  • Blog
  • Recipes
    • Appetizer
    • Breakfast/Brunch
    • Side Dish
    • Main Course
    • Dessert
    • Drinks
    • Personal
  • About

Guest Post by Lauren Lee: Fresh Spring Pea Soup With Crème Fraiche & Garlic Croutons

March 19, 2015 by Asharae Leave a Comment

I’m so excited to have one of my dear friends share a fantastic springtime recipe here today! I have looked up to Lauren for a long time for her confidence in the kitchen, her love of cooking and sharing meals with others, and her fabulous restaurant recommendations. Our stories overlap back and forth, starting before she was even in college when we worked at the same camp together, extending to shooting her wedding a couple years ago, with a whole lot in between!

You might remember that I mentioned her family in a post last summer on stovetop popcorn – they get complete credit for inspiring me to learn how to make it!

I absolutely love that Lauren and her husband have ended up in North Carolina, not too far from us. If you’re ever in the Chapel Hill area and need a good restaurant suggestion, Lauren is the person to talk to!

I can attest that this soup is totally fresh and delicious. It’s perfect for these days lately that have been hinting at spring, but still get chilly in the evenings.

Without further ado, I’ll hand it over to Lauren!

Spring has arrived in North Carolina! It’s hard to believe that just three short weeks ago there were several inches of snow on the ground.

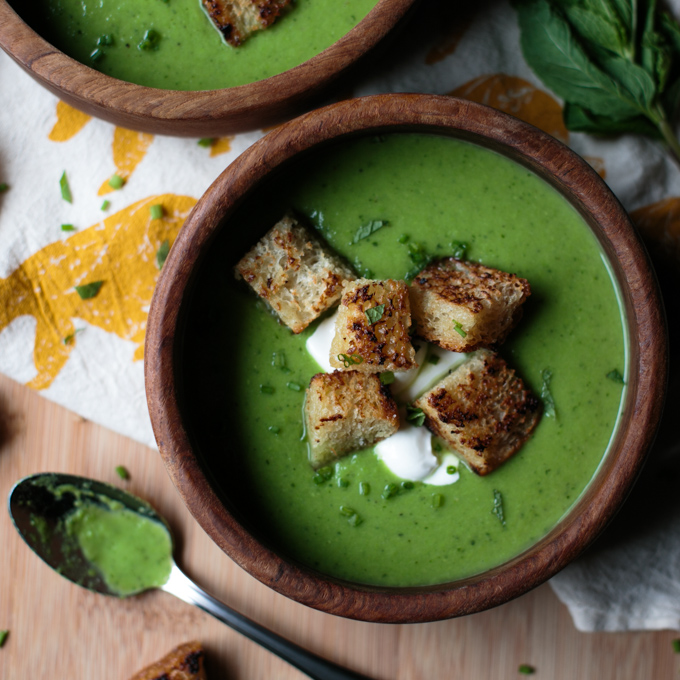
In honor of spring, I would like to share a recipe for Fresh Spring Pea Soup. I know that peas can get a bad rap, but this soup is amazingly flavorful, healthy, and shockingly green! It’s also a bit impressive when serving it to friends, but super simple (and quick) to make.

The origin of this soup comes from my favorite chef- Ina Garten, also known as The Barefoot Contessa. I love Ina for her classic and “Foolproof” recipes, and of course for her love of Paris. Paris and recipes aside, I believe my (more than minor) infatuation* with The Barefoot Contessa comes from the way that her food unites my family as we live states apart.

Every week my sister (Chelsy), my mom, and I share food stories over the phone. For me, the joy of making a great meal is only multiplied when I am able to share the details with them. Although we can’t physically sit down to eat dinner together, we love poring over recipes and meal ideas, laughing & learning from each other’s cooking fails, and celebrating successful dinners together.

I can’t quite remember if it was my sister or my mom who sent me this recipe the first time, but we’ve all made it at some point, and have decided to put it in our arsenal of good soup recipes. I hope you enjoy making & eating it, and that you find yourself sharing it with your favorite foodie friend.

*Chelsy and I have (somewhat jokingly) dreamed of going to the Hamptons to stalk Ina at her gorgeous home 🙂

Fresh Spring Pea Soup at thiswildseason.com -2 Fresh Spring Pea Soup at thiswildseason.com -3 Fresh Spring Pea Soup at thiswildseason.com -4 Fresh Spring Pea Soup at thiswildseason.com -5

Fresh Spring Pea Soup With Crème Fraiche & Garlic Croutons

Adapted from Ina Garten
Print Recipe Pin Recipe
Prep Time 15 mins
Cook Time 20 mins
Total Time 35 mins
Servings 4 -6

Ingredients
  

  • 2 tablespoons unsalted butter
  • 2 cups chopped leeks white and light green parts (about 2-3 leeks) (Asharae's note - if you're unfamiliar with leeks, fear not! They're easy to use - be sure to check out this video on how to clean your leeks before you get started!)
  • 1 cup chopped yellow onion
  • 4 cups chicken stock homemade or store-bought
  • 2 10-ounce packages frozen peas (the freezing process locks in freshness)
  • 2/3 cup chopped fresh mint leaves
  • 2 teaspoons kosher salt
  • 1 teaspoon freshly ground black pepper
  • ½ cup crème fraiche
  • ½ cup chopped fresh chives
  • Garlic croutons for topping (see recipe below)

Instructions
 

  • Melt the butter in a large saucepan.
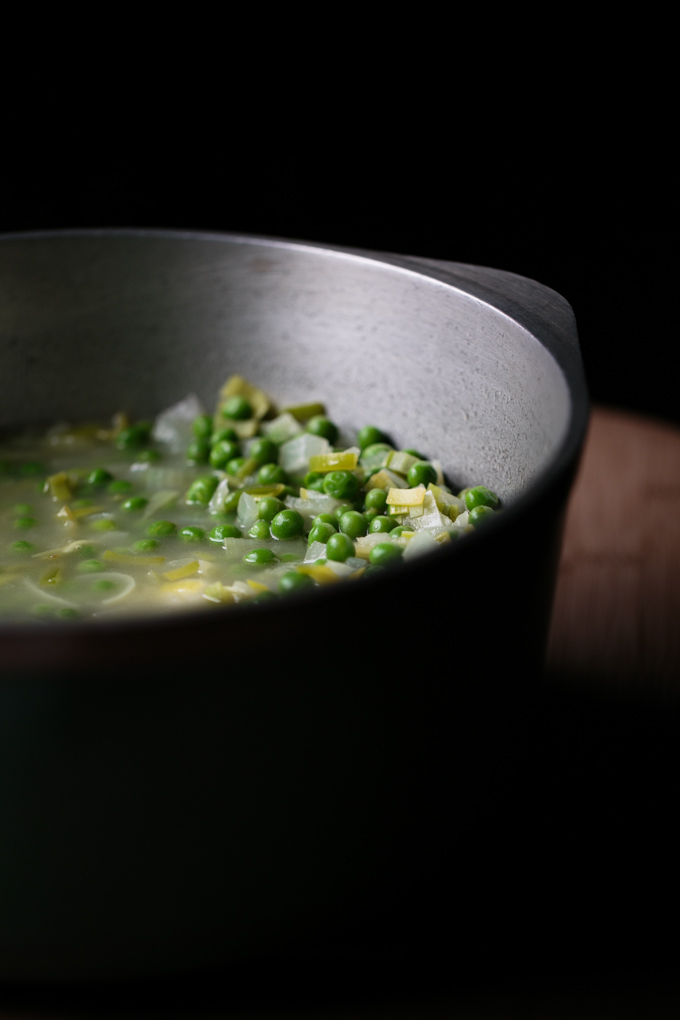
  • Add the leeks and onion. Cook on medium-low heat for 5 to 10 minutes until the onion is tender.
  • Add the chicken stock, and turn the heat to high to bring it to a boil.
  • Add the peas and cook for about 3 minutes, or until the peas are tender.
  • Turn off the heat, and add the mint, salt, and pepper. Stir to combine.
  • Next is the fun part- Pureeing the soup until smooth. As Asharae has mentioned in her previous posts, the immersion blender is a great tool for soups like this. If you don’t have an immersion blender, you can use your regular blender or food processor to puree the soup until smooth. Just be careful when transferring the extremely hot liquid.
  • Whisk in the crème fraiche and chives and add more salt and pepper to your preference.
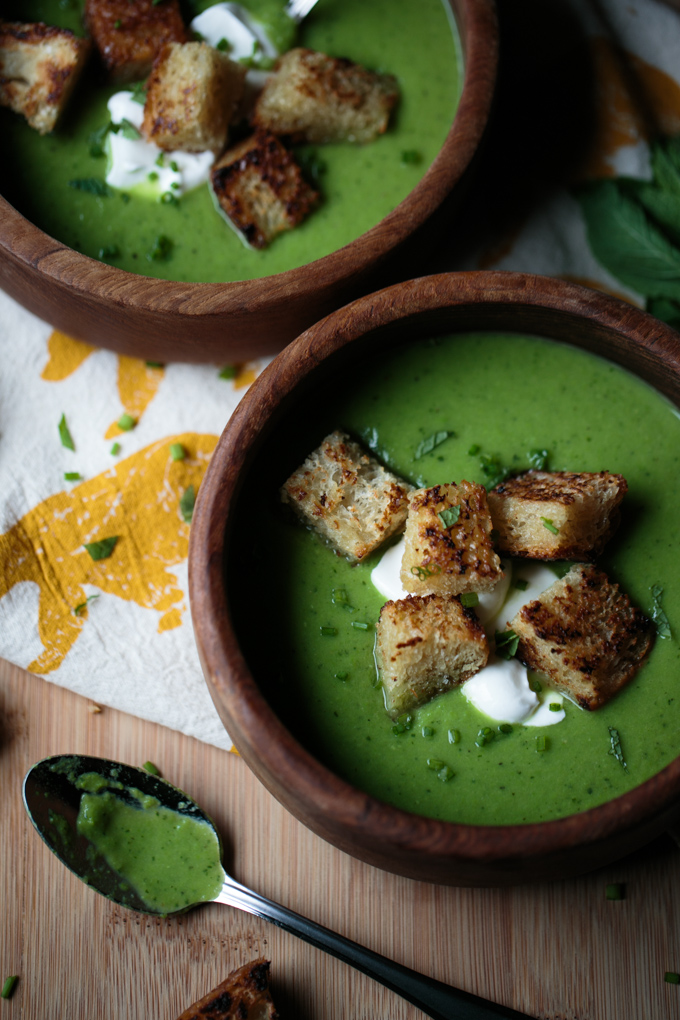
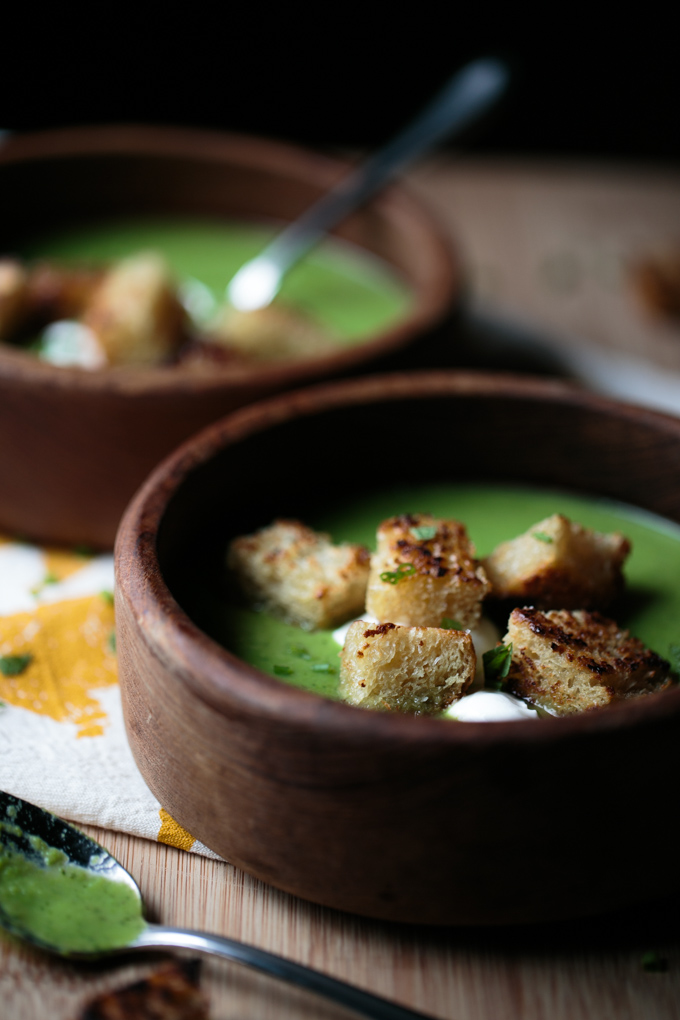
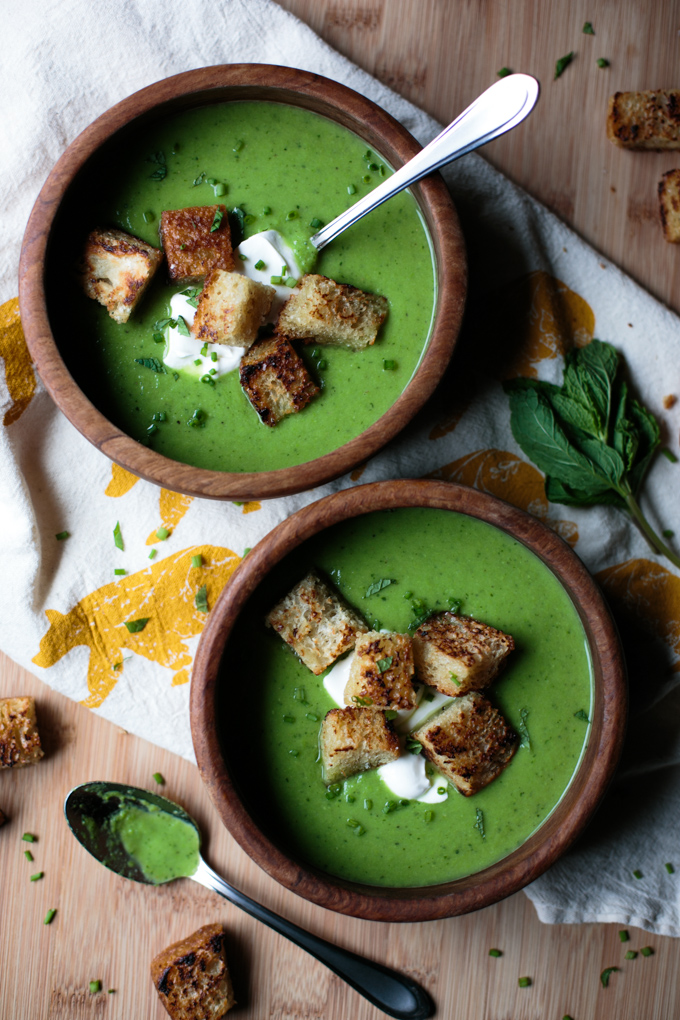
  • Serve hot with garlic croutons, a tiny dollop of crème fraiche, a sprinkle of snipped chives, and a drizzle of olive oil.

Asharae’s Note: If you’re looking for the immersion blender I recommend, check out this one. I seriously use it all the time.


Garlic Croutons

Adapted from Martha Stewart
Print Recipe Pin Recipe
Prep Time 5 mins
Cook Time 15 mins
Total Time 20 mins

Ingredients
  

  • ½ loaf of crunchy bakery bread my favorite is a rustic Italian or French loaf, and day or two old works great
  • 2 tablespoons chopped garlic
  • 2-4 tablespoons olive oil
  • Kosher salt and freshly ground black pepper

Instructions
 

  • Heat your oven to 400 degrees.
  • (You can make croutons in a skillet on the stove or in the oven. If making on the stove, read more about that method here.)
  • Cut the bread into cubes. I never make mine look perfect- always going for that easy, rustic feel.
  • Toss the bread cubes in a large bowl with a generous amount of olive oil (I tend to use a lot). Then add the garlic, a heavy pinch of salt, and several cracks of pepper to the bowl and mix it all together.
  • Spread your croutons on a foil lined rimmed baking sheet (rimmed sheets are great for keeping these little guys from slipping off the pan, and foil makes the clean-up process way easier). You want them spread out and not too crowded.
  • Bake for about 10-15 minutes until golden brown and crunchy. You will want to give them a good stir or shake about half way through to get all of the sides browned.
  • Set aside to cool while you make your soup.

Notes

These babies are also awesome on salads (often with a bit of parm melted on them)

This post contains affiliate links, but all opinions are my own.

Filed Under: Guest Posts, Main Course Tagged With: comfort food, easy recipe, Guest Post, shared meals, simple recipe, soup

Simple Granola

March 5, 2015 by Asharae Leave a Comment

Do you ever stand in the cereal aisle, lusting over the boxes of granola, wondering to yourself, “Why are those boxes so tiny? And why on earth are they so expensive??” Me too, my friend. Me too.

Making your own granola really isn’t difficult at all. I’ve adapted this recipe from Deb Perelman’s The Smitten Kitchen Cookbook – she’s already done the hard work of perfecting the granola crunch, sweetness ratios, and all that. I just simplified it a bit further by only using what I had on-hand. She uses a 1/4 c of wheat germ in her recipe, and I’ve yet to find it at our local grocery store – so mine has no wheat germ. Feel free to add it back in if you like! I also added a bit of nutmeg and let the nuts be an optional addition. If I’ve got some on-hand, I’ll add them. But this granola is still delicious without!

I remember when my mom would make granola it always seemed to be a big production – huge bowls of ingredients, multiple pans in the oven at a time, and all that stirring. So much stirring.

For this recipe you just need one bowl (okay two actually), one pan, and you only have to stir the granola once in the middle of baking. Super simple. And delicious. Enjoy.

Simple Granola by thiswildseason.com -2 Simple Granola by thiswildseason.com -3 Simple Granola by thiswildseason.com -4 Simple Granola by thiswildseason.com -5 Simple Granola by thiswildseason.com -6 Simple Granola by thiswildseason.com -7 Simple Granola by thiswildseason.com -8 Simple Granola by thiswildseason.com -9 Simple Granola by thiswildseason.com -10


Simple Granola

Adapted from Deb Perelman
Print Recipe Pin Recipe
Prep Time 10 mins
Cook Time 45 mins
Total Time 55 mins

Ingredients
  

  • 3 c old fashioned rolled oats
  • 1 c sweetened shredded coconut
  • 1 c walnuts optional
  • 1/4 tsp ground cinnamon
  • Dash of nutmeg
  • 1/2 tsp coarse salt
  • 2 Tbs olive oil
  • 1/2 c real maple syrup
  • 1 large egg white

Instructions
 

  • Preheat oven to 300 F.
  • Stir together oats, coconut, walnuts (optional), cinnamon, nutmeg, and salt.
  • Add olive oil and maple syrup to oat mixture, stir together.
  • Whisk egg white in a small bowl until frothy. Add to oat mixture and stir well to combine.
  • Spread oat mixture on a parchment-lined rimmed baking sheet.
  • Bake for 20 minutes, remove from oven and use a spatula to turn granola, being careful not to break the pieces too much. Bake for 25-30 more minutes, or until granola is brown and toasted.
  • Let granola cool completely on the pan. Move to an airtight container and store up to two weeks.
  • Serve with milk, over ice cream, or sprinkled over plain Greek yogurt with a drizzle of honey and some dried cranberries - that's my favorite!

Notes

If you're wondering what to do with the egg yolk you're left with after making this granola, you could always make these cookies! They call for one egg and one egg yolk.


Filed Under: Breakfast/Brunch Tagged With: breakfast recipe, brunch recipe, easy recipe, simple recipe

Roasted Winter Veggies and Israeli Couscous

February 26, 2015 by Asharae Leave a Comment

Today we’re snuggled up in our house, trying to avoid taking part in anything pertaining to the outdoors. Last night we had a big storm come through, but the promised 8-10 inches of snow simply didn’t happen at our house. Our yard is a slushy muddy mess at the moment, and I confess I’m jealous of all our friends posting photos that look like Narnia.

One big snowfall. That’s all I ask of winter in North Carolina. Until then, I’m going to stay holed up in my house, pretending spring is just around the corner. Last week I shared a blood orange strawberry limeade that’s perfect for warding off the winter blues! This week I wanted to share one of my new favorite dinner recipes that’s great for all the same reasons.

Between the Israeli couscous, the vinaigrette, and the fresh veggies, this meal is a light alternative to the hearty, filling dishes I typically think of for winter meals. Since all the veggies I included in this recipe are still in season, they’ll be cheaper at the store and they’ll taste better than veggies that come into season later in the year!

Roasted Winter Veggies and Israeli Cous Cous Bowl by thiswildseason.com -2 Roasted Winter Veggies and Israeli Cous Cous Bowl by thiswildseason.com -3 Roasted Winter Veggies and Israeli Cous Cous Bowl by thiswildseason.com -4 Roasted Winter Veggies and Israeli Cous Cous Bowl by thiswildseason.com -5

I was inspired by several sources while coming up this recipe. Be sure to check each of these out for even more delicious winter recipe ideas!

Winter Buckwheat + Shaved Brussels Sprouts Bowl by Dolly and Oatmeal // Winter’s Bounty Buddah Bowl by Vegenista’s Kitchen // Winter Pasta Salad by Victoria McGinley

The idea for the vinaigrette also came from a couple places: Shaved Root Vegetable Salad with Goat Cheese and Hazelnuts by Salt & Wind // Basic Vinaigrette by Shauna Niequist in her book Bread & Wine

Roasted Winter Veggies and Israeli Couscous

Print Recipe Pin Recipe

Ingredients
  

Couscous and Veggies

  • 1 1/4 c of israeli couscous I used this couscous from World Market
  • 3 medium carrots washed, peeled, sliced into rounds
  • 1 turnip washed, peeled, diced
  • 8 oz brussels sprouts outer leaves removed, ends trimmed, quartered
  • 2-3 leaves kale finely chopped
  • Shelled pistachios or sliced almonds for garnish

Vinaigrette

  • 1/4 c white balsamic vinegar
  • 2 tsp dijon mustard
  • 1 tsp maple syrup
  • 1/4 tsp salt
  • 1/8 tsp pepper
  • 1/2 c olive oil

Instructions
 

  • Preheat oven to 400 degrees F
  • Combine all vinaigrette ingredients except olive oil in a small jar with a lid. Cover with lid and shake to combine. Add olive oil, cover again, and shake to combine. Set aside.
  • Heat a pot of water for the couscous (follow the package instructions - my couscous called for 1 3/4 c water to 1 1/4 c couscous). While the water is heating, chop your veggies. Cook your Israeli couscous according to the package instructions.
  • Toss sliced carrots and diced turnips on a rimmed baking sheet, drizzle with 1-2 Tbs olive oil, toss to combine, sprinkle with salt and pepper and roast in 400 degree oven for 10 minutes. Remove from oven, flip veggies with a spatula, and roast 5 more minutes.
  • Toss cleaned, chopped brussels sprouts in 1 Tbs of olive oil. Remove veggies from the oven, add brussels sprouts to the pan, roast for 5 more minutes. Chop the kale while you're waiting. Add kale to the pan, sprinkle with salt and pepper if desired, and roast the veggies one final time for 5-10 minutes, until kale is slightly crispy.
  • Combine veggies and cooked Israeli couscous in a large bowl, toss to combine. Serve with vinaigrette on the side so each person can add the amount they like. Garnish with almonds or pistachios if you wish!

This post contains affiliate links, but all opinions are my own.

Filed Under: Main Course Tagged With: easy recipe, roasted vegetables, salad dressing, simple recipe, vegetarian, vinaigrette

Blood Orange Strawberry Limeade

February 18, 2015 by Asharae 7 Comments

Let’s all take a moment to step away from our declarations of love for snow days, snowmen, and all things winter. And let’s pretend that warm weather is here! This limeade hits the spot if you’re feeling the winter blues – it’s beautiful and delicious and it just screams summer!

Blood oranges are still in season too – if you’ve never tried a blood orange, drop everything and go to the store. I’m not a huge fan of regular oranges – but I could eat blood oranges all day long. They only have a short season, so hop to the grocery store before they disappear!

Blood Orange Strawberry Limeade by thiswildseason.com -2 Blood Orange Strawberry Limeade by thiswildseason.com -3 Blood Orange Strawberry Limeade by thiswildseason.com -4 Blood Orange Strawberry Limeade by thiswildseason.com -5 Blood Orange Strawberry Limeade by thiswildseason.com -6

A couple notes on making this recipe even simpler! I highly recommend using a juicer like this one – it’s perfect for juicing limes and oranges and even grapefruits as it has two different sides for smaller or larger fruits. We got ours as a Christmas gift and I have been using it every chance I get!

I also tried something new for blending my ingredients together – instead of hauling out the blender and having to wash it once I was finished, I used our immersion blender to do the heavy lifting. This is genius I tell you.

Go now, and buy your own immersion blender. It’ll be the best $35 you’ve ever spent on a kitchen appliance. If you’re wondering what else you could use a blender like this for, see this smoothie recipe, blueberry lemonade, or even this butternut squash soup.

I included a range for the amount of sugar you can use for this limeade – if you want it to be more tart, use 1/4 c sugar, and if you’d rather it be sweet, use 3/4 c. I think that 1/2 c is probably the perfect amount for a limeade – not too sweet and not too tart. Adjust the flavors to suit your preferences.

Blood Orange Strawberry Limeade

Asharae Kroll
Print Recipe Pin Recipe

Ingredients
  

  • 1 c strawberries thawed if frozen
  • 1/2 c fresh squeezed blood orange juice
  • 1/4 c fresh squeezed lime juice
  • 1/4-3/4 c sugar less for a tart limeade, more to make it sweeter
  • 1 c hot water
  • 3 c cold water

Instructions
 

  • Combine strawberries, blood orange juice, lime juice, sugar, and hot water in a blender (or a pitcher and use an immersion blender to blend). Blend until strawberries are pureed and the sugar has dissolved.
  • Using a sieve to remove the pulp, strain into a large pitcher.
  • Add cold water, stir to combine, and chill at least 1 hour before serving.

This post contains affiliate links, but all opinions are my own.

Filed Under: Drinks Tagged With: drink recipe, easy drink recipe, easy recipe, juice, lemonade, limeade

  • « Previous Page
  • 1
  • 2
  • 3
  • 4
  • 5
  • …
  • 9
  • Next Page »

Hello there!

My name is Asharae. I’m a photographer by trade, wife to an amazing man, and mama to three little ones. I am passionate about creating good food, sharing meaningful conversation around the table, trying new things, and encouraging others to do the same.

Welcome to This Wild Season! This is a place for sharing what I’m learning in the kitchen and outside of it. Most of all, it is a challenge to myself and to you to slow down, be present in the moment, and re-learn how to savor food and conversation around the table.

About

Search

Connect

  • Facebook
  • Instagram
  • Pinterest
  • Twitter
  • Vimeo

Find my book on Amazon:

Recent Posts

  • Emmeline’s Birth Story, The Story of Her Name
  • Emmeline’s Birth Story, Birth Day Part 2
  • Emmeline’s Birth Story, Birth Day Part 1
  • Emmeline’s Birth Story, My Pregnancy
  • Emmeline’s Birth Story, An Introduction
Follow on Bloglovin
Visit This Wild Season's profile on Pinterest.

Copyright © 2025 · Foodie Child Theme by Shay Bocks · Built on the Genesis Framework · Powered by WordPress