This Wild Season

Sharing what I'm learning in the kitchen as well as outside of it.

Navigation
  • Home
  • Blog
  • Recipes
    • Appetizer
    • Breakfast/Brunch
    • Side Dish
    • Main Course
    • Dessert
    • Drinks
    • Personal
  • About

Simple Vegetable Soup

November 11, 2014 by Asharae 1 Comment

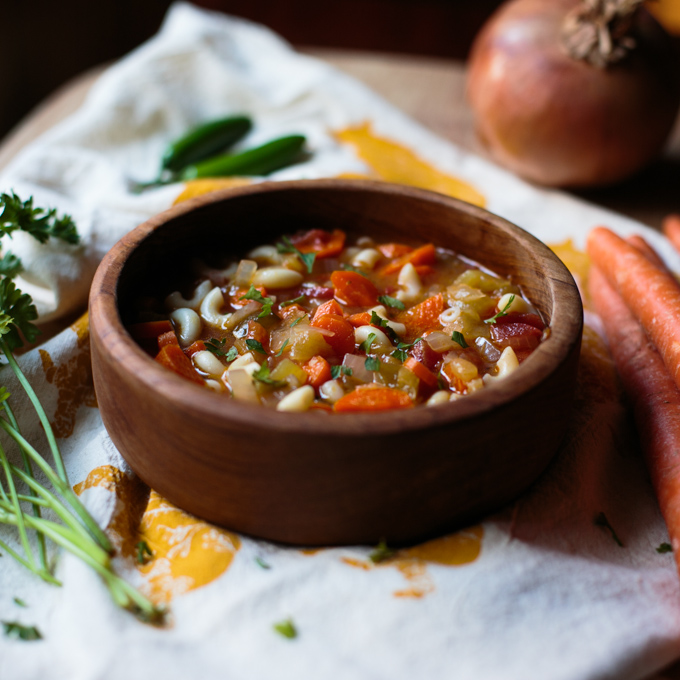
In an effort to save space, I titled this post “Simple Vegetable Soup.” What I actually scribbled down on the scrap of paper as I made the soup was – “Use-What-You-Have-In-Your-Pantry-Veggie-Soup.” I personally like that name a lot better. It’s a much better description of the story of this recipe.

Tim and I have been traveling a lot lately – between our three week road trip to three different weddings, several other short weekend trips away for weddings here in NC, and a roommate reunion with my college friends, we’ve put a lot of miles on the road lately. This means that our eating has been less than stellar. And the state of our fridge is abysmal at times. For being a go-with-the-flow kinda gal, I really love to have my meals planned out. I like shopping the menu to save money and save space in our fridge too. I’m the kind of person that wakes up thinking about dinner, and I love being able to look forward to something I know will be delicious. I think the last time we had that sort of routine was back in the summer. Or maybe late spring. It’s been a busy one.

All that being said, the other night Tim and I were wrapping up our editing for the day and looking towards dinner. It was one of those stare-at-the-fridge-hoping-something-will-appear nights. I scrounged around a bit and found we had enough ingredients in the fridge and few staples in the pantry to whip up a batch of soup. (Sidenote – I highly recommend keeping cans of beans and veggies, and a couple cartons of vegetable or chicken broth in your pantry for just such an occasion.)

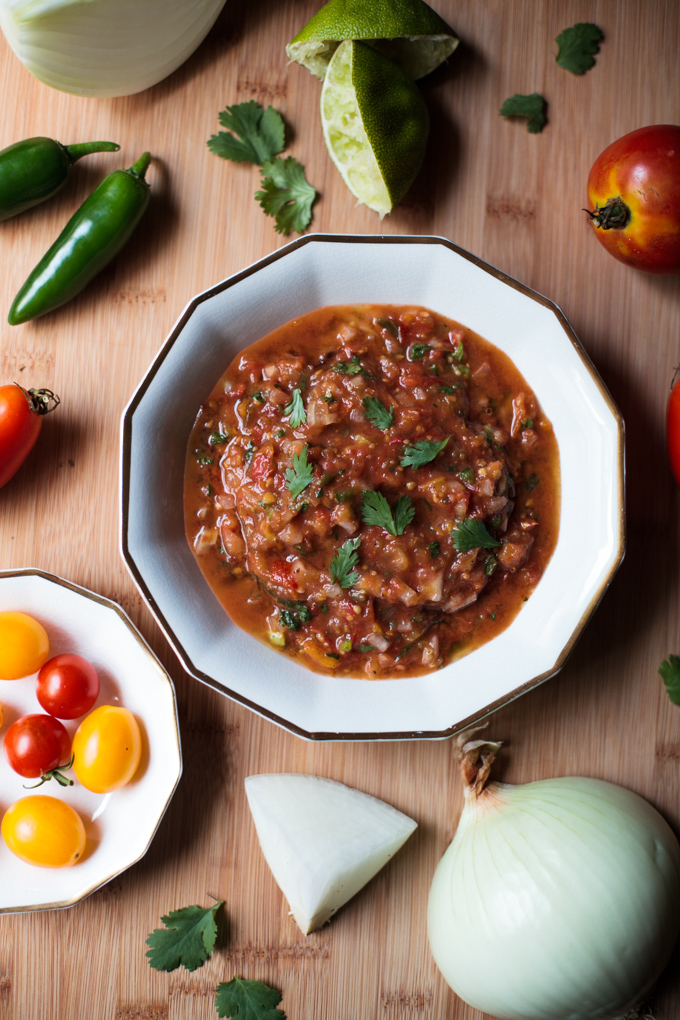
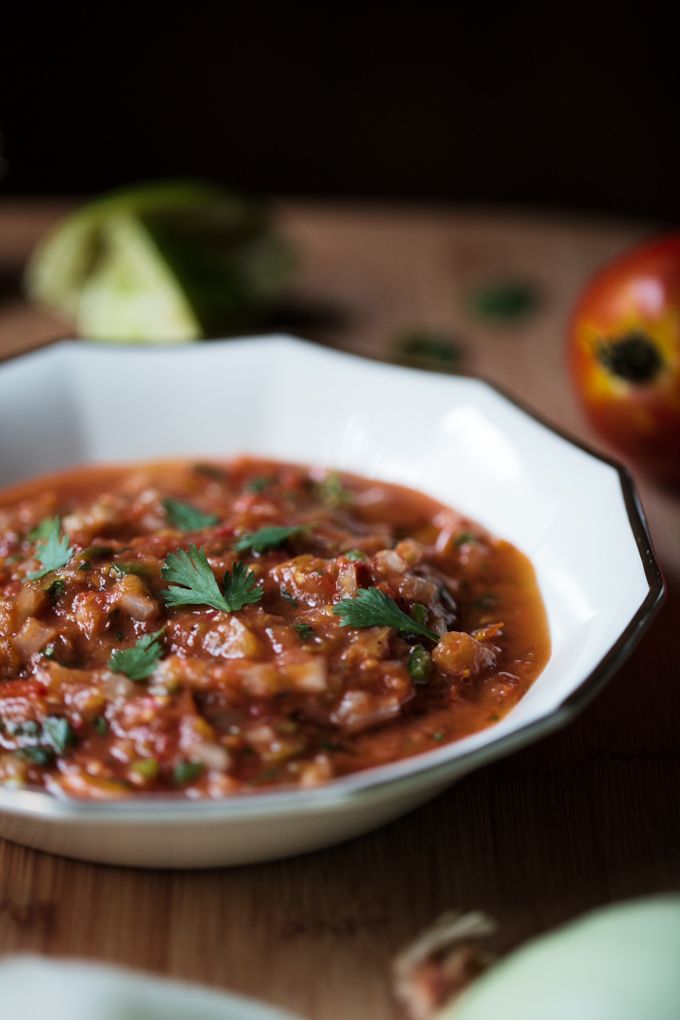
Nights are getting chillier here in NC and the sun is setting unreasonably early, so a bowl of warm soup is the perfect antidote to the dark and cold outside. And I rejoiced at how this seemingly thrown-together soup turned out – it’s hearty and delicious with just the right amount of spice. We served ours with grilled cheese on the side – so good.

Simple Vegetable Soup - thiswildseason.com -2 Simple Vegetable Soup - thiswildseason.com -3 Simple Vegetable Soup - thiswildseason.com -4

This soup has a little kick to it – you’re more than welcome to leave out the jalapeños and can of green chilies if you don’t like spicy food. I recommend adapting this recipe to whatever you have on hand. I’m sure it would be great with a can of corn, some potatoes, perhaps some celery. Feel free to add more vegetable or chicken broth (or water) if you like your soup to have more broth than veggies, just adjust your salt and pepper accordingly.

Simple Vegetable Soup

Asharae Kroll
Print Recipe Pin Recipe
Prep Time 10 mins
Cook Time 40 mins
Total Time 50 mins
Servings 4

Ingredients
  

  • 1 Tbs butter
  • 1 Tbs olive oil
  • 1 yellow onion diced
  • 4 medium carrots sliced
  • 2 jalapeños diced and seeds removed
  • 1/2 bell pepper diced (use a yellow one if you're looking to make this soup pretty)
  • 3 cloves garlic minced
  • 1 7 oz can green chilies
  • 1 15 oz can diced tomatoes with juice
  • 1 32 oz carton of chicken or vegetable broth
  • 1/2 lb pasta we used elbow pasta
  • 1/4 tsp oregano
  • Salt and pepper to taste
  • Optional: Garnish with parsley

Instructions
 

  • Cook pasta according to package directions, rinse in cold water to stop the cooking. Add 1 Tbs olive oil, stir, and set aside.
  • While the pasta is cooking, heat oil and butter in a large stock pot over medium heat. Add carrots and peppers, cook about 3 minutes. Add onion, green chilies, and jalapeños, and cook about 5 more minutes or until tender. Add garlic, cook for one minute.
  • Add broth and tomatoes and bring to a boil. Reduce heat and simmer 20-30 minutes. Add oregano, and salt and pepper to taste.
  • Place noodles in bowls, ladle soup over the top, and serve. Garnish with parsley if you wish (or if you have leftovers in your fridge like me!)
  • I store leftover soup and noodles separately so the noodles don't get too soggy in the fridge.

Flour sack towel from The High Fiber – check out more of her gorgeous work at her Etsy shop!

Simple Vegetable Soup - thiswildseason.com -5

Filed Under: Main Course Tagged With: comfort food, easy recipe, simple recipe, soup, vegetarian

Roasted Tomato Salsa

September 4, 2014 by Asharae Leave a Comment

Our garden is currently exploding with tomatoes – anyone want some? A couple weeks ago we had an abundance of cucumbers, but this week it’s tomatoes. Obviously that means I should share another salsa recipe with you. I mean, pico de gallo is great for any occasion, but if you want to put a little extra something special into your salsa, roasting your tomatoes is a great option!

Tomatillos are also coming into season, so if you’re really wanting to think outside the box, grab a few of those and add them to this recipe. And a side note – tomatillos are super easy to grow – at least in our hot southern climate. Last year we grew two tomatillo plants (you have to grow at least two so they can cross-pollinate – oh the things you learn when growing your own food!) They’re fun plants to have in your garden because the fruits grow in pretty little paper husks – once they fill the husk and start to break out of it, you know they’re ready! We still have a freezer full of tomatillos from last year, so we decided not to grow any this time around.

Speaking of an abundance of veggies – one of the things I’ve always loved about living in the country is how many people have backyard gardens, and how willing they are to share their produce. “Eating local” and “growing organic” isn’t a newfound fad around here, it’s a way of life. I remember when I was a kid we always had people from the church my dad pastors dropping off bags of tomatoes, peppers, cucumbers, and peaches on our front doorstep. Sometimes we’d look in the bag and wonder “what exactly is that vegetable?” Inevitably the mystery veggie would make its way into some soup or casserole. Another story for another day.

Recently a sweet lady in our church offered up an open invitation to my mom to stop by her house and pick pears whenever she wanted.  My mom stopped by Dixie’s house to take a few pears off her hands and called me as she was leaving, “I ended up with more fruits and veggies than I know what to do with! I’m bringing some by your house!” When she arrived she brought in a bag of pears and a bag of tomatoes and exclaimed “I’m not done yet – come help me get stuff out of the car!” Two bell peppers, three banana peppers, seven jalapeños, two honeydew, one huge watermelon, five eggplant, twenty or thirty something pears, and two ginormous bags full of tomatoes later, we’d split her bounty down the middle. All that being said – many thanks to Dixie for the gorgeous yellow tomatoes below! We used them for everything from bruschetta to pasta sauce to this delicious salsa.

Roasted Tomato Salsa - thiswildseason.com -3 Roasted Tomato Salsa - thiswildseason.com -2 Roasted Tomato Salsa - thiswildseason.com -4 Roasted Tomato Salsa - thiswildseason.com -5 Roasted Tomato Salsa - thiswildseason.com -6

Roasted Tomato Salsa

Asharae Kroll
Print Recipe Pin Recipe
Prep Time 10 mins
Cook Time 30 mins
Total Time 40 mins

Ingredients
  

  • 2-3 c of cherry tomatoes halved
  • Optional 3-4 large tomatillos, halved (6-7 if using small tomatillos like I did)
  • 2 or more jalapeños halved lengthwise and the seeds removed if you want a milder salsa
  • Juice from 1-2 large limes
  • 1/2 - 1 c loosely packed cilantro leaves
  • Salt and pepper to taste
  • 1 clove garlic minced
  • 1/4 tsp cumin
  • 3/4 medium tomatoes
  • 1/4 c white onion finely diced

Instructions
 

  • Preheat the oven to 400 degrees
  • Grease a baking sheet lined with aluminum foil and place tomatoes, tomatillos (if using), and jalapeños, cut side down on the pan. (I didn't do that for the photos, but your veggies will stick to the pan later if you do it the other way!)
  • Roast in a 400 degree oven for 15 minutes. Remove pan from oven, carefully flip all the veggies so they're now cut side up, and roast for about 15 more minutes, or until roasted and delicious looking. Keep an eye on them during the last half of roasting to be sure they don't burn - char is good, burn is bad. Let cool slightly before adding to the rest of the ingredients.
  • While the veggies are roasting, you can begin to assemble the rest of your ingredients.
  • Place roasted veggies, lime, cilantro, salt and pepper, garlic, cumin, and fresh tomatoes in a food processor or blender and blend to desired consistency. If your salsa is too thick, you can always add another tomato or two to add more juice back in. Adjust to taste.
  • For a little more texture in my salsa, I stir the onion in at the very end. If you want a smoother salsa, you're welcome to blend that in as well.

Notes

For roasting, I used a combination of Sweet 100 cherry tomatoes and yellow tomatoes from a sweet lady in our church (not sure of the variety). To add some juice back into the salsa when blending, I used a combination of Black Krim, Better Boy, and Roma tomatoes. Obviously you're welcome to use whatever variety you have on hand - the flavor and color of your salsa will vary depending on what you use.


Filed Under: Side Dish Tagged With: crowd pleaser, easy recipe, salsa, simple recipe, tomatillo

Guest Post by Tim Kroll – Focaccia / Pizza Dough

August 28, 2014 by Asharae Leave a Comment

This pizza dough recipe is a long-standing tradition in my husband’s family, so I felt it was only appropriate that he write about it! We’ve taken a little liberty with the recipe itself, and discovered that it makes an excellent dough for focaccia as well! Today I’m just sharing the recipe for the dough and photos of the focaccia version – if you’d rather make pizza, you can be creative with your own toppings!

A while back my in-laws gifted us one of those three-ring-binder-church-cookbooks full of recipes from families in the church where Tim’s mom grew up. I love it because I know that there is family history within the pages of that book – each recipe has a story behind it and belongs to a family that enjoyed it enough to share with the whole church. I know that on page 58 I’ll find a recipe for “Pizza From Scratch,” with notes scribbled in the margins. Without further ado, I’ll let Tim share his family’s story of this recipe.

My family likes traditions.  Traditions like riding in the car all cozied up on Christmas Eve looking for the neighborhood with the best light display, gathering around the Thanksgiving table with the plethora of family on my mom’s side, celebratory birthday banners that appeared the morning of each of our birthdays – sneakily designed by someone in the family, and french toast every Sunday morning (but seriously, every Sunday morning).  These are just some of the fun traditions I had growing up.

Another wonderful tradition that we started when I was in middle school was weekly homemade pizza. We’d usually rent a movie from one of the local rental stores and top the pizzas in whatever way our hearts desired.  Inevitably my mom would try to sneak healthy things like green peppers or wheat germ into the recipe, but it still made for a tasty meal!  I love how the pizza crust isn’t a thin crust, but also isn’t so doughy that you feel like it’s more bread than toppings.  Growing up we usually made 3 or more pizzas, went downstairs to watch our movie while we ate, and put the left-overs (if we had any) in a ziploc bag to be enjoyed the next day for lunch.  If I ever had friends over to share in the tradition, they’d always tell me (and mostly my mom) how delicious the pizza was.

When dressing the pizza, I fully recommend using a spoon to spread the sauce on the dough, and because I’m not a huge crust person, I would try to get the sauce as close to the edge as possible (within a half inch or so).  Get a good mozzarella cheese blend to top the sauce, and then ever so carefully spread your desired toppings equally spaced along the top.  I like to think that with all the years practice I’ve had growing up, I’m pretty good at spreading the toppings on the pizza in the most precise manner possible! (Asharae’s note: Tim takes this very seriously. Can you tell he’s more of a mathematician than I am?)

One thing to note, my mom loved it when she got a bread machine that could mix the ingredients together for her.  Even if you don’t plan ahead, you could easily get inspired to make pizzas while reflecting on a delicious lunch, and still have plenty of time to make the homemade pizza dough and get it ready in time for dinner. I have used store-bought pizza dough in the past, but it never has been as good as this recipe.

I hope that you’re reminded of your own family traditions as you make this recipe, and who knows, maybe it will get a new spot in the rotation of your family’s traditions!

This-Wild-Season_Focaccia+Pizza_Dough-2 This-Wild-Season_Focaccia+Pizza_Dough-3 This-Wild-Season_Focaccia+Pizza_Dough-4 This-Wild-Season_Focaccia+Pizza_Dough-5 This-Wild-Season_Focaccia+Pizza_Dough-6 This-Wild-Season_Focaccia+Pizza_Dough-7 This-Wild-Season_Focaccia+Pizza_Dough-8 This-Wild-Season_Focaccia+Pizza_Dough-9 This-Wild-Season_Focaccia+Pizza_Dough-10 This-Wild-Season_Focaccia+Pizza_Dough-11

Simple Pizza Dough / Focaccia

Makes two large cookie-sheet-sized pizza crusts.
Print Recipe Pin Recipe
Prep Time 1 hr 30 mins
Cook Time 20 mins
Total Time 1 hr 50 mins
Servings 6

Ingredients
  

For Dough

  • 1 1/4 c warm water
  • 2 Tbs vegetable oil
  • 1 tsp salt
  • 4 c flour
  • 1 package dry yeast 2 1/4 tsp

For Pizza

  • Pizza sauce of your choice
  • Mozarella Cheese
  • Toppings of your choice

For Focaccia

  • Olive oil
  • Kosher salt
  • Italian Seasoning
  • Fresh grated parmesan cheese

Instructions
 

  • (With a bread machine) Place ingredients in bread machine in the order listed (unless your bread machine manufacturer recommends something different). Choose the Dough setting and the largest loaf size. Let the bread machine work its magic!
  • (By hand) Sift flour and salt together, set aside. In a separate bowl dissolve yeast into warm water, stir in 2 Tbs vegetable oil. Pour into flour and salt mixture and stir until it comes together. Knead vigorously until smooth and elastic. Shape into a ball. Place in a greased bowl, brush with oil, cover and let rise until doubled in size.
  • Once dough is ready, divide in half and spread on two floured baking sheets.
  • (For pizza) Brush crust lightly with olive oil (this keeps it from getting soggy from the sauce), top with sauce and toppings of your choice. Bake 15-20 min at 400. Broil for a minute or two if your cheese isn't bubbly enough.
  • (For focaccia) Once dough is spread out, make divots in the surface of the dough with your fingers. Try not to poke through the dough - these divots will hold the olive oil. Drizzle several Tbs of olive oil over the top of the dough, allowing it to pool in the divots you made. Sprinkle dough with kosher salt, Italian seasonings, and freshly grated parmesan cheese. Bake for 10-12 min at 400. Broil for a minute or two if you'd like the top to be crispier.

Notes

This dough is freezable. I usually make the full recipe and then place half of it in a freezer safe ziplock bag and freeze it till later. When ready to bake, simply let the dough come to room temperature first, spread on a floured baking sheet as usual, and bake as instructed.


Filed Under: Main Course Tagged With: bread machine, easy recipe, pizza, simple recipe

Homemade Stovetop Popcorn

August 20, 2014 by Asharae 1 Comment

A couple months ago I had a fun family session down at Holden Beach, south of Wilmington, NC.  A sweet friend of mine from college hired me to do photos with her whole family – all four generations. It was so special to spend the whole day with them, capturing the ebbs and flows of the day, kicking our toes around in the sand, sharing stories, and soaking up the last golden rays of light as the sun dipped beneath the clouds. It was a long enough drive that they invited me to spend the night, and we sat around chatting and playing games till late into the night, all the while munching on copious amounts of homemade popcorn.

My friend Lauren explained to me that homemade popcorn was her dad’s tradition – a little oil, some popcorn kernels, and a little salt makes for a deliciously simple midnight snack. Apparently he keeps huge 50 lb bags of popcorn kernels at home for just such an occasion. I love families that have food stories like this – popcorn is his thing. The whole family knows that when they get together, dad will be making popcorn. It’s tradition. I love that.

As we sat around the dining room table at the beach house, I was in awe at the bowl after giant bowl of popcorn he kept bringing out from the kitchen. I’d always thought that stovetop popcorn was some magical method of popcorn-making that I’d never be able to perfect. Isn’t there a certain way you have to shake the pan? Will I burn the popcorn? Or have too many kernels left over? I never tried it because I was afraid I’d fail. But after sitting around the table with Lauren’s family, laughing and chatting long after the kiddos had gone to bed, eating popcorn until I could eat no more – I decided I needed to learn how to make my own stovetop popcorn.

And you guys – here’s a secret – it’s really really easy to make!

I snooped around the internet for a while until I found a method that was simple enough and provided a good popcorn to oil ratio. I found this recipe over on the Pastry Affair and haven’t looked back since. She recommends using coconut oil, which I agree with. I tried olive oil and canola oil as well, but I like the subtle flavor the coconut oil gives to the popcorn (it doesn’t taste like coconut, I promise). Use whatever neutral oil you have around the house and have fun making your own homemade popcorn! It’s very rewarding and only takes a couple minutes longer than the microwaved stuff. It’s well worth it to know you’ve made a healthier snack with ingredients you can pronounce!

This-Wild-Season_Homemade-Stovetop-Popcorn-2 This-Wild-Season_Homemade-Stovetop-Popcorn-3 This-Wild-Season_Homemade-Stovetop-Popcorn-4 This-Wild-Season_Homemade-Stovetop-Popcorn-5 This-Wild-Season_Homemade-Stovetop-Popcorn-6 This-Wild-Season_Homemade-Stovetop-Popcorn-7

The instructions below might look a little overwhelming, but you really don’t have to take it this seriously. I’ve found that setting a timer for myself helps keep my mind on the task at hand – I’m easily distracted and fear I’d burn the popcorn otherwise!

Homemade Stovetop Popcorn

Adapted from Pastry Affair
Print Recipe Pin Recipe
Prep Time 1 min
Cook Time 6 mins
Total Time 7 mins
Servings 2 -3

Ingredients
  

  • 3 Tbs coconut oil or other neutral oil
  • 1/3 c popcorn kernels
  • Optional 1 Tbs melted butter
  • 1/4 tsp kosher salt or popcorn salt if you have it!

Instructions
 

  • Heat oil over medium high in a large heavy bottomed pot with a lid. Place 4-5 popcorn kernels in the pot and cover.
  • Once kernels begin to pop, pour the rest of the popcorn into the pot, cover the pot, and use potholders to shake the pot a couple times to distribute the kernels evenly. Remove from the heat for 30 seconds - this allows the kernels to reach the same temperature so they pop around the same time. At this point I like to start a timer for 4 minutes - once the countdown reaches 3:30, place the pot back on the heat.
  • When the kernels begin popping vigorously (around 2:30 on my stovetop), tilt the lid so it is slightly askew on the pot - this allows the steam to escape so your popcorn doesn't get soggy. At this point, I watch the clock and shake the pot every 10 seconds until the popping slows down. The popping itself should last 2-3 minutes - I've found on my stovetop that it finishes just as my 4 minute timer runs out.
  • Once the popping slows significantly, remove the pot from the heat and let rest for a moment to ensure no kernels pop out when you uncover it. Pour the popcorn into a large bowl, drizzle with the melted butter (optional), and sprinkle with salt and your toppings of choice.


Filed Under: Side Dish Tagged With: comfort food, crowd pleaser, easy recipe, simple recipe, snack

  • « Previous Page
  • 1
  • 2
  • 3
  • 4
  • 5
  • 6
  • Next Page »

Hello there!

My name is Asharae. I’m a photographer by trade, wife to an amazing man, and mama to three little ones. I am passionate about creating good food, sharing meaningful conversation around the table, trying new things, and encouraging others to do the same.

Welcome to This Wild Season! This is a place for sharing what I’m learning in the kitchen and outside of it. Most of all, it is a challenge to myself and to you to slow down, be present in the moment, and re-learn how to savor food and conversation around the table.

About

Search

Connect

  • Facebook
  • Instagram
  • Pinterest
  • Twitter
  • Vimeo

Find my book on Amazon:

Recent Posts

  • Emmeline’s Birth Story, The Story of Her Name
  • Emmeline’s Birth Story, Birth Day Part 2
  • Emmeline’s Birth Story, Birth Day Part 1
  • Emmeline’s Birth Story, My Pregnancy
  • Emmeline’s Birth Story, An Introduction
Follow on Bloglovin
Visit This Wild Season's profile on Pinterest.

Copyright © 2025 · Foodie Child Theme by Shay Bocks · Built on the Genesis Framework · Powered by WordPress