This Wild Season

Sharing what I'm learning in the kitchen as well as outside of it.

Navigation
  • Home
  • Blog
  • Recipes
    • Appetizer
    • Breakfast/Brunch
    • Side Dish
    • Main Course
    • Dessert
    • Drinks
    • Personal
  • About

Strawberry Streusel Muffins

May 23, 2016 by Asharae 2 Comments

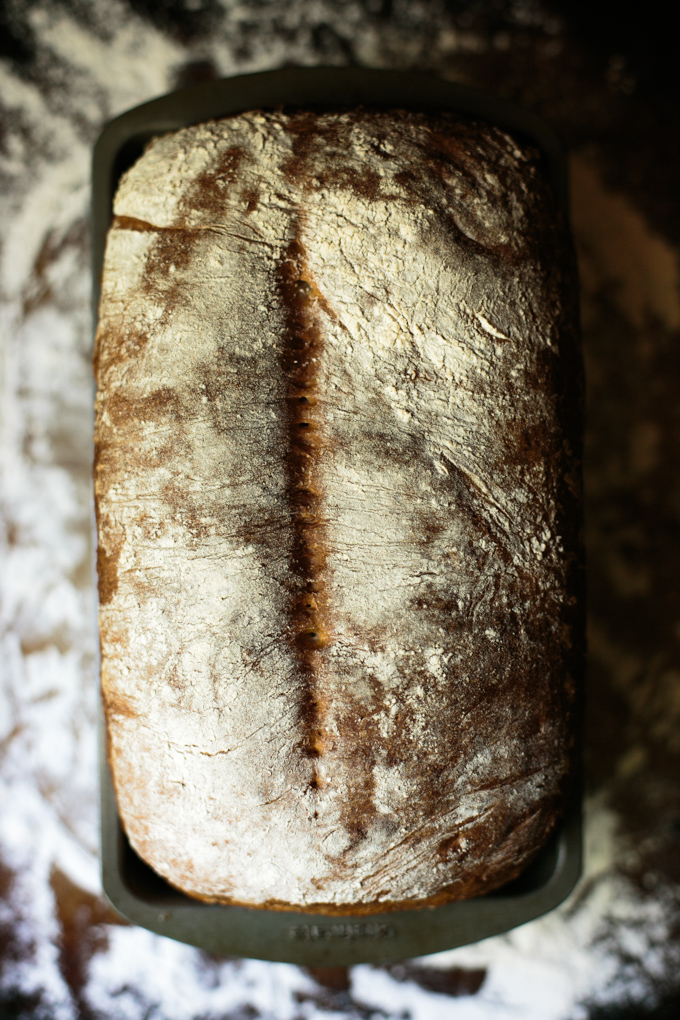
Lately I’ve been on a baking kick which is actually really unusual for me. Not sure if it’s the pregnancy talking as I’m still riding the high of my second trimester energy. Or if it’s my unusual craving for sweets that’s pushing me to bake more than normal. Either way we’re all benefiting from it!

Just the other week Tim and I had a sweet in-home maternity session with our dear friend Alicia White (check out her work! It’s amazing!) We decided to go strawberry picking early in the morning, come back to the house and make breakfast, drink coffee on the porch, listen to big band music on the record player, and play in the garden. Basically all our favorite things. It was really special to set aside some time to have Alicia capture this fleeting season of our lives. I’m a photographer as well, so I’m biased, but I highly recommend documenting each life season not just for having the photographs, but to practice slowing down and noticing the here and now.

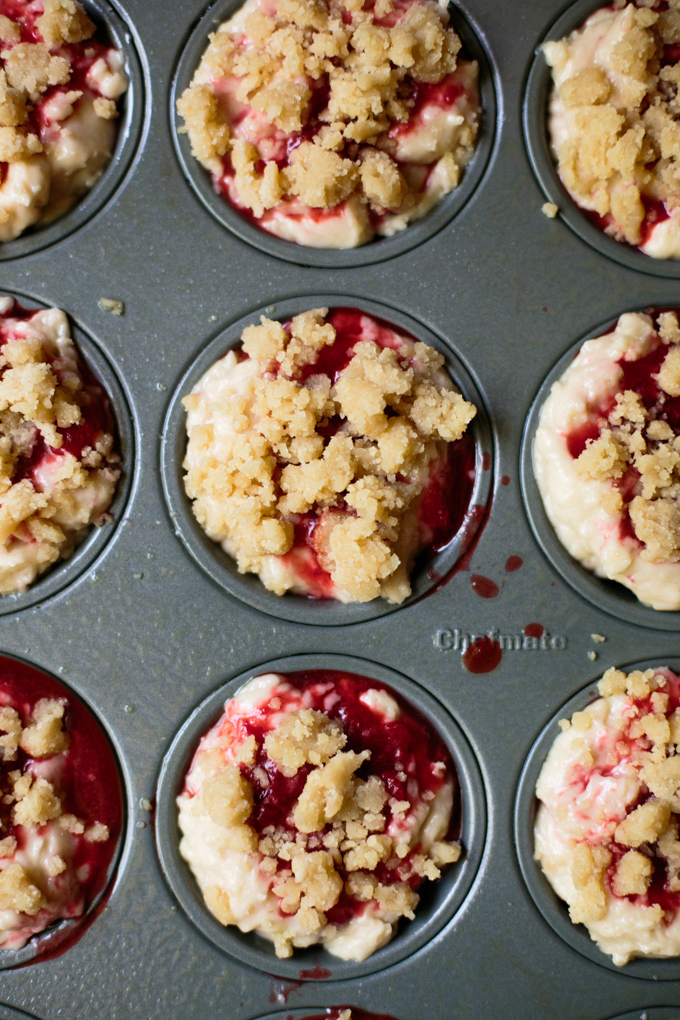
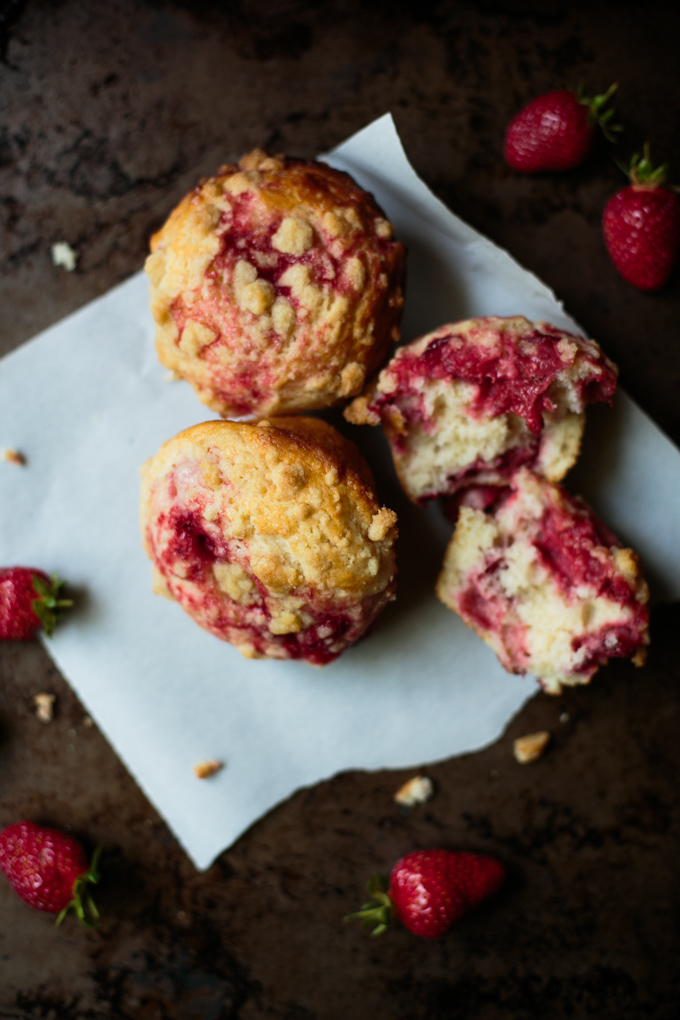
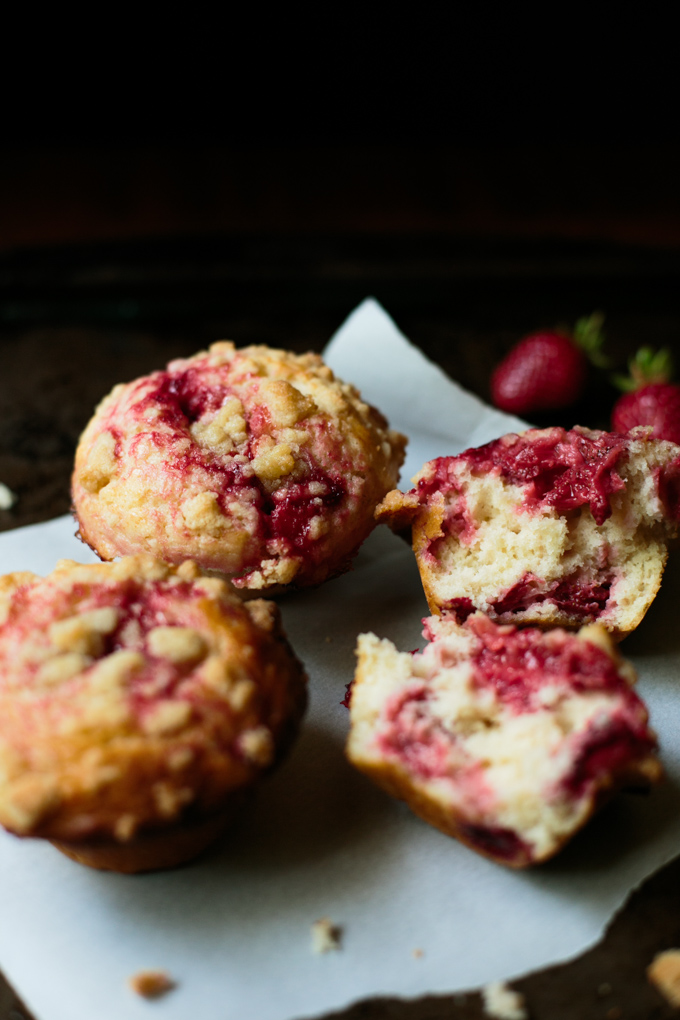
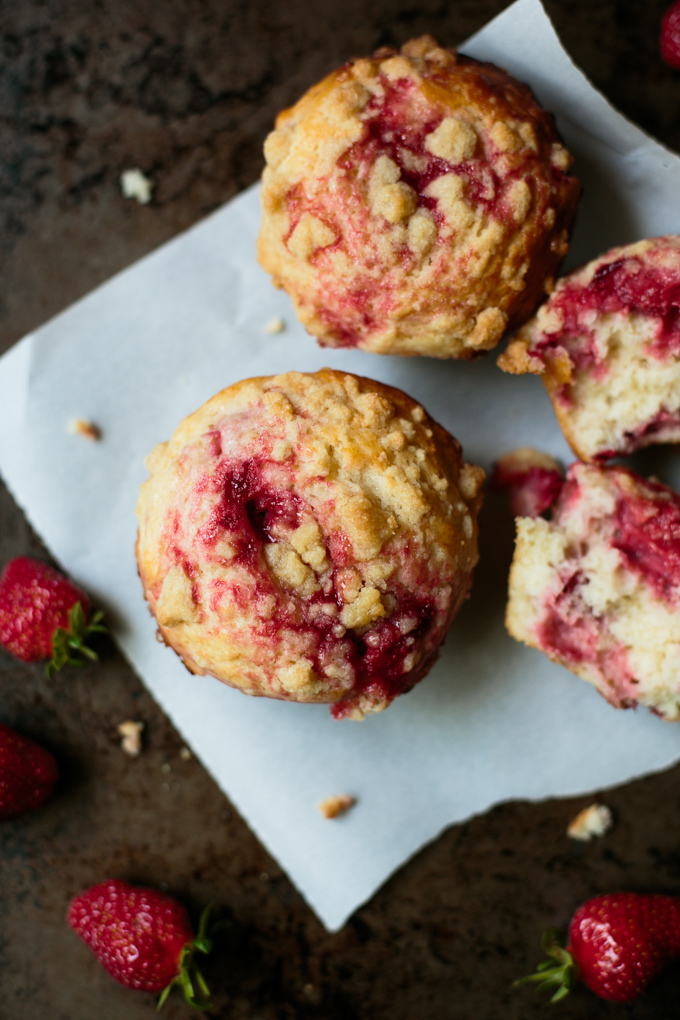
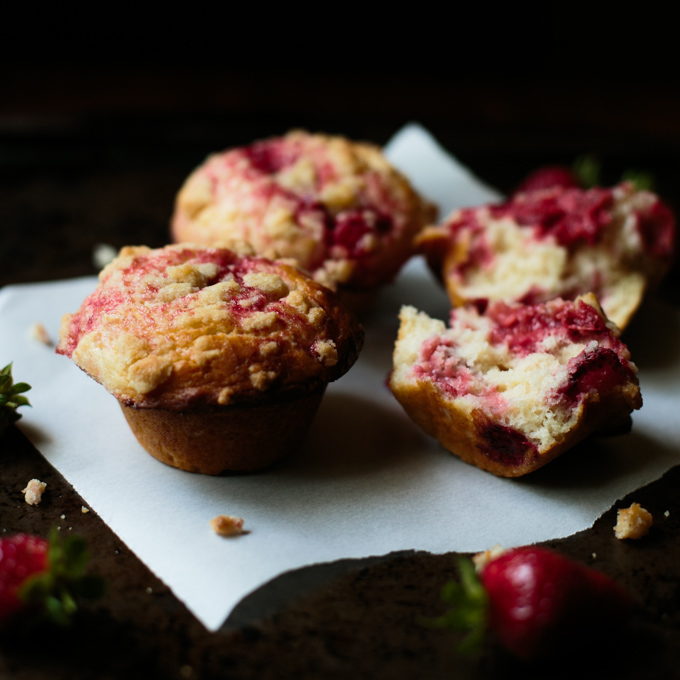
I decided to experiment with this recipe for our photo shoot as the original is actually made with blueberries instead of strawberries. We couldn’t have been happier with how it turned out! These muffins are delicious and oh-so-pretty! If you haven’t already made a date with your local strawberry patch, hurry up and go berry picking before they’re all gone!

Strawberry Streusel Muffins by thiswildseason.com -2 Strawberry Streusel Muffins by thiswildseason.com -3 Strawberry Streusel Muffins by thiswildseason.com -4 Strawberry Streusel Muffins by thiswildseason.com -5 Strawberry Streusel Muffins by thiswildseason.com -6 Strawberry Streusel Muffins by thiswildseason.com -7 Strawberry Streusel Muffins by thiswildseason.com -8

Strawberry Streusel Muffins

Adapted from Honestly Yum
Print Recipe Pin Recipe
Servings 12 muffins

Ingredients
  

  • 2 cups strawberries hulled and sliced
  • 1 cup plus 2 Tbs sugar
  • 2 1/2 c flour
  • 2 1/2 tsp baking powder
  • 1 tsp salt
  • 2 large eggs
  • 4 Tbs butter melted and cooled
  • 1/4 c vegetable oil
  • 3/4 c plain Greek yogurt
  • 1/4 c milk
  • 1 1/2 tsp vanilla extract

Streusel Topping

  • 1 1/2 Tbs sugar
  • 1 1/2 Tbs brown sugar
  • A pinch of salt
  • 1/4 c flour
  • 2 1/2 Tbs warm melted butter

Instructions
 

  • Make the streusel topping by combining the dry ingredients in a small mixing bowl. Slowly add the melted butter, stirring with a fork until mixture is combined and reaches a crumbly consistency.
  • Preheat your oven to 425 degrees F.
  • Make the filling for your muffins by placing 1 c sliced strawberries and 1 tsp sugar in a small saucepan over medium heat. Cook for about 5 minutes, stirring frequently, until mixture is thickened and the strawberries begin to break down. Set aside and let cool to room temperature. (Place in the fridge for a few minutes to hurry the process along if need be.)
  • In a large mixing bowl stir together the flour, baking powder, and salt.
  • In a separate bowl whisk the eggs and remaining sugar until thickened. Slowly add the butter and oil to the egg mixture, whisking as you go. Whisk in the Greek yogurt, milk, and vanilla.
  • Fold this egg mixture into your flour mixture. Fold in the remaining c of strawberries, being careful not to over-mix your batter. It's okay for it to be a little lumpy.
  • Prepare your muffin pan, either by greasing the pan or using paper muffin cups.
  • Use a spoon to divide the batter between muffin cups. The batter should completely fill the cups.
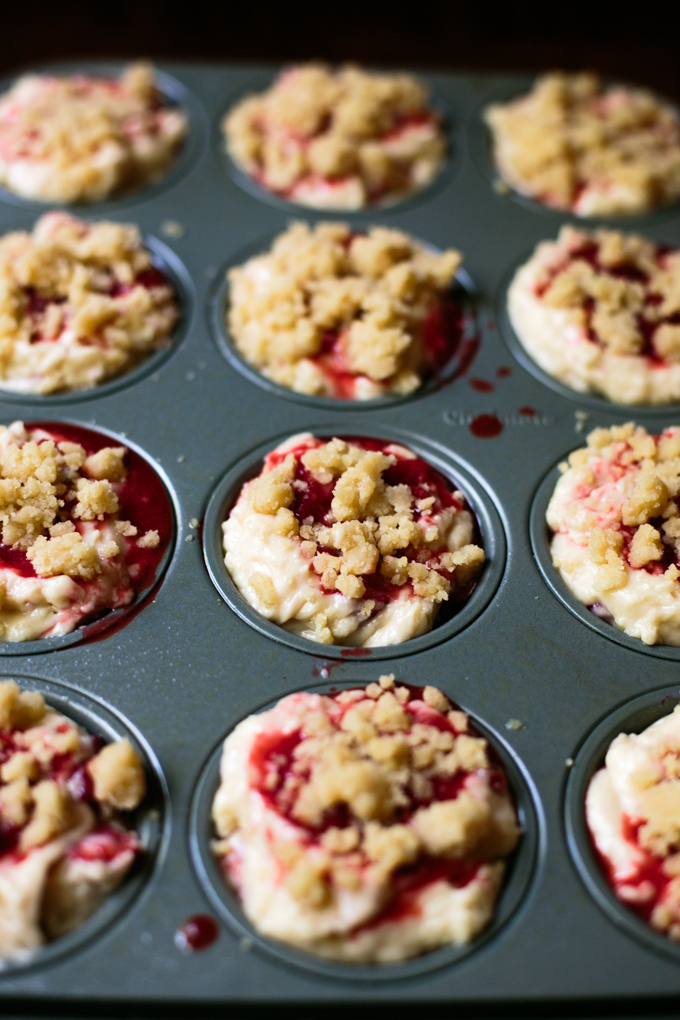
  • Evenly divide the cooled strawberry filling mixture between the muffins, using a chopstick or skewer (or your finger) to poke the filling down into the strawberries. This part doesn't have to be perfect - any berries left showing through will make the muffins look pretty!
  • Sprinkle the streusel topping over the top of your strawberry-filled muffin cups.
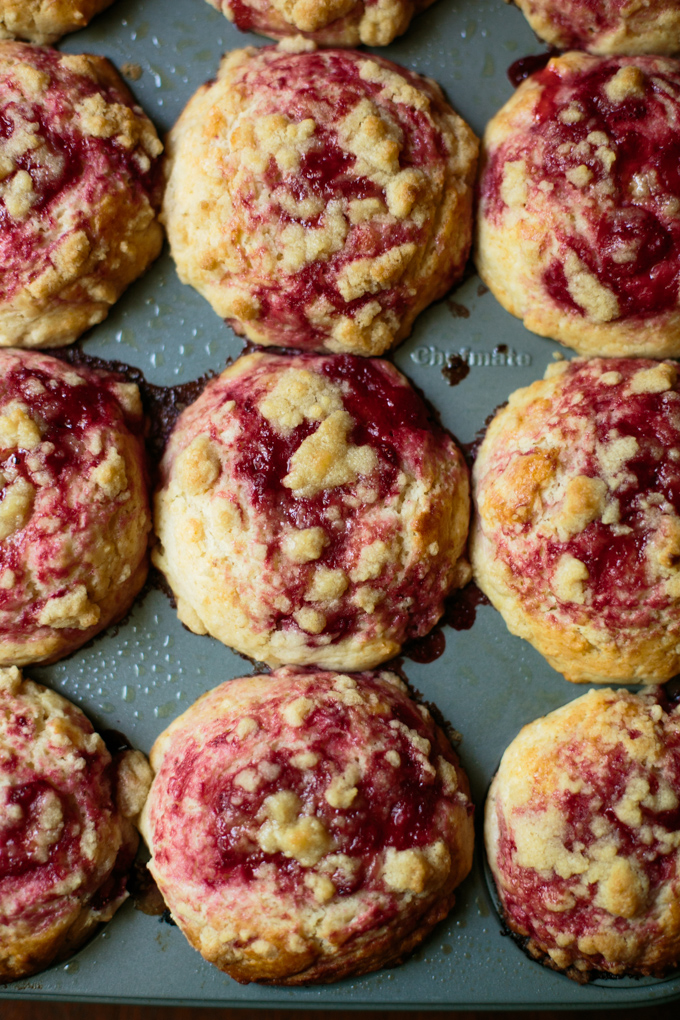
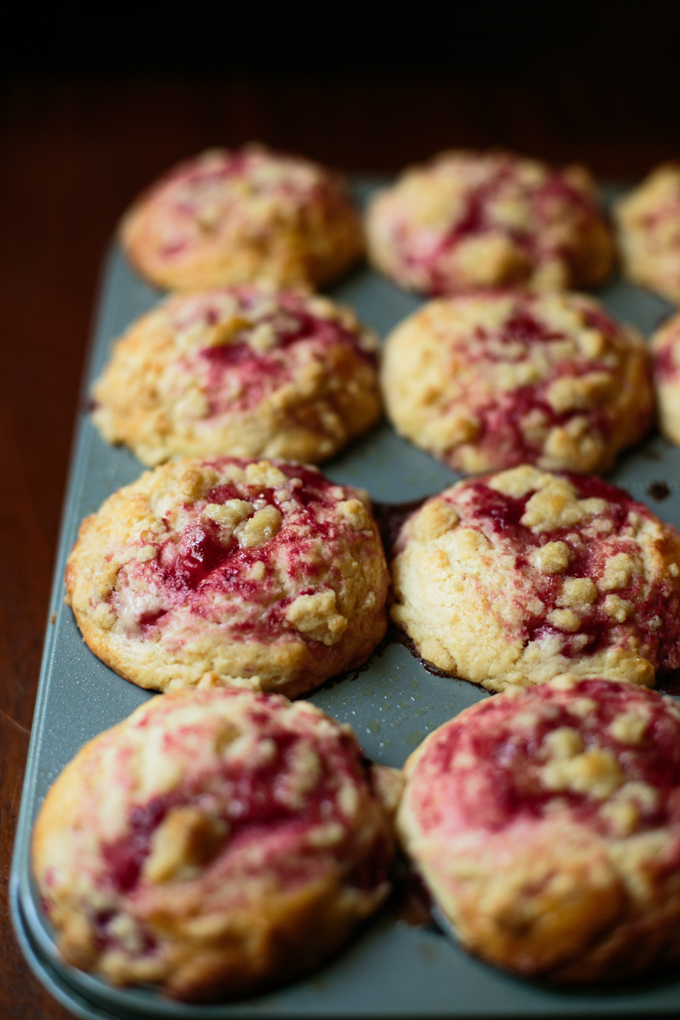
  • Bake in your preheated oven for about 17 minutes, until a toothpick inserted in the center comes out with just a few crumbs on it.
  • Remove from the oven and let cool in the muffin pan for 5 minutes before removing to a cooling rack.

Strawberry Streusel Muffins by thiswildseason.com

Filed Under: Breakfast/Brunch Tagged With: baked goods, baking, breakfast, breakfast recipe, brunch, brunch recipe, in season, muffins

Double Chocolate Heath Brownies

May 13, 2016 by Asharae 8 Comments

I learned something new recently. Brownies are just about as easy to make from scratch as they are from a box. I had no idea. I feel like this is a life lesson I’ve somehow been missing out on. So now, I pass along this lesson to you – make brownies from scratch and you’ll be happier for it.

The great thing about starting from scratch is you can customize your brownies to include anything you want. Like peanut butter with your brownies? Add peanut butter chips instead of the Heath and chocolate chips I included below! Want to add a caramel drizzle sauce to the top? Go for it. Dreaming up some other delicious brownie creation? Try it out and see what happens!

Lately I’ve been sort of obsessed with including Heath chips in my baking (remember these salted brown butter Heath and chocolate chip cookies? Mmmm. Yep. Me too.) But if you don’t have any Heath chips on-hand and are dying for some brownies, just replace them with some extra chocolate chips! I’m sure they’ll still be fabulous.

Double Chocolate Heath Brownies by This Wild Season -2 Double Chocolate Heath Brownies by This Wild Season -3 Double Chocolate Heath Brownies by This Wild Season -4 Double Chocolate Heath Brownies by This Wild Season -5 Double Chocolate Heath Brownies by This Wild Season -6 Double Chocolate Heath Brownies by This Wild Season -7 Double Chocolate Heath Brownies by This Wild Season -8 Double Chocolate Heath Brownies by This Wild Season -9

Double Chocolate Heath Brownies

Inspired by Broma Bakery
Print Recipe Pin Recipe
Prep Time 10 mins
Cook Time 40 mins
Total Time 50 mins
Servings 9 -16 servings

Ingredients
  

  • 12 Tbs unsalted butter
  • 1 1/2 c sugar
  • 2 eggs
  • 2 tsp vanilla extract
  • 1/2 tsp salt
  • 3/4 c cocoa powder
  • 1/2 c all purpose flour
  • 1/2 c chocolate chips
  • 1/2 c Heath chips

Instructions
 

  • Preheat oven to 350 F. Line an 8x8 pan with parchment paper.
  • In a large microwave safe bowl melt the butter.
  • Stir sugar, eggs, vanilla, and salt in with the melted butter.
  • Fold in cocoa powder and flour until just combined and large lumps are gone. Try not to over-mix.
  • Fold in chocolate chips and heath chips, pour into 8x8 pan, bake for 40 minutes or until a knife inserted into the center comes out clean. Remove from oven and let cool completely (if you can manage to wait that long!)

Double Chocolate Heath Brownies by thiswildseason.com

Filed Under: Dessert Tagged With: baking, brownies, crowd pleaser, easy dessert, easy recipe, simple dessert, simple recipe

DIY: Handlettered Woodland Themed Baby Shower Invitations

May 6, 2016 by Asharae Leave a Comment

Last weekend our friends put on the most wonderful baby shower for our sweet little one! Four of my college roommates traveled from all over the Carolinas and one even flew in from Chicago for the occasion. They stayed with us throughout the weekend and helped my friends Paige and Christy decorate our home and make delicious food.

Knowing our love for travel, Paige chose a vintage travel theme for our shower and Christy helped put together a menu of foods from all over the world. I wanted nothing more out of our shower than to have a bunch of my favorite people in our home, eating delicious food, and enjoying themselves. It was really important to me that both guys and girls (and kiddos) felt welcome and that no one felt like they were at a stuffy, uptight baby shower. It turned out to be truly perfect!

We are still feeling so overwhelmed by all the love and support we felt last weekend and have no doubt that Baby Kroll will be well-loved by our sweet friends.

Since we’re all a-flutter with baby showers over here, I wanted to share these woodland themed invitations I created for my friend Paige back in January. My talented husband used watercolor and ink for the woodland animals and greenery, and I handlettered the rest.

DIY Baby Shower Invitations by This Wild Season -2

If you’d like to create your own reproducible baby shower invitations you just need a few things! (Disclaimer: I have included a few affiliate links to my favorite products below! That means I make a small commission off any purchase you make through that link, at no additional cost to you. Thanks for your support of This Wild Season!)

  • Pencil, pens, and paper (tracing paper and watercolors optional)
  • A printer and scanner
  • Editing software such as Photoshop (you can get a free 30 day trial through Adobe)
  • 8.5 x 11 cardstock for printing
  • Envelopes (I used these for this project)
  • Optional – paper cutter
  • Optional – my book! If you want to recreate these specific handlettering styles, you can find instructions for them (and many others) in my book DIY Handlettering.

DIY Baby Shower Invitations by This Wild Season -3

1. Sketch out your designs with pencil and paper till you’re happy with the way they look. Think about the size of paper you’ll be using for your invitations and take that into account. Since I printed these myself, I wanted to use a minimal amount of paper and make the least amount of cuts to it. I designed these to fit on a quarter sheet of regular 8.5 x 11 card stock, so my original design was 4.25 x 5.5 in. With this size, your invites will fit perfectly in A2 envelopes (I used these). For the inserts, I fit 8 on a page, so my original design was 2.75 x 4.25 in.

2. Once you’re happy with your design, finalize it with ink. These pens are my favorite at the moment. I also like to use tracing paper for this step because it makes it go much faster! (That link is to my favorite “translucent visual bond.” It works great for handlettering and even calligraphy nibs. I use it all the time!) I simply lay the tracing paper over my pencil designs and carefully copy them. This also allows me to make adjustments to the layout and design as I go along.

DIY Baby Shower Invitations by This Wild Season -4

3. Scan your designs into the computer using high resolution settings. I usually scan them as tiff files at 600 dpi. If you need to make additional adjustments, add cute little woodland creatures, or other doodles, bring your files into Photoshop and arrange them as necessary. I prefer to make separate layers for my lettering and doodles, erase the white backgrounds, and touch up any mistakes this way. (If you plan on just using Photoshop, you’ll want to make sure your Canvas Size is the same size that you want your final printable to be. You can either adjust as you go or create a new file that is the correct size and copy your cleaned-up files over.)

DIY Baby Shower Invitations by This Wild Season -5

4. Optional – if you have additional editing software, it can make this process even smoother. I like to use the Image Trace function in Adobe Illustrator to turn my lettering into vectors so they can be scaled up or down in size without losing detail. I then take those vectors into Adobe InDesign documents that I’ve created in the size I want my final printables to be. I actually do most of my layout and design in InDesign rather than Photoshop. If you don’t have these additional programs, you can create Photoshop files that are sized properly and save your files as jpegs for printing.

DIY Baby Shower Invitations by This Wild Season -6

5. Once you’ve got your finalized designs on your computer, you’ll want to create an 8.5 x 11 file (a program like Word or InDesign works for this) and insert your designs as you’ll want them to print. As I mentioned before, I did 4-to-a-page for the invitations and 8-to-a-page for the inserts. Sizing your invite and insert files properly in the first place will ensure these fit 4 and 8 to a page once you get to this step.

6. Print your invitations! Use card stock to print your invites and inserts at the best quality. It’s a good idea to try printing them on regular printer paper first, cut them to size, and make sure you’re happy with how they look before you commit to printing all of them! If you designed front-and-back invitations, you’ll need to figure out how your printer works to print on both sides properly. (I confess this can be the most frustrating part of the whole process, but it’s worth it in the end!)

DIY Baby Shower Invitations by This Wild Season -7

7. If you have a paper cutter, use it! I recommend getting one that has replaceable blades, like this one that I use. (That’s a good entry-level paper cutter. You can definitely spend more if you want something that’s more precise and heavy duty!) Cut all your invites and inserts to size.

8. Address your envelopes. You can get creative with these too! I chose to address all of the envelopes for Paige’s shower in the same style I used for her invites. It adds an extra layer of personality and your guests start to get a feel for the party before they even open the invitation!

9. Finish the invites. If you want to go above and beyond, you can incorporate ribbon, confetti, baker’s twine, or anything else you can dream of into the invitation. For these I chose to tie the invites and inserts together with baker’s twine. I tied each one up like a little gift before stuffing them into the envelopes and sealing them up.

DIY Handlettered Woodland Themed Baby Shower Invitations by thiswildseason.com

Filed Under: DIY Tagged With: baby shower, craft, crafting, DIY, DIY Handlettering, hand lettering, handlettering

Honey Wheat Bread for the Bread Machine

April 21, 2016 by Asharae 3 Comments

Today I’m sharing a recipe that has become the go-to bread in our kitchen. Several years ago I “borrowed” my mom’s bread machine and somehow just haven’t given it back yet. The bread machine is one of those weird kitchen appliances that takes up entirely too much room, and is really only good for one purpose, but I really do think it’s worth its weight in gold.

Homemade bread is approximately 1273 times more delicious than store-bought bread, and the bread machine makes it so much more attainable. If I was kneading bread by hand or even watching it in my KitchenAid Mixer, I would rarely make it. With the bread machine I make bread almost every week. It’s so easy to throw all the ingredients in, push a few buttons, and forget about it for an hour and a half. I do prefer to use my machine to knead the dough and do the first rising, but then I bake it in the oven in a regular 5×9 loaf pan.

After the dough has completed its cycle, you just remove it from the bread machine pan and pat it out on a floured surface (I like to flour a rimmed baking sheet because it makes for easy clean-up!) You want your dough to be roughly rectangular, and about the length of your well-greased 5×9 loaf pan. Don’t think too much about this though – it doesn’t have to be perfect!

Honey Wheat Bread Recipe for the Bread Machine by This Wild Season -2

Once you’ve patted the dough out, fold it into thirds. Look! It’s a little bread burrito!

Honey Wheat Bread Recipe for the Bread Machine by This Wild Season -3 Honey Wheat Bread Recipe for the Bread Machine by This Wild Season -4

Once your dough is folded, gently lift it and flip it into your greased bread pan so that the seam or fold is on the bottom.

Honey Wheat Bread Recipe for the Bread Machine by This Wild Season -5

Use a knife to make a shallow (about 1/4 inch deep) cut in the top of your bread. This will allow space for it to expand while it rises a second time.

Honey Wheat Bread Recipe for the Bread Machine by This Wild Season -6

At this point we wait again. Time to let the dough rise. Set it aside in a warm place till it looks about the size you want it to be once baked. My method for this is to heat my oven up slightly and then shut it off. I put the dough in for about 25 minutes before removing it. This speeds up the rising process quite a bit, especially if your house tends to be cold.

Honey Wheat Bread Recipe for the Bread Machine by This Wild Season -7

Once the dough is almost the size you want it to be when finished, remove it from the oven so you can preheat it to 375 F. Once the oven is good to go, put your dough in for 25 minutes. It’s finished when browned on top and hollow-sounding when tapped with your finger.

Honey Wheat Bread Recipe for the Bread Machine by This Wild Season -8 Honey Wheat Bread Recipe for the Bread Machine by This Wild Season -9

Carefully remove the bread from the pan and let it cool completely before cutting it. If you have a cooling rack, that’s perfect for this. If you place your bread flat on a plate, it can get soggy on the bottom as the steam from the bread will condense on the plate as it cools. And no one likes soggy bread.

Honey Wheat Bread Recipe for the Bread Machine by This Wild Season -10 Honey Wheat Bread Recipe for the Bread Machine by This Wild Season -11

Mmmm. Fresh-baked bread perfection. That wasn’t so difficult was it?

If you’ve got a bread machine, use it! If your mom or grandma has a bread machine, borrow it! You can thank me later. This bread is perfect for sandwiches, grilled cheese, french toast, and even just dipping in olive oil and spices.

And one last note – if you don’t have whole wheat flour or prefer not to use it, you can follow my original bread recipe instead.

Honey Wheat Bread for the Bread Machine

Asharae Kroll
Print Recipe Pin Recipe

Ingredients
  

  • 1 c warm water
  • 2 Tbs butter softened
  • 1 tsp salt
  • 2 Tbs honey
  • 2 c bread flour
  • 1/2 c whole wheat flour
  • 1 packet yeast 2 1/4 tsp

Instructions
 

  • Place ingredients into bread machine in the order recommended by the manufacturer.
  • Mine recommends to put the water, salt, butter, and honey in first.
  • Add the flours on top of that.
  • Make a small well in the flour and add the yeast.
  • Adjust your bread machine to the Dough setting, 1.5lb loaf and let it run. I like to check on it about 5 minutes in to make sure it's not too wet or too dry. If it looks too wet and sticky, add a tablespoon or two of flour. If too dry and flaky-looking, add a tablespoon or two of water. Let the machine run through its whole cycle and try not to peek at it too much! (Bread machines heat up slightly which helps the rising process, each time you open it you let some of the heat out which can cause it to rise slower.)
  • Once the dough cycle is finished, turn dough out onto a floured surface. Gently press into a rectangle about 9-10 inches long (you can measure it along the side of your 9x5 pan). Fold one of the long sides in toward the center and fold the other long side on top of that - you're essentially folding it in thirds. Gently place the dough, seam side down, in your well-greased 9x5 pan. Use a knife to cut a small slit (about 1/4 inch deep) down the middle of the dough - this will allow it to expand.
  • Let the dough rise for 30 minutes or so until it looks good. If your house is colder, this could take up to an hour or more. I like to heat my oven for a few minutes, turn it off, and place the dough in for about 30 min to speed up the process. Whatever it looks like now is approximately the size it'll be when it's done baking. Toward the end of this final rising, preheat your oven to 375 degrees. (Take the bread out at this time if you used the oven to let it rise.)
  • Once dough is finished rising, bake for 25 minutes at 375.
  • Bread is finished when you tap it with your finger and it sounds hollow.


Filed Under: Side Dish Tagged With: baking, bread, bread machine, comfort food, easy recipe, simple recipe

Weekend Links

April 15, 2016 by Asharae Leave a Comment

Happy Friday! Hope you have a fun and relaxing weekend ahead of you! Today I wanted to share a few things I’ve been inspired by lately, along with several recipes I’d love to try one day soon. And of course I had to share a few film shots from Chicago for you – we’re looking forward to our next trip there in a few weeks. (Be sure to check out the link at the bottom if you wish to purchase any of our fine art prints for yourself or a friend!)

Weekend Links with This Wild Season -2

This article from Allison Fallon: How A Creative Project Can Heal Your Body, Your Mind, And The World. I’ve taken to writing a lot more lately and it’s been hugely freeing for me. It has felt good to write for no one but myself, and to free myself from the need to share everything I produce.

This article from The New York Times: How to Raise a Creative Child. Step One: Back Off. One of the biggest things I hope for is to raise children that are creative. Creativity can look like many things – I don’t mean I hope my children become photographers or painters or candlestick makers. I simply hope that they feel the freedom to explore what they’re interested in, and eventually to hone in on the gifts and talents they are given and use them to the best of their abilities.

And this one titled You Don’t Want Marie Forleo’s Website, from RKA Ink. I adore Marie Forleo, so this one cracked me up. We’re also in the process of redoing our Grain & Compass website, so lots of her thoughts resonated with me and reassured me that we’re doing the right thing with our new site!

Weekend Links with This Wild Season -3

Recipes I want to try:

Goat Cheese Guac Burgers with Cheddar and Caramelized Onions from How Sweet It Is. Because whoa. What more could you want on a burger?

Caprese Stuffed Garlic Butter Portobellos from Cafe Delites. Goodness these look delicious!

Popsicles! These are all over the interwebs these days. Take your pick. Chai Tea Ombre Popsicles from Paper & Stitch, Roasted Strawberries and Cream Popsicles from Fork Knife Swoon, or these Yogurt Parfait Popsicles from Le Zoe Musings. I don’t even care that it’s not summer! These look good enough to eat year-round. I think it’s time to get some popsicle molds.

Raspberry Mojitos from Heather Christo. I won’t be able to have one of these for a while, but seriously – mint, lime, raspberries, and rum? Yes please. After baby of course.

Blackberry-Thyme Jam and Whipped Goat Cheese Filled Donuts from For the Love of Lasagna. These look like a labor of love, but seriously? That ingredient list? Yum.

Weekend Links with This Wild Season -4

Photographs above were taken with Portra 160 film and processed by Richard Photo Lab. These and more are available for purchase at our Grain & Compass Print Shop! Hop on over there if you need some art for your walls, a gift for a friend, or simply want to see some of the places we’ve traveled!

Weekend Links with This Wild Season -5

Filed Under: Weekend Links Tagged With: adventure, chicago, inspiration, travel, weekend links

  • « Previous Page
  • 1
  • …
  • 3
  • 4
  • 5
  • 6
  • 7
  • …
  • 21
  • Next Page »

Hello there!

My name is Asharae. I’m a photographer by trade, wife to an amazing man, and mama to three little ones. I am passionate about creating good food, sharing meaningful conversation around the table, trying new things, and encouraging others to do the same.

Welcome to This Wild Season! This is a place for sharing what I’m learning in the kitchen and outside of it. Most of all, it is a challenge to myself and to you to slow down, be present in the moment, and re-learn how to savor food and conversation around the table.

About

Search

Connect

  • Facebook
  • Instagram
  • Pinterest
  • Twitter
  • Vimeo

Find my book on Amazon:

Recent Posts

  • Emmeline’s Birth Story, The Story of Her Name
  • Emmeline’s Birth Story, Birth Day Part 2
  • Emmeline’s Birth Story, Birth Day Part 1
  • Emmeline’s Birth Story, My Pregnancy
  • Emmeline’s Birth Story, An Introduction
Follow on Bloglovin
Visit This Wild Season's profile on Pinterest.

Copyright © 2025 · Foodie Child Theme by Shay Bocks · Built on the Genesis Framework · Powered by WordPress