This Wild Season

Sharing what I'm learning in the kitchen as well as outside of it.

Navigation
  • Home
  • Blog
  • Recipes
    • Appetizer
    • Breakfast/Brunch
    • Side Dish
    • Main Course
    • Dessert
    • Drinks
    • Personal
  • About

Pregnancy, a blogging hiatus, and learning to rest

January 26, 2016 by Asharae 4 Comments

As I sit down to share my thoughts on the last couple months, I can tell that my writing muscle is feeling a little rusty. I feel sort of like I’m getting back to doing yoga after taking weeks away from my mat. Everything feels a little sore and in need of some good stretching.

In the fall I had all good intentions of sharing delicious recipes as well as a few fun DIY handlettering projects in anticipation of my book release – but I somehow forgot that fall is to wedding photographers what tax season is for accountants. And this fall was our busiest yet. I think at one point I was buried beneath 9 weddings to edit – yikes. All our days pre-Christmas turned into seemingly never-ending hours with a how-much-can-we-get-done-before-we-sleep-tonight mindset. Luckily we have amazing couples who are sweet and understanding and (mostly) patient, but we knew some things had to be put on the back burner for the time being so we could focus more on each of the couples we serve. So. I reluctantly decided to step away from this little online space for a bit.

BabyKrollAnnouncement-1

In stepping away I found some freedom to rest – freedom to not spend every waking hour working on either Grain & Compass or This Wild Season. It was refreshing and necessary I think, particularly in a season where so much actually did need to get done each day. Being able to work hard when I needed to allowed me the freedom to relax each evening before bed, stay away from my inbox on the weekends, and simply say no to some things. That freedom to rest has been a life saver in a season that otherwise has felt hectic and unsettled.

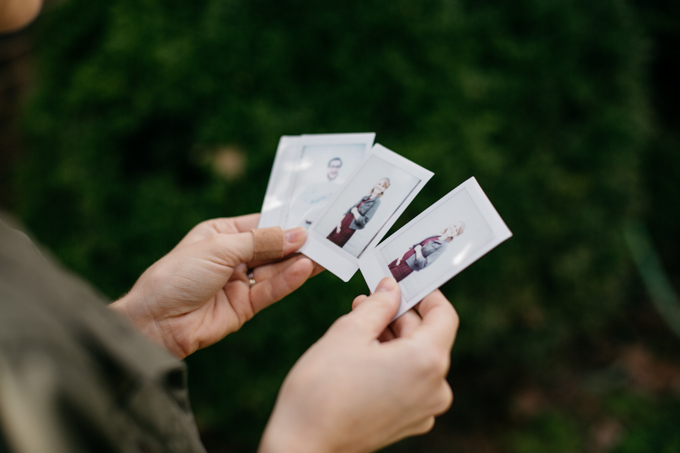
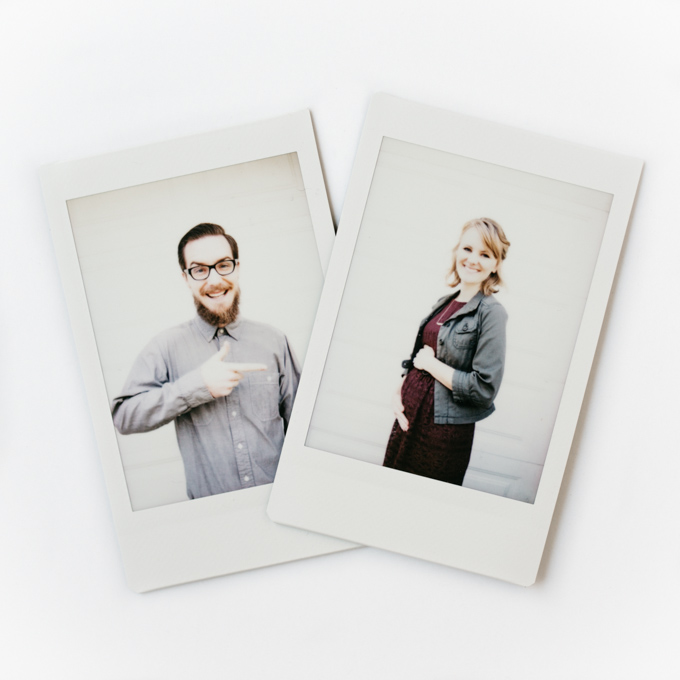
In the midst of learning how to step back, make time to rest, and also buckle down and get work done when necessary, we found out that we’re expecting a baby this summer! (Yes it was on purpose, we’re due July 11th, no we’re not finding out the gender ahead of time, and yes you actually can touch my belly – I’m very proud of it. Any other questions?)

BabyKrollAnnouncement-2

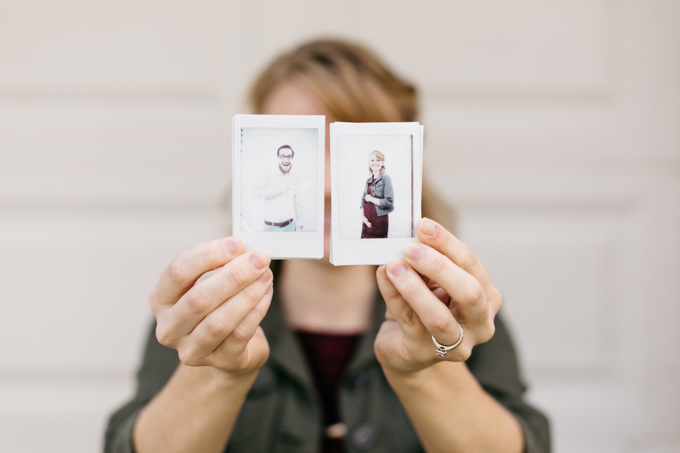
Beyond anything Tim and I have done together, this feels like our wildest and most exciting adventure. I’d been so terrified, honestly, of getting pregnant for so long that I just kept putting off the conversation for later. When Tim and I finally confronted what it was we were avoiding, and really started to get to the bottom of it, we realized we weren’t trusting that the Lord was going to provide for us if we added a baby to the mix. We were afraid he wouldn’t provide the money to support a baby, enough work to allow us to continue doing what we love, or the time for us to follow the various things we’re passionate about. Realizing this and naming our fear was huge for us.

We had always wanted to “get to the next step” before we even began to think about kids. We realized though that if we kept doing that – if we kept waiting for the next best thing – we would never ever arrive, and we would never have kids. So, over the course of a few months our hearts slowly changed and softened toward the idea of having a baby sooner rather than later. That terrified feeling isn’t completely gone, but we are so grateful and excited to be on this adventure together.

BabyKrollAnnouncement-3


Filed Under: Personal Tagged With: baby kroll, fears, pregnancy, productivity, rest

DIY: Spooky Handlettered Halloween Menu

October 29, 2015 by Asharae Leave a Comment

I recently got asked to co-author a handlettering book, so I want to share a little sneak peek of what’s to come! For the book I’ve created a bunch of fun lettering styles along with little doodads and flourishes to spice up your handlettering. My fabulous co-author Melissa Averinos has created a ton of fantastic crafts that utilize the styles I’ve created and really bring them to life! I’m so excited about all the things we’ve been working on behind the scenes and can’t wait to share the book with you!

Until then, I’ll be sharing little teasers here! This particular craft is my own creation and won’t be in the book, but it’ll add a classy touch to your Halloween party this weekend! You only need a few supplies and a little creativity to get started!

DIY Spooky Halloween Menu || thiswildseason.com

The Tools You Need:

Picture frame (I found mine for 25 cents at our local thrift store)

Matte black spray paint 
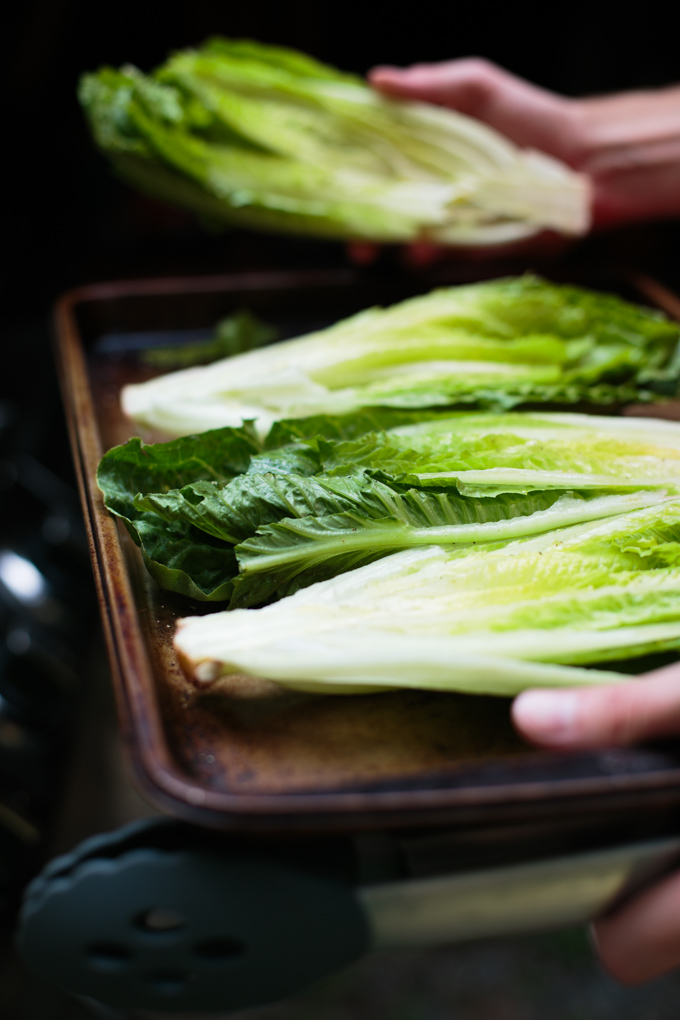
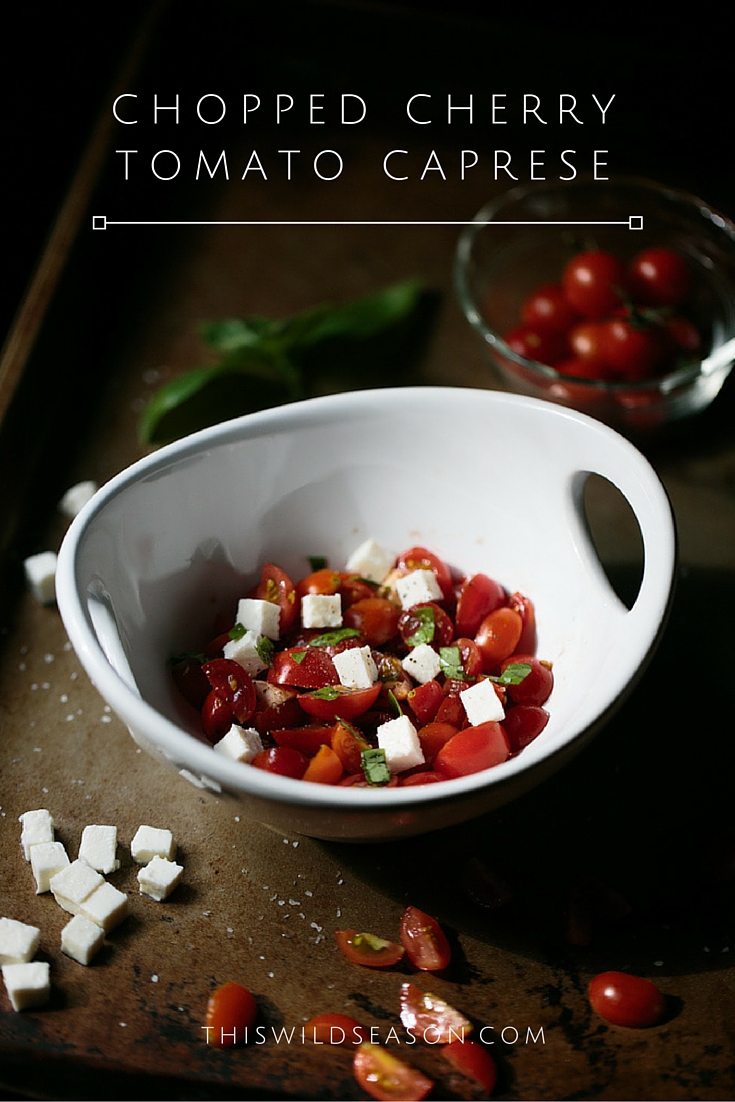
and newspaper to protect your work surface
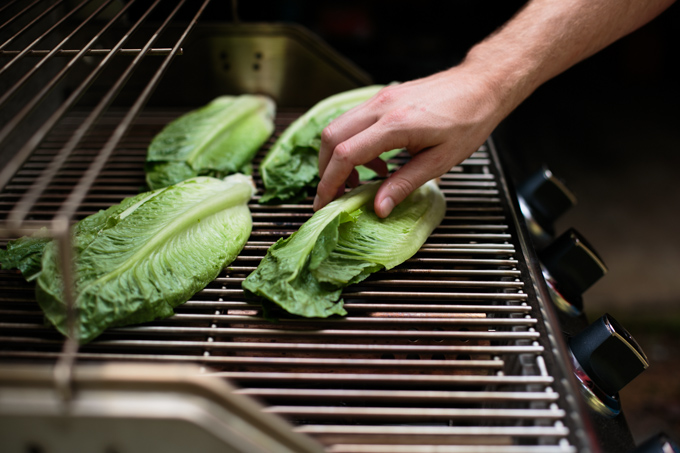
Paper of your choosing (I used two layers of black construction paper with some sparkly ribbon for the border)

Gold pen or marker – this kind is my current favorite

DIY Spooky Halloween Menu || thiswildseason.com

Steps:

1. Painting your picture frame. Remove the backing and glass from your picture frame, and set aside. (If the back of your frame isn’t actually removable but on a hinge instead, then you can wrap it in newspaper to avoid getting paint on it.) Working outdoors, spray paint your picture frame. Be sure to use newspaper or cardboard to protect your driveway or whatever surface you’re working on. When spraying your picture frame, light coats of paint work better than trying to cover all the surfaces at once. Let the paint dry between each coat, keep coming back and adding another coat until your frame is covered. Let dry completely while you work on the next step.

2. Creating your menu card. Measure the glass you removed from the frame to determine what size your paper should be. This is where you can get creative and choose different colors of paper to make this project your own. I used simple black construction paper, added a border of sparkly ribbon with tiny dots of glue, and then wrote my menu on a smaller piece of paper and glued it on when I was finished with the handlettering (that way, if I made a mistake, I could just start over on the menu portion without scrapping the whole project!)

DIY Spooky Halloween Menu || thiswildseason.com

3. Handlettering your menu. You’ll want to give your lettering a creepy Halloween-y kind of look to it. This is easier than it seems! Simply elongate your lettering, draw out the tails of your letters, and give your lettering an imperfect, scratchy kind of feel to it. Just imagine you’re hurriedly scrawling this menu down before scurrying back to your cauldron boiling over the fire.

4. Finishing the project. Once your picture frame is completely dry and your menu is ready, place your menu card in the frame and whip up a batch of this apple cider sangria from The Wholesome Dish! It’s optional to use the glass in your frame – if you want to protect your hand lettering, go ahead and use it. If you like the look of it without the glass (like pictured here) then leave it out!

This post contains affiliate links. That means I make a small commission off any purchase you make through that link, at no additional cost to you. Thank you for your support of This Wild Season!

Filed Under: DIY, How To Tagged With: craft, crafting, DIY, DIY Handlettering, fall, Halloween, hand lettering, handlettering, spooky

Slow Cooker Corn Dip

October 27, 2015 by Asharae 2 Comments

Football season is in full swing y’all. That means gathering all your people to cheer on your favorite team and eat delicious food together. At least. That’s what it means to me.

The two teams we cheer for, the Packers and the Panthers, are both 6-0, so we’re feeling pretty great about football in our house these days.

Whether your team is at the top, or you’ve resigned yourself to a losing season already, this corn dip is a perfect addition to your next football get-together. It’s got a kick from the jalapeño and spices, includes a variety of cheeses of your choosing, and gets finished off with a squeeze of fresh lime.

Throw it all together in a slow cooker a couple hours before the game starts and you’ll be all set. Fair warning though: this corn dip is addicting. If you find yourself headed back for seconds, thirds, and fourths… Well. I’ll say I told you so.

Slow Cooker Corn Dip || thiswildseason.com Slow Cooker Corn Dip || thiswildseason.com Slow Cooker Corn Dip || thiswildseason.com Slow Cooker Corn Dip || thiswildseason.com Slow Cooker Corn Dip || thiswildseason.com Slow Cooker Corn Dip || thiswildseason.com

My version of this recipe was heavily adapted from Chungah’s recipe over on Damn Delicious – her method works great, I just wanted to add a lot more flavor to the finished product! You’re welcome to adapt this recipe – add more spice or leave it out, add different peppers, try different kinds of cheese. Experiment and see what you like best!

Slow Cooker Corn Dip

Inspired by Damn Delicious
Print Recipe Pin Recipe
Prep Time 10 mins
Cook Time 2 hrs 15 mins
Total Time 2 hrs 25 mins
Servings 6 -8 as a side or appetizer

Ingredients
  

  • 4 c frozen corn
  • 2 jalapeños seeded and diced
  • 1 1/4 c shredded cheese your choice - my favorite combination is pepper jack, cheddar, and a little feta
  • 1/2 tsp cumin
  • 1/8 tsp garlic powder
  • 1/8 tsp onion powder
  • dash of paprika
  • Kosher salt and pepper to taste
  • 8 oz cream cheese cubed
  • Juice of 1 lime

Instructions
 

  • Combine all ingredients except cream cheese and lime juice in a small slow cooker, stir to combine well. Place cubed cream cheese on top of corn mixture, set slow cooker to low, and let cook for 2 hours.
  • Stir in the cream cheese, add the lime juice, cover and set to high for 15 more minutes. Serve with tortilla chips, tacos, quesadillas, or a spoon.

Notes

I use a tiny slow cooker for this recipe and it works perfectly! It's just the right size for all the ingredients and works well as a serving bowl too. If you're using a larger slow cooker, you may be able to shorten the cooking time a bit. If you try it - let me know how it goes!!

Slow Cooker Corn Dip by thiswildseason.com

Filed Under: Appetizer Tagged With: crock pot, crockpot, crowd pleaser, easy appetizer, easy recipe, football, simple appetizer, simple recipe, slow cooker, superbowl, tailgating

Grilled Greek Salad

October 20, 2015 by Asharae 2 Comments

I know, I know. It’s almost November. Shhh! Don’t tell that to our new grill.

Now that our wedding season is finally slowing down, Tim and I are taking advantage of all the summer grilling that we missed out on. We have a fancy-pants new grill (it’s WAY better than our old one – the handle would come off every time you opened it, the grill rack would rock precariously every time you set anything on it, and there were only a few remaining hot-spots over which you could actually cook food.) We are pretty stoked about this new grill so we are hereby extending grilling season into the fall!

Over the summer we stayed with Tim’s brother and our sister-in-law in Chicago and they made us some ridiculously delicious food (they always do!) including a grilled salad. You guys. Grilled salad. You have to try it. I needed to try it myself, and that’s why I made this recipe!

You don’t actually grill the lettuce long enough to “cook” it, only long enough to get some good grill marks on the leaves which give it a delicious smoky flavor. You can get romaine hearts at the grocery store and cut them down the middle, keeping the center root-end intact as it will hold all those pretty leaves together. Brush each half with a little olive oil, add some salt and pepper if you like, and grill just long enough to get a good char on the leaves. Chop up the leaves and toss with any dressing! I made a Greek dressing for this recipe, but you can easily adapt this technique to suit your flavor preferences.

Chopped Greek Salad || thiswildseason.com -2 Chopped Greek Salad || thiswildseason.com -3 Chopped Greek Salad || thiswildseason.com -4 Chopped Greek Salad || thiswildseason.com -5 Chopped Greek Salad || thiswildseason.com -6 Chopped Greek Salad || thiswildseason.com -7 Chopped Greek Salad || thiswildseason.com -8 Chopped Greek Salad || thiswildseason.com -9 Chopped Greek Salad || thiswildseason.com -10

Grilled Greek Salad

Asharae Kroll
Print Recipe Pin Recipe
Servings 2 -4

Ingredients
  

For the Dressing

  • Juice of 1 lemon
  • 1 clove of garlic minced
  • Kosher salt and pepper
  • 1/4 c olive oil

For the Salad

  • 2 hearts of romaine
  • 1 Tbs olive oil
  • Cherry tomatoes halved
  • Pitted Kalamata olives I like to halve these just to make sure no pits are still hiding inside
  • Cucumber halved lengthwise and cut into pieces
  • Feta cheese
  • Dried oregano

Instructions
 

  • Whisk together the lemon juice, garlic, salt, and pepper. Slowly drizzle in the olive oil, whisking constantly. Set aside.
  • Peel off any dirty outer leaves from each of your romaine hearts. Cut each one down the middle. I find it's easiest to cut down the middle of the stem first, then cut through all the leaves. Some leaves may fall out - that's okay! Save them for later and you can toss them back into your salad right before serving. (Rinse the leaves if you like and drain cut-side-down on a paper towel. Pat dry before continuing.)
  • Preheat the grill to medium high. Place hearts of romaine, cut side up, on a plate or rimmed baking sheet. Drizzle with 1 Tbs olive oil. Grill for just a couple minutes, or until leaves are slightly charred. You're not trying to cook the lettuce, just give it some color and smoky flavor.
  • To serve, place one romaine heart half on a plate, cut side up. Drizzle with dressing, top with cherry tomatoes, Kalamata olives, cucumber, and feta. Sprinkle with dried oregano and extra salt and pepper if desired.

Notes

Serve half a head of romaine per person as a side dish, or a whole head of romaine as the main course.
You could serve topped with roasted or grilled chicken to make this salad more filling.

Grilled Greek Salad by thiswildseason.com

Filed Under: Main Course Tagged With: grilled, salad, summer recipe, summertime, vinaigrette

Chopped Cherry Tomato Caprese

October 13, 2015 by Asharae Leave a Comment

The Sweet 100 cherry tomato plant in our garden has been most prolific this summer and into the fall. Each day I go out to find a few more little red tomatoes on the vine. As the weather is starting to turn to fall here in NC, this is my ode to warmer days and some of my favorite summer flavors.

Caprese salad is typically made with large slices of tomato and mozzarella, layered with fresh chopped basil, a drizzle of balsamic vinegar, and a little olive oil and salt and pepper. This version is a twist on the traditional recipe by using cherry tomatoes and chopping everything up to make a pretty tossed salad. I usually like to leave out the olive oil, but you’re welcome to add it back into this recipe.

Chopped Cherry Tomato Caprese by thiswildseason.com -2 Chopped Cherry Tomato Caprese by thiswildseason.com -3 Chopped Cherry Tomato Caprese by thiswildseason.com -4


Chopped Cherry Tomato Caprese

Asharae Kroll
Print Recipe Pin Recipe

Ingredients
  

  • 1 pint cherry tomatoes quartered
  • 1-2 Tbs balsamic vinegar
  • Handful of chopped mozzarella You can purchase a pre sliced ball of mozzarella at the store to make this simpler. I used a couple slices and chopped them into small squares.
  • A few leaves of fresh basil chopped
  • Kosher salt and pepper to taste

Instructions
 

  • Combine all ingredients.
  • Let rest in the fridge for 15 minutes for the flavors to get happy.
  • Enjoy.

Chopped Cherry Tomato Caprese by thiswildseason.com

Filed Under: Appetizer, Side Dish

  • « Previous Page
  • 1
  • …
  • 5
  • 6
  • 7
  • 8
  • 9
  • …
  • 21
  • Next Page »

Hello there!

My name is Asharae. I’m a photographer by trade, wife to an amazing man, and mama to three little ones. I am passionate about creating good food, sharing meaningful conversation around the table, trying new things, and encouraging others to do the same.

Welcome to This Wild Season! This is a place for sharing what I’m learning in the kitchen and outside of it. Most of all, it is a challenge to myself and to you to slow down, be present in the moment, and re-learn how to savor food and conversation around the table.

About

Search

Connect

  • Facebook
  • Instagram
  • Pinterest
  • Twitter
  • Vimeo

Find my book on Amazon:

Recent Posts

  • Emmeline’s Birth Story, The Story of Her Name
  • Emmeline’s Birth Story, Birth Day Part 2
  • Emmeline’s Birth Story, Birth Day Part 1
  • Emmeline’s Birth Story, My Pregnancy
  • Emmeline’s Birth Story, An Introduction
Follow on Bloglovin
Visit This Wild Season's profile on Pinterest.

Copyright © 2025 · Foodie Child Theme by Shay Bocks · Built on the Genesis Framework · Powered by WordPress