This Wild Season

Sharing what I'm learning in the kitchen as well as outside of it.

Navigation
  • Home
  • Blog
  • Recipes
    • Appetizer
    • Breakfast/Brunch
    • Side Dish
    • Main Course
    • Dessert
    • Drinks
    • Personal
  • About

Grapefruit Margarita and Mid-Week Inspiration

March 25, 2015 by Asharae 4 Comments

It’s been a while since I’ve written a Mid-Week Inspiration post, so I thought it was about time I share a few of the things that have been inspiring me lately!

The Nester – Oh my goodness ya’ll. I had the incredible honor and sweetest surprise this weekend to be featured on Myquillyn’s site! Whoa. I’ve been following her blog for a year or so now, and read her fabulous book last summer. If you haven’t heard of The Nesting Place, go pick up a copy today! I read it at just the right time last year and it’s really helped me to embrace this season that Tim and I are in.

We’ve felt like our living situation has been so temporary for the past few years, so I had been avoiding putting things up on the walls, unpacking boxes, and the like. After reading her book, I created a gallery wall in our dining room and one in our living room, I began unpacking more of our things, and I started to fully embrace our current space – in all its ugly-wood-paneled-1970s glory. Even just this past week I unpacked all our books (they’d been in boxes since we lived in Seattle over three years ago!) and began decorating our front hall with a couple antique store finds and a hand-lettered piece I created. All that to be said, if you need a little (or a lot) of encouragement to step past your fear, embrace the space you’re in, and learn how to make it beautiful with what you have, go read Myquillyn’s blog and buy her book. You can thank me later.

This Ted Talk – Finding my Analog Self in a Digital World. Brian Faherty, owner and founder of Schoolhouse Electric, speaks about the increasing difficulty of getting away from technology, and its impact on our connectedness with others. He argues that technology and our increasing connectedness to the entire world is decreasing our connectedness with those around us. Yes and yes. He’s really on to something.

He speaks about a desire to create digital-free zones – places and times to disconnect from technology and reconnect with others. I resonate deeply with his sentiments. I find it’s all too easy to be on my phone or on the computer and realize at the end of the day that I haven’t even really looked up or stepped away to have a meaningful connection with Tim or my friends or family. I crave time away from all the screens – time to have a real conversation with a friend, share a meal, or enjoy a new experience.

Our Garden – After writing about Brian Faherty’s Ted Talk above, I realize that our garden is sort of my “digital-free zone.” It’s a place I can get away from the computer, dig around in the dirt, reconnect with the changing of the seasons and the patterns of the weather. It’s a place where I get to practice mindfulness – a discipline that I’m so naturally drawn to, but I so often neglect.

Taking care of this little rectangle of dirt is extraordinarily rewarding. With just a little time and attention, some sun and some water, we’ll have spinach and peas and carrots and beets and tomatoes and peppers and cucumbers and basil and the list goes on. We get to rejoice in seeing this little plot of empty dirt transform over the next several months, from death to life, from empty and barren to overflowing with color and sustenance. What a joy.

Marie Forleo – If you’re an entrepreneur, a business owner, a blogger, or curious about being and doing any of those things, you should check out Marie’s blog. I’ve been watching her videos non-stop the past couple weeks. She’s hilarious and engaging, unabashedly herself, and incredibly encouraging – particularly to women entrepreneurs. Fair warning – the “unabashedly herself” can sometimes include some language. The advice and encouragement she has to offer is well worth your time though.

One of the videos I watched recently was so affirming to me. She calls herself a “multi-passionate entrepreneur” and goes on to explain all the things she loves to do. I resonated so much with that – I love photography and videography, food and sharing recipes with others, hand-lettering and calligraphy, sitting and listening to other people’s stories, and on and on. Simply hearing an extraordinarily successful woman share that she too has a ton of passions was so encouraging!

Grapefruit Margarita by thiswildseason.com -2 Grapefruit Margarita by thiswildseason.com -3 Grapefruit Margarita by thiswildseason.com -4 Grapefruit Margarita by thiswildseason.com -5 Grapefruit Margarita by thiswildseason.com -6

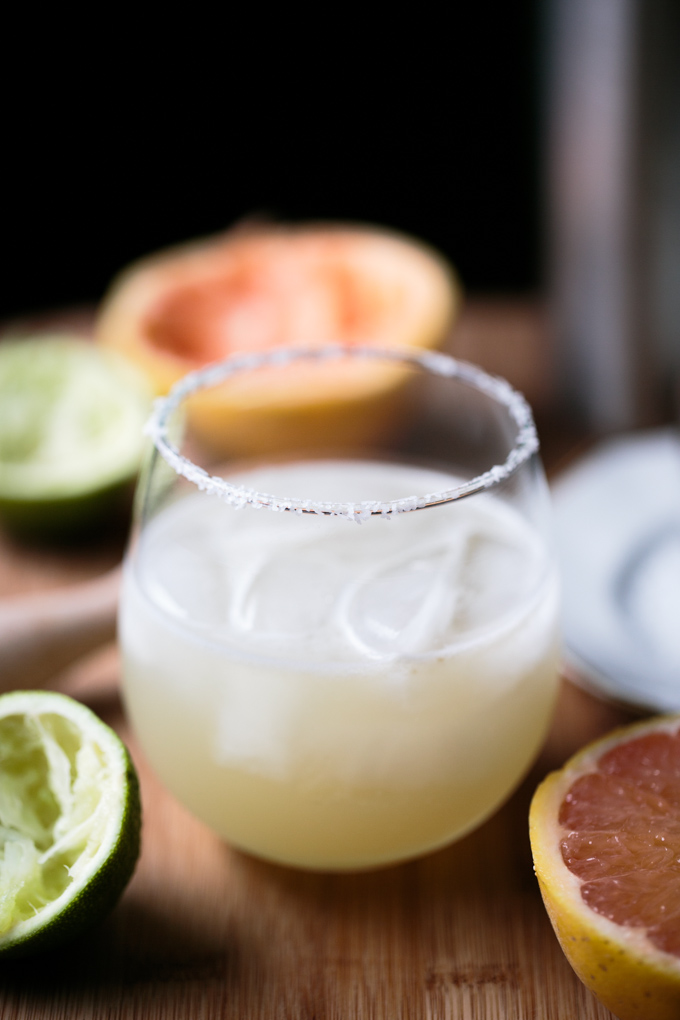
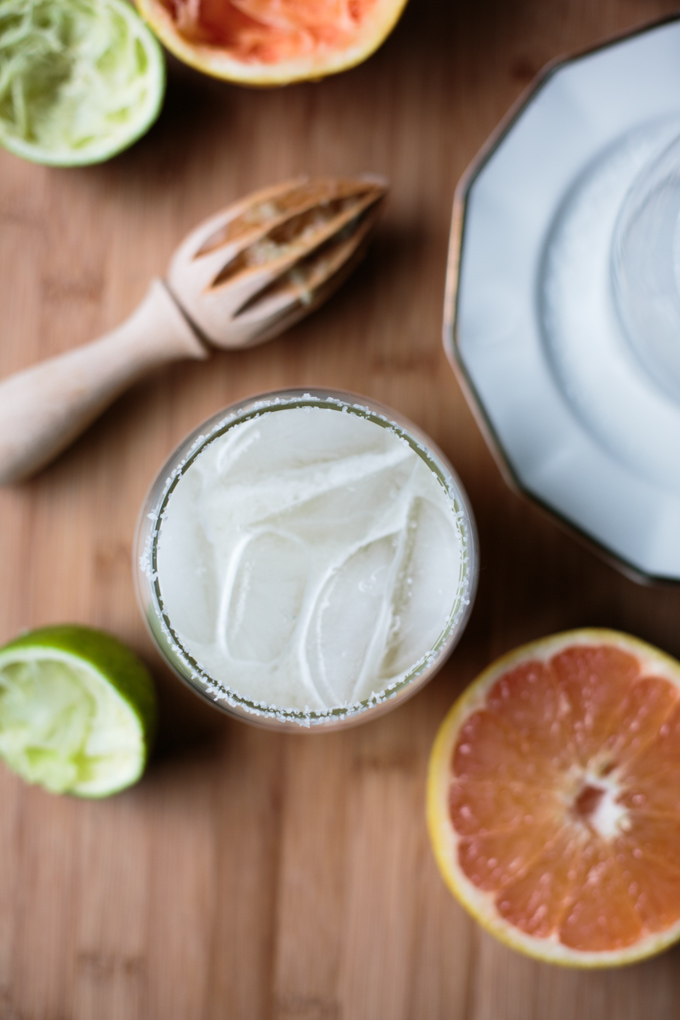
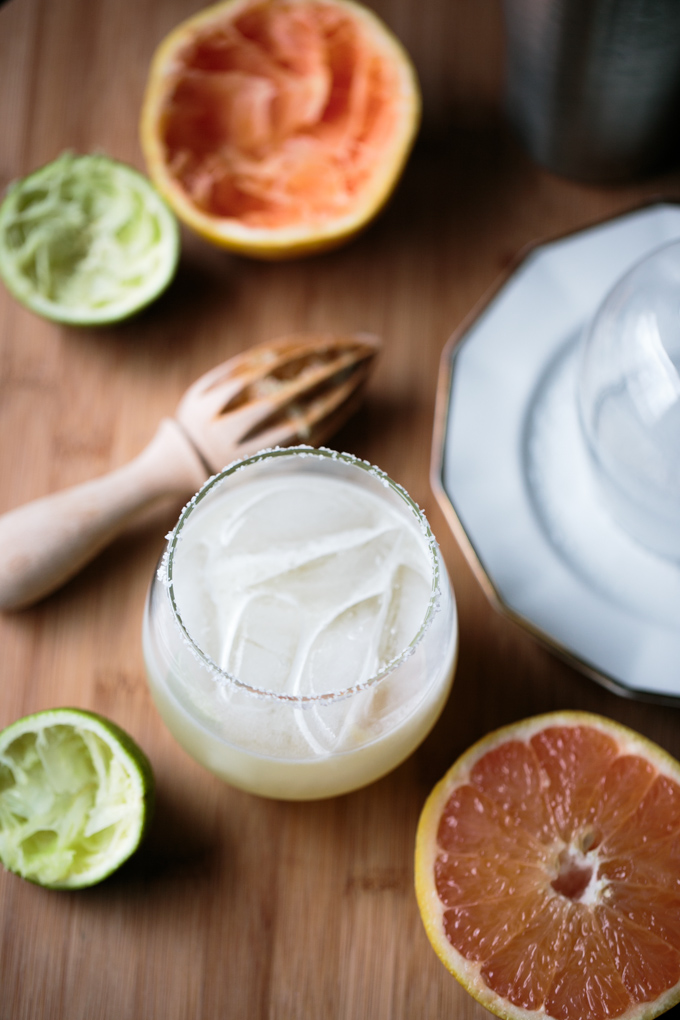
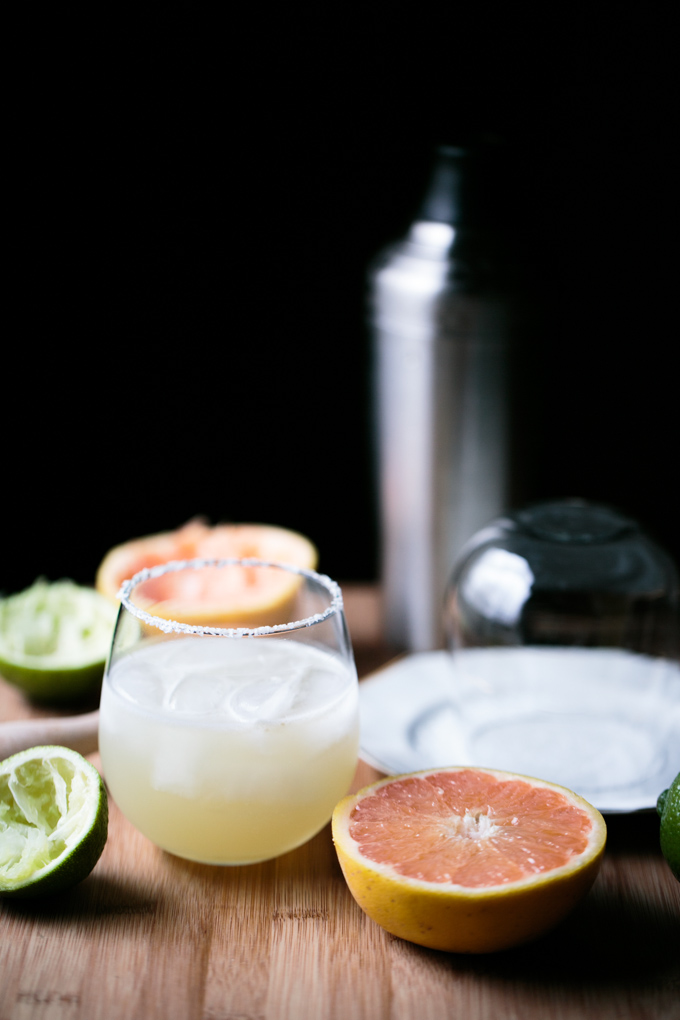
Now, onto the margarita-making! This recipe is my go-to for margaritas – it’s simple, fresh, and delicious! You can use any type of grapefruit – we just happened to buy these blush-colored ones the day I photographed this recipe. If you use a darker colored grapefruit, your margarita will be even more pink! Some people don’t like the tart flavor the lime can give to a margarita, so I suggest using Rose’s lime juice instead of fresh lime if you like your margarita to be a little sweeter! And if you don’t like grapefruit at all – try this recipe anyway! I’ve gotten rave reviews on it, even from friends who claimed they hate grapefruit!

Grapefruit Margarita

Adapted from Apartment 34
Print Recipe Pin Recipe
Servings 1

Ingredients
  

  • 2 oz 1/4 c Tequila
  • 2 oz 1/4 c fresh squeezed grapefruit juice
  • 1 oz 2 Tbs fresh squeezed lime juice (or Rose's lime juice, if you like a sweeter margarita)
  • 1/2 oz 1 Tbs Triple Sec
  • 1/2 oz 1 Tbs agave
  • kosher salt for salted rims

Instructions
 

  • (Optional step) Place kosher salt in a small dish. Rub a lime wedge around the lip of your empty glass. Flip your glass over and place the top of it into the salt. Rub it around a few times to ensure the salt sticks to your glass.
  • Place the rest of the ingredients in a shaker with ice, cover and shake vigorously. Pour over ice and serve.

Notes

You can easily double this recipe to make two margaritas in one shaker.

This post contains affiliate links but all opinions are my own. If you click through and make a purchase through any of the affiliate links, I make a little change to keep This Wild Season up and running.

Filed Under: Drinks Tagged With: crowd pleaser, drink recipe, mid-week inspiration

Snowball Cookies

December 23, 2014 by Asharae 2 Comments

Merry Christmas y’all! I thought this week called for sharing a classic Christmas recipe (and story). These cookies were an essential part of Christmas when we were growing up. Every year my parents re-tell the story of little me – probably four years old – stuffing one of these cookies into my face and then trying to talk. Instead of any actual words coming out, I got the giggles because, as everyone knows, you can’t talk with a snowball cookie in your mouth. Giggles devolved into four-year-old me drooling powdered sugar dust down my chin and onto my red Christmas dress. It’s one of those classic family get-together stories that gets retold around this time each year.

These cookies are perfect for making with kids – you can have them roll the cookie dough into balls and even roll them in the confectioner’s sugar once they’ve cooled. I always loved getting my hands dirty in the kitchen and helping my mom roll these cuties in powdered sugar – it always meant we got to “taste-test” a few extras while we made them.

Snowball Cookies - thiswildseason.com -2 Snowball Cookies - thiswildseason.com -3 Snowball Cookies - thiswildseason.com -4 Snowball Cookies - thiswildseason.com -5 Snowball Cookies - thiswildseason.com -6

This recipe is for a very large batch of cookies – perfect for taking to a cookie exchange, church gathering, or school event. If you’re looking to just share with your family, the recipe can easily be halved. Cookies do not rise at all, so whatever shape you roll them into is the same shape they’ll be when they come out of the oven. I like snowballs that aren’t completely perfect. Be sure to watch them carefully especially at the end of their baking time. Cookies will just barely turn light brown when they’re finished – I always check the bottoms of the cookies to make sure they’re not burning. Roll in powdered sugar twice and they’re ready to enjoy!

Snowball Cookies

Adapted from Betty Crocker
Print Recipe Pin Recipe

Ingredients
  

  • 2 c of Butter softened (4 Sticks)
  • 1 c Confectioner's sugar
  • 2 tsp Vanilla
  • 4.5 cups flour
  • 1/2 tsp salt
  • 1.5 c roughly chopped pecans or walnuts optional

Instructions
 

  • Sift flour and salt together in a medium bowl. Set aside.
  • In a separate large bowl, using an electric hand mixer, thoroughly mix together butter, confectioner's sugar, and vanilla until smooth.
  • Stir in flour and salt mixture until dough forms. Add in nuts if desired.
  • Chill dough in the fridge for at least an hour.
  • Preheat oven to 400 degrees F.
  • Roll into 1 inch balls. Bake on an ungreased baking sheet for 10-12 minutes. Watch cookies carefully as they're quick to burn. Cookies are done when they're just slightly turning light brown - you'll think they need more time. Don't be fooled. Check the bottoms before you leave them in longer to be sure you're not burning them.
  • Remove from the oven, let cool until you can handle them comfortably, then roll in confectioner's sugar.
  • Let cool completely, then roll in sugar one more time.


Filed Under: Dessert Tagged With: cookies, crowd pleaser, easy recipe, holiday, holiday desserts, holiday ideas, simple recipe

Butternut Squash Soup with Bacon, Goat Cheese, and Pistachios

December 10, 2014 by Asharae 1 Comment

I’m so excited to share this post with you today! This recipe. You guys. I really thought I knocked it out of the park last week with the most ridiculously delicious pumpkin cheesecake. I gotta be honest though, I’m more of a savory/salty kinda gal than a sweets one. So this butternut squash soup with bacon AND goat cheese AND pistachios is really just the perfect thing.

I’d never worked with butternut squash until my mother-in-law bestowed one upon us after one of our holiday gatherings in Maryland a couple years ago. She ran out to the car as all the kids were packing things into our respective cars, and I caught a glimpse of her placing some sort of squash in our trunk. A couple days later, I got a perplexed text from my sister-in-law in Chicago, “Did you have a butternut squash in your trunk too?”

I’m not sure what she ended up making with hers, but I promptly scoured Pinterest for a recipe for butternut squash soup. Our first attempt a few years back was not nearly as glorious as the recipe before you now. But I do apologize for the unhealthiness accept your gratitude for the deliciousness of this recipe.

The initial inspiration for this recipe came from this one over on Half Baked Harvest – her food photos are simply amazing. I saw one photo of her soup on Pinterest and knew I wanted to try something similar. The flavors I aimed for were quite different, but I always love pointing back to my source of inspiration when I can!

Butternut Squash Soup - thiswildseason.com -2 Butternut Squash Soup - thiswildseason.com -3 Butternut Squash Soup - thiswildseason.com -4 Butternut Squash Soup - thiswildseason.com -5 Butternut Squash Soup - thiswildseason.com -6 Butternut Squash Soup - thiswildseason.com -7

Butternut Squash Soup with Bacon, Goat Cheese, and Pistachios

Asharae Kroll
Print Recipe Pin Recipe
Prep Time 15 mins
Cook Time 40 mins
Total Time 55 mins
Servings 4 -6 servings

Ingredients
  

  • 1 medium butternut squash peeled, seeds scooped out, and diced
  • 2 large carrots peeled and diced
  • 1 onion diced
  • 1 apple peeled, cored, and cubed
  • 2 cloves of garlic minced
  • 1 tsp fresh thyme
  • 1/4 tsp dried sage
  • 1/2 tsp salt
  • 1/4 tsp pepper
  • 1 bay leaf
  • 32 oz vegetable broth
  • 1 c heavy cream
  • 1 package of bacon
  • 4 oz package of goat cheese
  • Shelled pistachios

Instructions
 

  • Place bacon in a cold pan, heat to medium and cook till crispy. Set on paper towels to cool. Reserve bacon grease. Once bacon is cool, crumble into small pieces.
  • Add 3 Tbs bacon grease to a large stockpot and heat over medium. Add carrots, onion, and diced butternut squash and sauté for 5-7 minutes, or until veggies start to soften.
  • Add apple, thyme, sage, salt, and pepper, and sauté 3-4 more minutes. (Add another Tbs of bacon grease if necessary.)
  • Add garlic and sauté one more minute, then add vegetable broth, scraping the delicious bits off the bottom of the pan. Add bay leaf. Bring to a boil, then reduce heat and simmer 6-8 minutes, or until the veggies and apples are soft. Remove from heat and let cool slightly.
  • Remove bay leaf and use an immersion blender to blend the soup to a smooth consistency. Alternately, you can carefully blend the soup in batches in a blender. (Side note - if you don't have an immersion blender, it's a worthwhile investment - perfect for soups, smoothies, salsas, and other things - we use ours all the time!) Once the soup is smooth, stir in the heavy cream.
  • Serve topped with bacon, goat cheese, and pistachios. Drizzle with a little extra heavy cream to make it pretty. Enjoy!

Notes

To more easily peel your butternut squash, use a fork to poke holes all over. Heat for 1-2 minutes in the microwave. Let cool, cut each end off with a knife, then use a vegetable peeler to remove the skin. To dice, cut your butternut squash in half, separating the taller skinny half from the wide fat end. Place each half of the squash on your cutting board, cut side down, and cut each one in half. Scoop the seeds out and then lay each quarter on your cutting board, flat side down and slice into 1/4 in - 1/2 in slices. Dice up each slice into smaller pieces and you're ready to use it in your soup recipe!

We use this Cuisinart Immersion Hand Blender and absolutely love it!

(Full disclosure – That’s an affiliate link above, so I’ll receive a small percentage of your purchase if you click through the link. I appreciate your help in keeping This Wild Season up and running!)

Filed Under: Main Course Tagged With: comfort food, crowd pleaser, soup

Pumpkin Cheesecake with Pecan Caramel Sauce

December 5, 2014 by Asharae 3 Comments

I do not exaggerate when I say that this cheesecake is the best dessert I’ve ever made. Ever ever. Even better than these cookies. I can’t take credit for the recipe though – the original was posted here on Food & Wine – feel free to hop over there for further instructions!

I know that I’m a little behind the times – hopping on the pumpkin bandwagon when it’s already December. But quite frankly, I don’t care. Because this pumpkin cheesecake is worth it. I’ve made this for two Friendsgivings in a row the past two years, and I have a feeling it’ll become a tradition. It’s just that good. It tastes like fall in the best way possible. I’m not sure what else to tell you to convince you to make this for your next holiday party…perhaps the photos will convince you?

Pumpkin Cheesecake with Pecan Caramel Sauce - thiswildseason.com -3 Pumpkin Cheesecake with Pecan Caramel Sauce - thiswildseason.com -2 Pumpkin Cheesecake with Pecan Caramel Sauce - thiswildseason.com -4 Pumpkin Cheesecake with Pecan Caramel Sauce - thiswildseason.com -5 Pumpkin Cheesecake with Pecan Caramel Sauce - thiswildseason.com -6

Okay and if the photos didn’t convince you, the long list of instructions certainly won’t. Don’t be discouraged though! This cheesecake has lots of steps but none of them are difficult. According to the original recipe’s author, the most important step is that you have all your ingredients at room temperature. Make this the day before your party, refrigerate it overnight, and serve drizzled with warm pecan caramel sauce. You can thank me later.

A lot of cheesecake recipes call for placing the springform pan in a bath of water, and baking it that way. I’ve read complaints of leaky springform pans, convoluted methods of sealing your pan with tinfoil, etc. It all sounds very tedious. And I don’t do tedious very well. But I do like cheesecake. So this recipe is the perfect compromise. No water baths. No aluminum foil. Just patience. Lots of patience. Trust me, it’s worth it.

In other news, I have a feeling my cheesecake shouldn’t have cracked while baking – there’s gotta be a scientific explanation for it and probably a way to correct for it, but I’m just going to let you know that it’s just as delicious with the cracks in the middle.

Enjoy this recipe. Take it to a party and I promise you’ll make new friends.

Pumpkin Cheesecake with Pecan Caramel Sauce

Katherine Beto
Print Recipe Pin Recipe

Ingredients
  

For the Cheesecake

  • One 15-ounce can pumpkin puree
  • 8 whole graham crackers
  • 1/2 cup pecans
  • 1 tablespoon light brown sugar
  • 5 tablespoons unsalted butter melted, plus more for greasing the pan
  • 1 1/2 cups cream cheese 14 ounces, at room temperature
  • 1 1/2 cups granulated sugar
  • 1 teaspoon salt
  • 1 teaspoon cinnamon
  • 1/4 teaspoon freshly ground nutmeg
  • 1/4 teaspoon ground cloves
  • 1/4 teaspoon ground allspice
  • 5 large eggs at room temperature
  • 1 cup heavy cream at room temperature
  • 1 tablespoon fresh lemon juice
  • 2 teaspoons pure vanilla extract

For the Pecan Caramel Sauce

  • 1 1/2 sticks unsalted butter
  • 3/4 cup dark brown sugar
  • 1/2 cup heavy cream
  • 1/4 teaspoon salt
  • 2 cups pecans

Instructions
 

For the Cheesecake

  • Take your "cold" ingredients out of the fridge and let them come to room temperature while you prep the pumpkin puree and bake the crust.
  • Line a large strainer (what you use to drain pasta) with two paper towels. Use a spatula to spread the pumpkin puree onto the paper towels. Let drain for 2 hours - the pumpkin puree should be fairly dry.
  • Preheat the oven to 500 degrees F and butter the bottom and sides of a 9 inch springform pan.
  • Use a blender or food processor to grind the graham crackers till they are a consistent texture - you're going for the texture of course sand. Add pecans and brown sugar and blend until finely ground. Add melted butter, pulse until combined, pour mixture into your springform pan, and press into the bottom of the pan. Bake the crust 3-5 minutes, until lightly browned. (The original recipe called to bake the crust for 8 minutes, but the edges of mine always start to burn around 4 minutes, so I take it out then.) Let the crust cool completely.
  • In a small bowl, stir together the sugar, salt, cinnamon, nutmeg, cloves and allspice. Set aside.
  • Use a standing electric mixer with the paddle attachment to beat the cream cheese until smooth. With the machine running, add the spiced sugar mixture and combine until smooth, scraping down the sides of the bowl as you go. Add the drained pumpkin puree and combine until smooth again. Add the eggs, one at a time. Scrape down the sides of your bowl between each egg. (I like to break the eggs in a separate bowl, one at a time, and then pour each egg into the mixing bowl - this ensures no pesky eggshells make their way into my cheesecake!) Beat well before adding each additional egg. Add heavy cream, lemon juice, and vanilla, and beat until smooth.
  • Pour cheesecake mixture over cooled crust. Bake for 12 minutes at 500 degrees F, then lower the oven temperature to 225 degrees F. Bake the cheesecake for 3 more hours, until an instant read thermometer measures 150 degrees. The center will still be slightly jiggly, but it shouldn't be liquidy.
  • Let the cheesecake cool, then cover with plastic wrap and refrigerate overnight or at least 8 hours.
  • The easiest way I've read (and tried) to remove the cheesecake from the pan is to run hot water over a knife (a butter knife works just great for this), dry it off, and immediately slide it between the edge of your cheesecake and the side of the springform pan. If the knife cools off, run it under hot water again, dry it off, and continue until you've loosened it from the pan. At that point you can remove the springform ring and cut and serve your cheesecake with the pecan caramel sauce. A hot knife works great for cutting the cheesecake as well! I've also heard of using floss to cut cheesecake, but I've never tried it - let me know if it works for you!

For the Pecan Caramel Sauce

  • While your cheesecake is cooling (or beforehand, while draining your pumpkin puree) set the oven to 350 degrees F. On a rimmed baking sheet spread the pecans in a single layer. Toast until lightly browned and fragrant, about 8 minutes. I like to stir them about 4 minutes in to be sure they don't burn. Check them toward the end of the 8 minutes in case your oven runs a little hot. Set aside to cool.
  • Combine butter and brown sugar in a saucepan over medium heat. Stir until smooth. Add heavy cream and salt, stir and bring to a boil. Lower heat and simmer until slightly thickened, around three minutes. Let cool.
  • Coarsely chop the pecans. Once caramel has cooled a bit, add the nuts and stir to combine.
  • Store in an airtight container and use the extra (if you manage to have any extra) to top your waffles and pancakes!
  • When ready to serve, heat caramel sauce slightly and pour over each individual slice of cheesecake. Take this to your next small group, family gathering, or church potluck and be prepared to make friends.

Notes

Apparently in the world of cheesecake-making it's very important that all your ingredients are at room temperature. I'm sure there's a perfectly good scientific reason for this which I am not prepared to give you. Just know that it's an important step!


Filed Under: Dessert Tagged With: crowd pleaser, dessert, holiday, holiday meal, shared meals

  • « Previous Page
  • 1
  • 2
  • 3
  • 4
  • 5
  • Next Page »

Hello there!

My name is Asharae. I’m a photographer by trade, wife to an amazing man, and mama to three little ones. I am passionate about creating good food, sharing meaningful conversation around the table, trying new things, and encouraging others to do the same.

Welcome to This Wild Season! This is a place for sharing what I’m learning in the kitchen and outside of it. Most of all, it is a challenge to myself and to you to slow down, be present in the moment, and re-learn how to savor food and conversation around the table.

About

Search

Connect

  • Facebook
  • Instagram
  • Pinterest
  • Twitter
  • Vimeo

Find my book on Amazon:

Recent Posts

  • Emmeline’s Birth Story, The Story of Her Name
  • Emmeline’s Birth Story, Birth Day Part 2
  • Emmeline’s Birth Story, Birth Day Part 1
  • Emmeline’s Birth Story, My Pregnancy
  • Emmeline’s Birth Story, An Introduction
Follow on Bloglovin
Visit This Wild Season's profile on Pinterest.

Copyright © 2025 · Foodie Child Theme by Shay Bocks · Built on the Genesis Framework · Powered by WordPress